Hasegawa's 1/48 scale
McDonnell Douglas
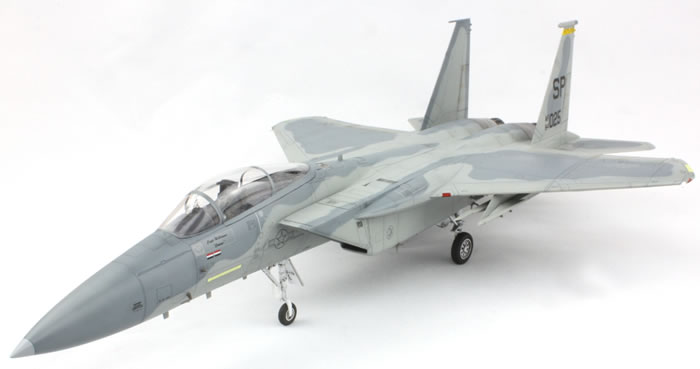
F-15C Mod Eagle
by Jon Bryon
|
|
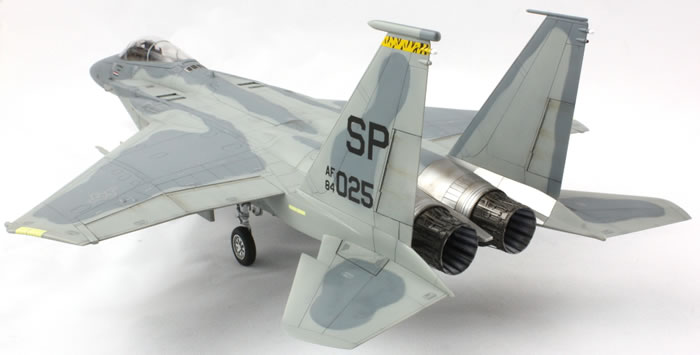
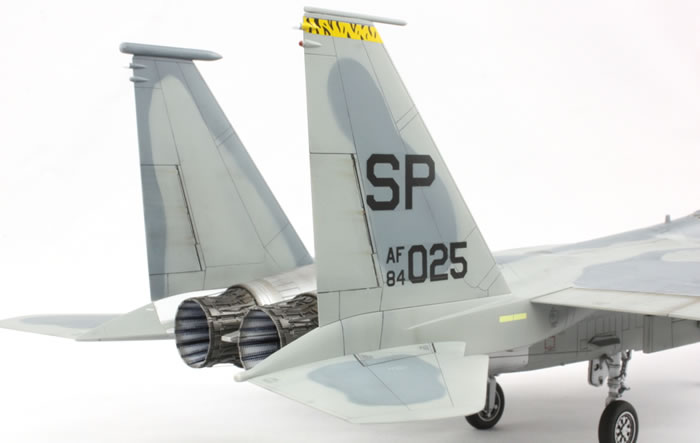
McDonnell Douglas F-15C Eagle |

Hasegawa's 1/48 scale F-15E is available online from Squadron.com
In January 2002 I drove my sister back to university in Edinburgh (some 420 miles away, which in the UK is a Very Long Way) and paid my first visit to Wonderland Models. Always on the look out for a bargain, I spied a dusty Hasegawa Hi-Grade kit of the F-15A with ASAT missile reduced to a measly £25. I don't build non-operational aircraft, so I wasn't interested in the markings on the box, but I was delighted to find inside decals and instructions for the standard F-15C PT10 boxing along with the later sprues and photo-etch for featherless exhausts and white metal landing gear and steel photo-etch for the cockpit. I came home a very happy boy.
Years passed and I sent the ASAT missile and markings to somebody who requested them on the internet and acquired a Superscale sheet for F-15Cs in the Mod Eagle scheme. I planned to use it to model a MiG killer from Gulf War I. No other aftermarket seemed necessary and construction of this kit finally started in 2012, in parallel with my F-15DJ.
Construction was basically the same as for the DJ, with the exception of the high-grade metal components. I used super glue for all the major joints, except around the intakes where I used Tamiya Extra Thin. I should have used super glue there too, since as the months passed a seam slowly became visible. I am a great believer that super glue is far superior to liquid cement in aiding seam removal.
The intakes took forever to clean up, and weren't exactly worth the time as you have to work quite hard to look down them. I refer you to my article on the F-15DJ for how I dealt with these and the overall construction sequence (I deviated significantly from the instruction sheet to get a better fit). The seams between the wings and the fuselage similarly took a long time to eliminate, but essentially the fit of this kit is very good. I made one small change to the grille on the shoulder, reducing its size slightly. The tip of one of the tail booms also needs to be sliced off and replaced with a rounded part provided in the kit but not mentioned in the instructions.
As with my two-seater, this kit got damaged as it was lugged around the world, and one of the shoulders got torn from the main fuselage. Unlike the DJ, the detached part remained in the box and was on the opposite side to the cannon, so fixing it was a simple matter of gluing it back on and removing the seam.
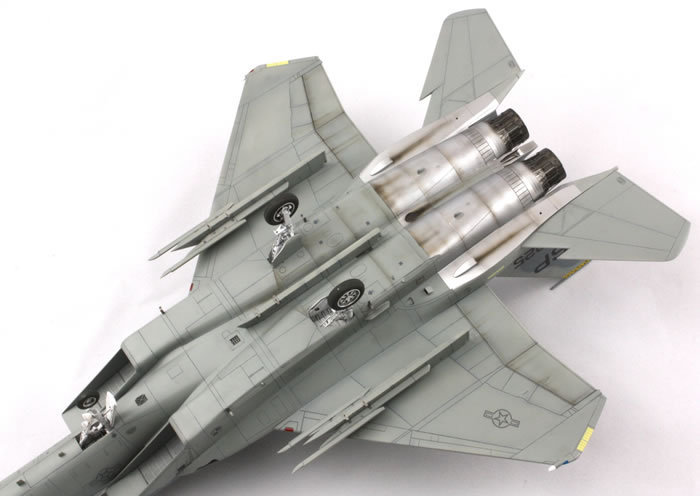
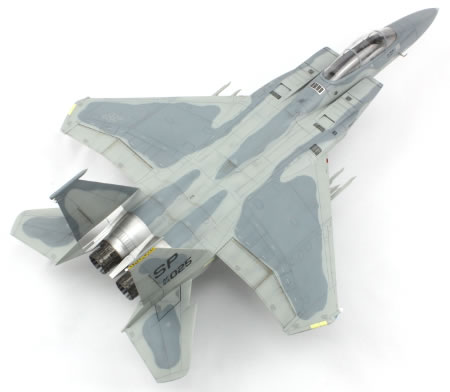
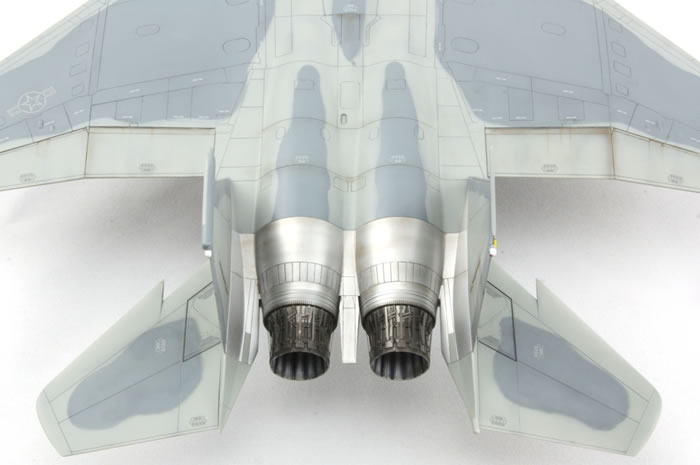
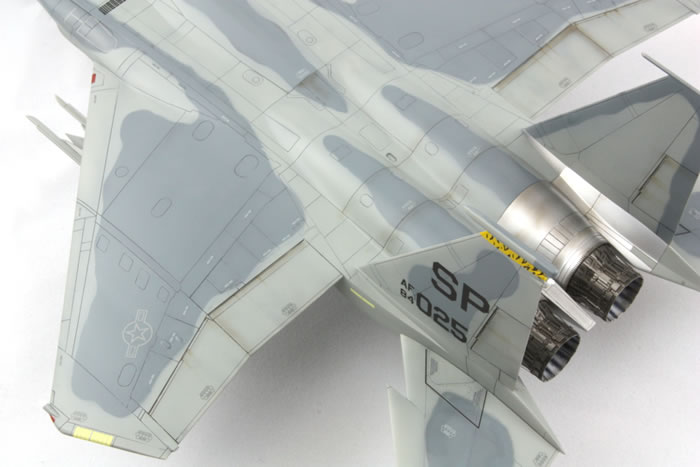
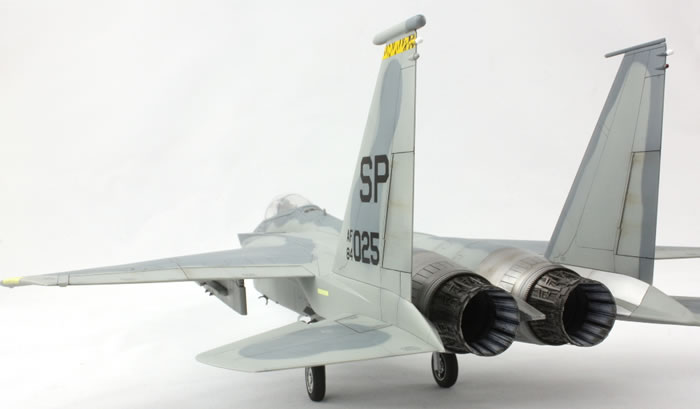
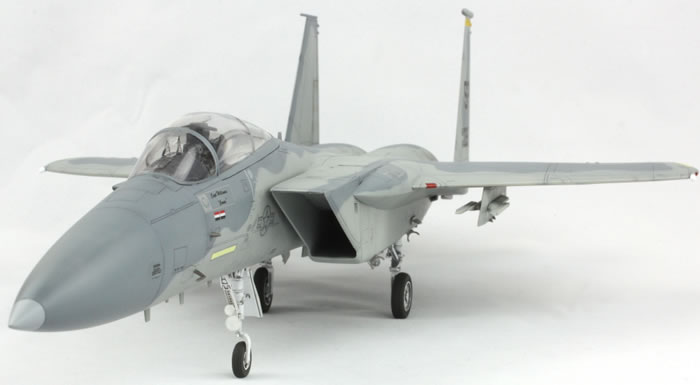
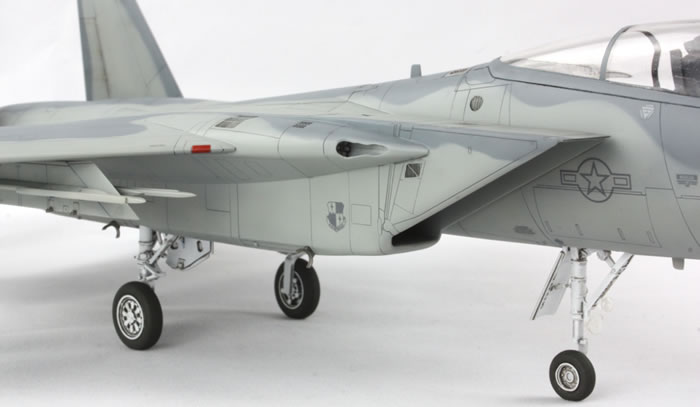
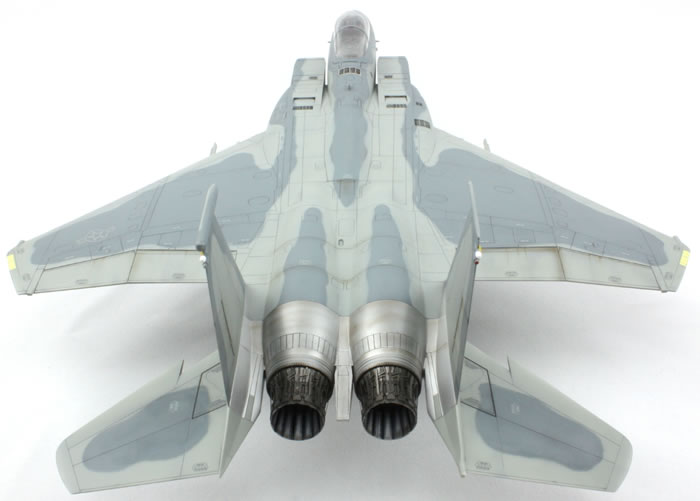
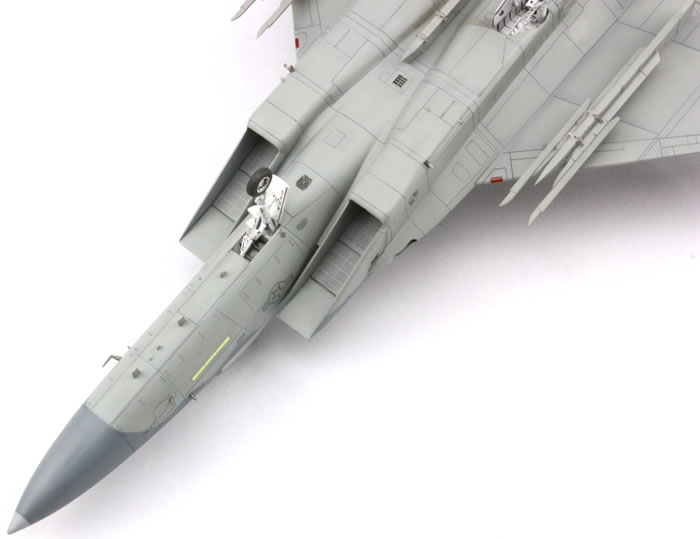
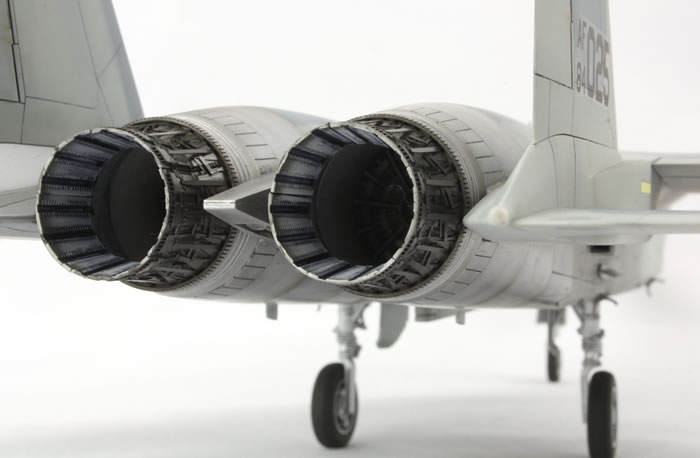
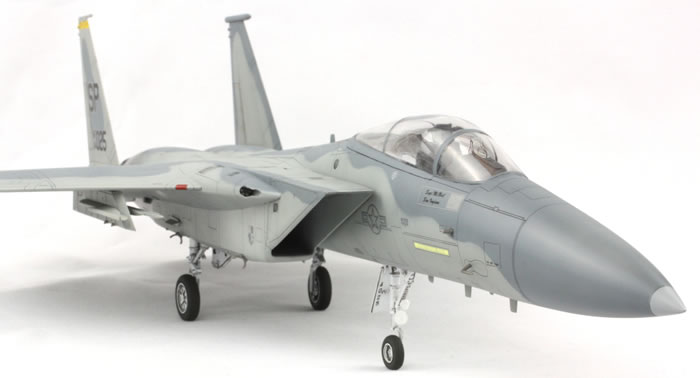
The high-grade components are a mixed bag. The photo-etch is steel, which is very hard and springy, and in the end I only used the HUD and buckles for seatbelts. I always intended to close the canopy, so a good deal of the detail was redundant. The undercarriage is nice, but took a while to clean up. The noseleg broke (who says metal is strong?) so I ended up using the plastic parts for the front undercarriage anyway. The featherless exhausts, on the other hand, are pretty good, and whilst the actuating arms are rather two-dimensional and the exhaust cans too shallow, I was quite happy with the detail.
One area I didn't modify is the arrestor hook. I believe most USAF F-15s in the late 90s should have an exposed hook with the fairing removed. This was a task beyond me and as far as I know no one has made a aftermarket tweak for this. My excuse is I had no photo of this area on 84-0025 and so I don't know if it should be modified or as in in the kit...
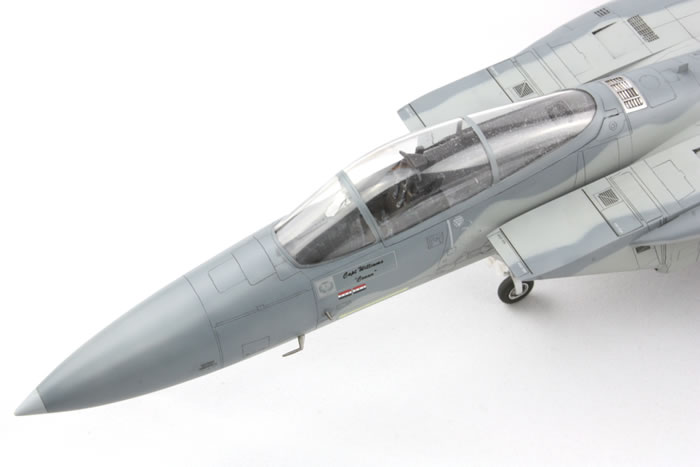
After 15 months or so I finally ended up with a complete airframe. I attached the canopy using Tamiya Extra Thin Cement, masked it and got ready for priming.
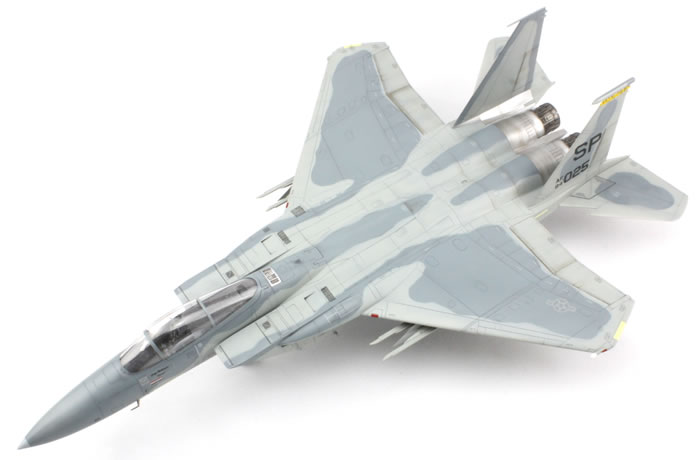
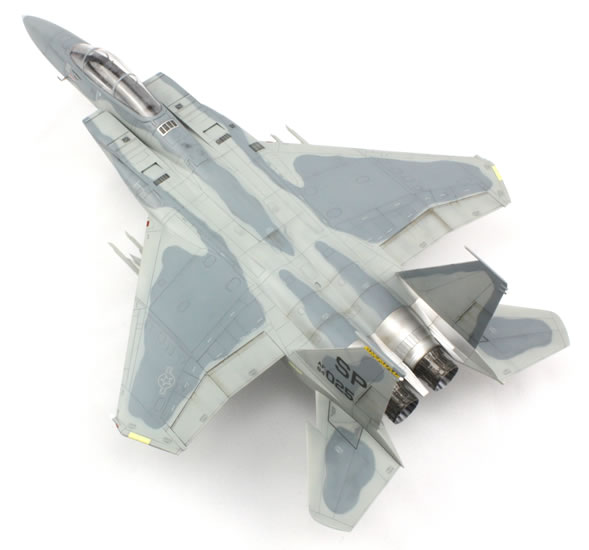
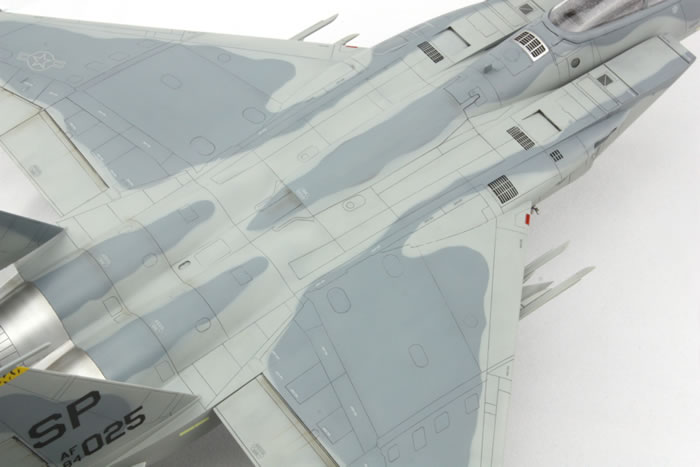
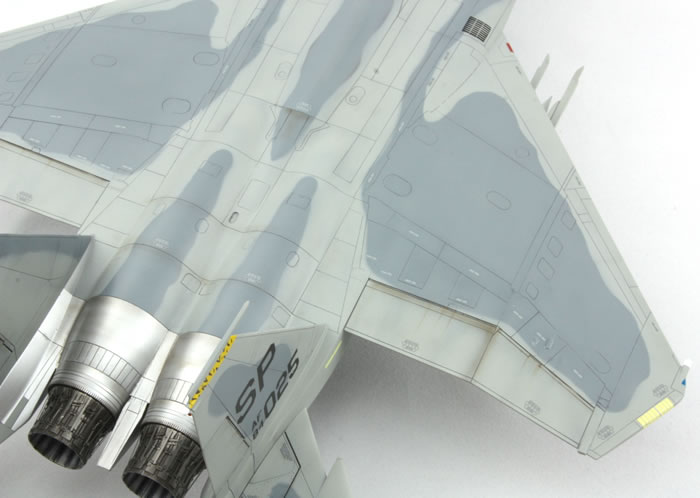
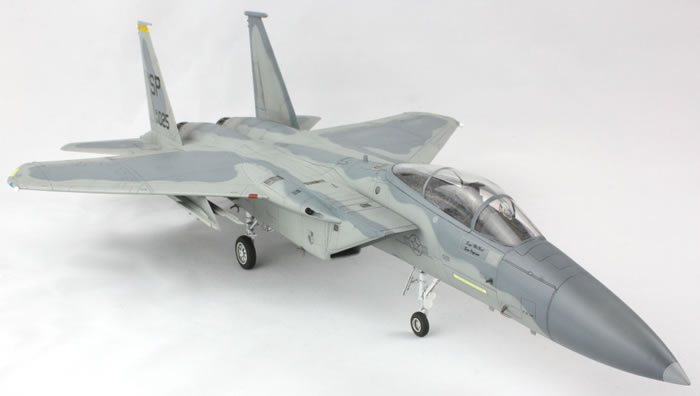
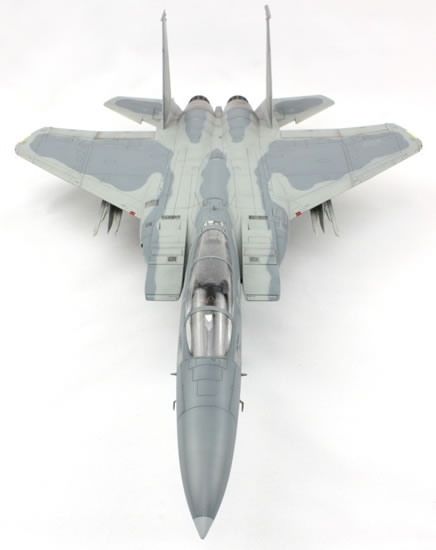
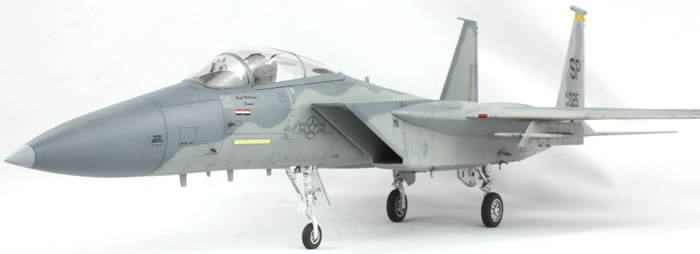
After spraying the canopy frames in black, I primed with Mr Surfacer 1000. I pre-shaded the entire airframe with gloss black and then painted the engine areas with Alclad II aluminium. The Mod Eagle colours proved problematic since they are not in the standard ranges of colours I had available to me in China. Some rooting around on Cybermodeler suggested that Tamiya XF-83 Medium Sea Grey and XF-82 Ocean Grey were good matches. I was sceptical that RAF WWII colours were good for late 20th century teen jets, but in the absence of any other easy options, went with the recommendations anyway. I'm jolly glad I did, since they match aftermarket decals for these colours exceptionally well.
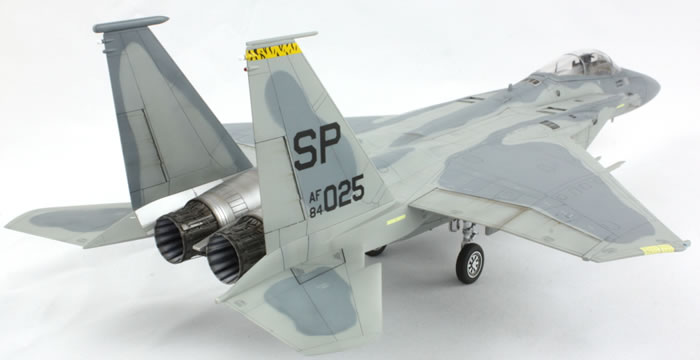
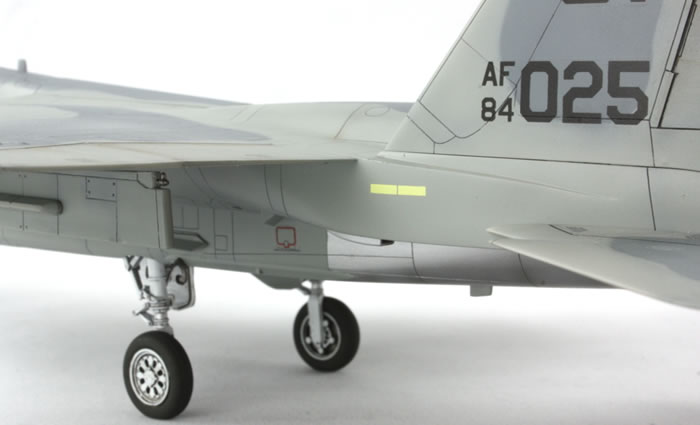
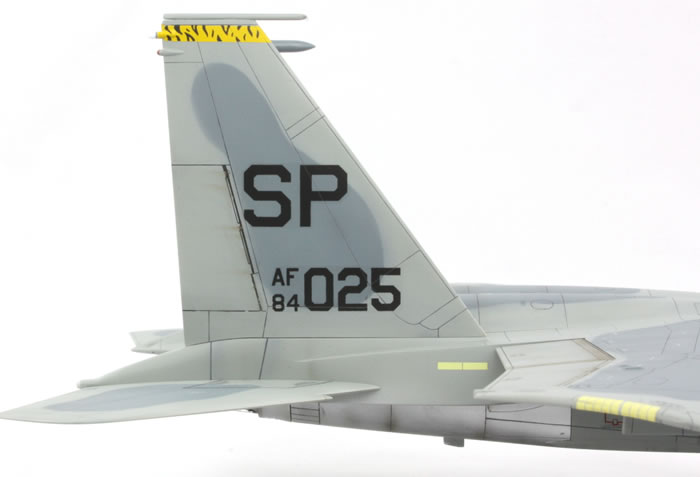
I found two photos of 84-0025 in the Mod Eagle scheme online, both dated 1995, but with a different pilot name under the canopy to that on the Superscale sheet. In both pictures the airframes were pretty clean and the tip of the nose a lighter grey. In one of the pictures there were other patches of light grey around the front fuselage, but not in the other. I like to make life easy, so didn't bother replicating these. 84-0025 has clearly been round the block a bit (being based in Germany, Japan and the USA) and if anyone knows the date represented by the markings I've used, I'd love to hear from you. Another photo of 84-0025 coded 'SP' is here but with significantly different camouflage markings and dated 1997.
I started with XF-82 for the smaller patches of camouflage and then used blu-tack and Tamiya tape as masks before spraying the lighter XF-83. Removal of masking tape is always stressful these days, and some patches of paint were pulled off down to the plastic on the metallic undersurfaces and on one of the tailplanes. Grrrr. I'd also messed up some masking by accidentally following the camouflage pattern for a Hawaiian ANG F-15A, which deviates from the standard scheme, and so retouched a fair amount of the XF-82 in freehand. My Harder & Steinbeck airbrush can spray very narrow, but I've discovered going freehand is very time-consuming and I don't see any time saving compared to masking and blasting away! The tip of the nose was sprayed with Humbrol 127.
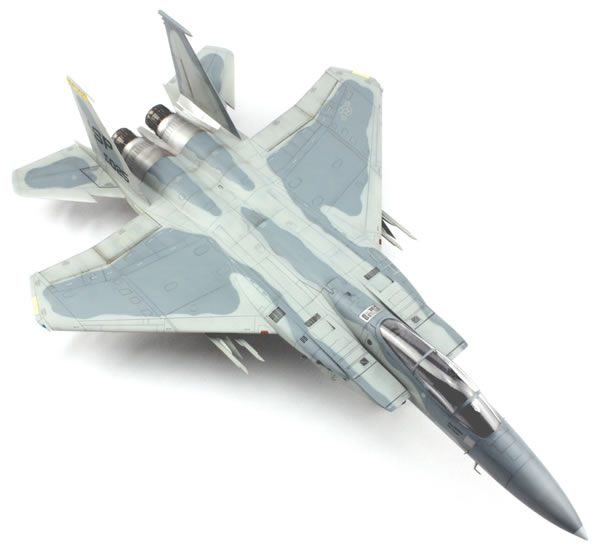
I was pleased with the tonal variation caused by the pre-shading. Although the aircraft was fairly clean in photos, it wasn't pristine and other pictures of F-15s based in Europe (especially at Lakenheath) showed they could get very, very dirty, so I wanted some weathering. I like to use Johnson's Klear as a base to protect the paint, and airbrushed a generous coat over the entire model. I made up two grey washes using Tamiya Black and Grey enamel washes, the darker for the XF-82 and the lighter for the XF-83. Using a small brush I gave all panel lines a pin wash then later cleaned up the unwanted 'spots' with a cotton bud dampened with white spirit. A pure black wash was used to delineate moving surfaces. I also mixed some burnt umber and black oil paint, put small dabs at the junctions of the wing with the ailerons and on the tails for the rudders and then smeared them rearward using a flat brush. I am working at getting a tighter pattern compared to my previous efforts, and was pretty happy this time. Once finished I sprayed the kit with Mr Colour Gloss Clear to provide a surface compatible with Gunze setting agents and a little extra gloss.
Decalling would be next. As I was building the kit I became aware that I needed stencils. The Superscale sheet didn't include any, and those in the kit were for the older Eagle scheme, and thus no good. Superscale do a dedicated sheet for Mod Eagle stencils, but I couldn't find it anywhere. Fortunately I had kept the remnants of an old Astra Decals sheet for Lakenheath F-15Cs and Es that I had used for my Revell Strike Eagle. There was still a pretty complete set of stenciling on the sheet. The only problem was I'd thrown away the instructions. Afterburner also released a set of Mod Eagle stencils and put their instructions online at Cybermodeler. Armed with these, I set about decalling.
The Superscale decals were fine; went down beautifully. The main problem was that they were not sized for the Hasegawa kit, so the refuelling door stencil didn't fit very well, and the slime lights didn't fit at all (especially at the wingtips). I knew the Astra Decals were going to be tough, since I'd found them previously to be stiff, quite thick and prone to silvering. My new method of simply leaving decals to dry in a pool of Mr Mark Setter solved most of this problem, but Mr Mark Softer was necessary in some areas. I've also discovered that this process is affected by gravity. This is relevant on the sides of the aircraft, where I generally just keep the fuselage the right way up, but it means the setting agent drips down from under the decal. Once I'd set up a jig to hold the aircraft vertical for decalling the sides, I obtained better results. Some stencils were missing compared to the Afterburner placement diagrams, so I'm not pretending I've managed to get it completely correct, but the overall effect is adequate.
More weathering was applied by airbrushing a mix of Tamiya black and red brown, especially on the undersides around the engine areas. This paint mix seems to be all the vogue and I rather like it; heavily thinned is sprays beautifully. (Unlike the Lifecolor Tensochrome Smoke I also used a little on the undersides; it clogs, splatters easily and is generally horrible to spray. I've found the Tensochrome paints a terrible waste of money.)
It was now almost finished and I was quite happy. Some detail painting using Vallejo white and Tamiya clear red and blue was necessary, and then it was time to bring everything together. The tail fins were glued on using a tiny amount of Tamiya Extra Thin; this is tricky as the fit is extremely loose and getting the fins vertical not easy. The undercarriage went on next and I found the main gear legs did not attach terribly well in their locating holes. They have a rearward rake which I can't see in the photos I have. The nosegear was added without drama and she was then sitting on her legs. The undercarriage doors, central pylon and pitot tubes were added without fuss, but the aerials under the nose took a little figuring out. I'd sliced them off the fuselage halves during construction and spent ages looking at the two photos I had to try and figure out what aerials were there. In the end I decided to go with the two larger blade antennae with a smaller one in the middle. The kit instructions wanted me to put in two smaller ones, but for the life of me I couldn't see them in photos. The tail planes were superglued in place without fuss.
With pretty much everything on the kit I airbrushed it with a 50/50 mix of Tamiya Semi-Gloss Clear and Mr Hobby Color Flat Clear. The final stages were to fit the underwing pylons and remove the masking from the canopy.
And then disaster! The cockpit was full of sanding dust particles! This was completely unexpected as the canopy had been attached for a long time before being masked. I'd thought the whole build was going pretty well, and so it was pretty disappointing to have it end on this note.
But no great matter; after more than 18 months it was finally finished and despite the canopy disaster, I am pretty pleased with how it looks. Now for something I can build a little faster...
Text and Images Copyright ©
2014 by Jon Bryon
Page Created 23 July, 2014
Last Updated
23 July, 2014
Back to
HyperScale Main Page

|
 Home
| What's New |
Features |
Gallery |
Reviews |
Reference |
Forum |
Search
Home
| What's New |
Features |
Gallery |
Reviews |
Reference |
Forum |
Search