Hunting Percival Provost T.1/51/52
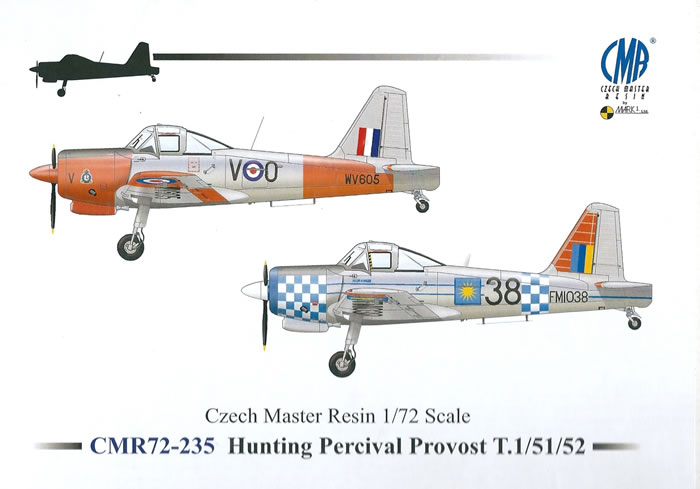
Czech Master Resin, 1/72 scale
S u m m a r y : |
Catalogue Number: |
CMR72-235 Hunting Percival Provost T.1/51/52 |
Scale: |
1/72 |
Contents & Media |
Thirty-seven green and five clear resin parts, one pre-coloured PE fret with twenty-nine parts, one plain PE fret with fifty-three parts, four vac-form canopy parts, and decals for five colour schemes. |
Price: |
Available on-line from these stockists:
Click here for currency conversion. |
Review Type: |
First Look. |
Advantages: |
Superb detail, lovely scale finesse in all areas other than the canopy, and a nice selection of colour schemes |
Disadvantages: |
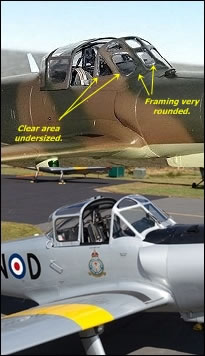
The canopy is spoiled by overly thick, raised framing that is far too curved in the corners where it meets. The result is clear panels that are far too small. It falls short of CMR’s usual high standards, and needs to be replaced for best results. |
Conclusions: |
CMR’s Provost is a simple kit compared to some of their recent releases. I think that it should build quite quickly and easily as far as multi-media resin kits go, although you will need to cope with some very small PE details. Despite the canopy, it is still a giant leap forward from the Matchbox kit, especially in terms of detail and refinement. This of course is reflected in its price.
Small model planes in particular, must have delicate detail and good scale finesse to appear really convincing. This kit certainly offers this in all respects other than the canopy; which is rather horrible. Refined rendition of all the kit parts is expected at this price.
I normally recommend it CMR kits very highly, and I acknowledge that their Provost kit does have the potential to build into a stunning model. On this occasion my recommendation is conditional; it is a lovely kit with an inferior canopy. Either accept this or replace it by whatever means you can. |
Reviewed
by Mark Davies

HyperScale is proudly supported by Squadron.com
The RAF’s initial pilot training was, by the late 1940’s, found wanting in its preparation of students for their transition to jet aircraft. A requirement for a modern piston-engined trainer to replace the Percival Prentice was issued in response to this. Fifteen companies responded with a variety of proposals to meet this new requirement.
Two proposals were selected for prototype construction, these being from Handley Page and Percival. Percival anticipated the need to some extent; they had begun work on a mock-up, and could meet the deadline for a prototype. Suffice to say, the Percival design was accepted, in part because it cost less and it could be delivered in a timelier manner than the Handley page design. This was a little ironic; as Percival was regarded as being aerodynamically weak, and with little experience of designing robust designs able to cope with harsh environments worldwide. This need for toughness was one of the design requirements.
An initial order for 200 Provost T.1’s was placed in May 1951, and they began to enter service in 1953. Over 330 Provosts were eventually procured for the RAF’s training needs.
The Hunting Group acquired Percival in 1954, after which it was named Hunting Percival. The company went on to develop three export versions of the Provost known as, the T.51, the T.52 and T.53, the last two both being a lightly armed variants. The T.52 was converted from the T.51, whilst the T.53 had its armament built in on the production line. These three variants were exported to the Burma, Iraq, the Irish Republic, Malaysia, Oman, Rhodesia, and Sudan.
The RAF used the Provost until the 1960’s, when the Hunting-Percival Jet Provost replaced it in service. This jet-powered development of the Provost shared many of its features, although it was in many ways a new design. In its turn, the Jet Provost developed to become the Strikemaster light attack trainer.
Previous 1/72 Provost kits
Airframe issued a vac-from kit of the Provost, of which I know nothing more than this. Many will be more familiar with the old Matchbox kit, of which I did have a copy. I recall it as being one of their more refined efforts; it lacked any deep trenches and having but the minimum of fine raised detail. The undercarriage had the oleos in the unloaded flight condition, and lacked the landing lights integrated with the base of the legs. The control surface riblets are a bit over-pronounced, the cockpit framing is too thick, the cockpit detail and engine are very basic, and the kit lacks refinement in general. Aeroclub offered a replacement vac-from canopy that I recall as being a big improvement over the kit item. A respectable model was possible with a bit of effort, provided you added a fair amount of scratch-built cockpit detail, as a lot could be seen of it.
CMR 235 - The Provost Kit |
Contents
The kit reviewed here is typical in most respects of CMR’s products released over the last few years. It comes in a sturdy top-opening box with two colourful aircraft profiles for its artwork. It has a highly detailed resin airframe, clear vac-form canopies, and includes pre-coloured PE parts. However, there is no sheet of pre-cut paint masks by Eduard, which is unusual. Nor are there any images of the real aircraft often provided with CMR’s kits.
Thumbnail panels:1 | 2 | 3 | 4
The kit is packed in CMR’s usual heat-sealed plastic pouches that separate the resin parts broadly by size and fragility. PE parts and canopies are further sealed and protected, as are the decals. A final outer bag then encloses everything, so there is little chance of parts going missing until all unpacked. However, I do advise care opening the pouches, just in case some small parts have broken off their casting blocks or been damaged.
Instructions
CMR’s instructions have a parts map and use an easy to follow diagrammatic format. What is immediately apparent is just how crisp and well drawn the graphics are. I rate the constructional diagrams as some of the best I have seen, mainstream kit brands included; in fact Tamiya is the only company that I can think of that would rival them. Examples of the instructions and information on the kit in general can be viewed here.
The instructions acknowledge several people who helped with the research for the kit. In fact, CMR’s global network of experts and enthusiasts is a major strength that underpins much of their quest for accuracy and high levels of detail. They also mention key references employed used for during research for the kit.
All text is in English, with instructions used where diagrams alone will not suffice. Notes also identify any features specific to the five colour schemes. The colour scheme guides are one A4 page of monochrome shaded diagrams per subject. Paint colours have at least a generic name, whilst some have their military name plus an FS-595 number.
The Kit
The resin airframe parts are green, and there is also a clear resin casting block with various light lenses attached. The parts are joined to easily removed casting blocks that have thin attachment points. This is leaves only minimal cleanup to be done after their removal. Detail levels are superb, with some incredibly fine and small resin pieces. The colour PE fret is produced to Eduard’s usual high standards, as is the plain PE fret. The kit includes vac-form canopies, meaning you get to practice cutting it out or have an insurance copy depending on how you look at it. The canopy is very clear and well formed, but I have a lot more to comment on about this later.
The cockpit will be a major feature of this rather small plane, as there is a lot to be seen; especially if the canopy is modeled open. Coloured PE harnesses garnish the two bucket seats. They sit surrounded by a combination of fine resin and coloured PE detail. This includes some very nicely cast seat frames and oxygen bottles within the floor part, a separate roll-over frame, and integral detail inside the fuselage. The PE rudder pedals are particularly delicate. The coloured PE instrument panel should be a standout feature of the finished cockpit. There is a simple reflector gun-sight to go with the armed option.
The Alvis Leonides engine is fairly simple, and lacks some detail I would have expected CMR to include. It is missing a pipe in front of the upper cylinders, as well as what I think is a prop governor in a cutout of the large conical fairing covering the reduction gear housing (see photo*). It sits well back within the cowling behind a large conical fairing, so some may settle for things as they are. The fuselage halves are ready for joining once fitted out with the cockpit and engine.
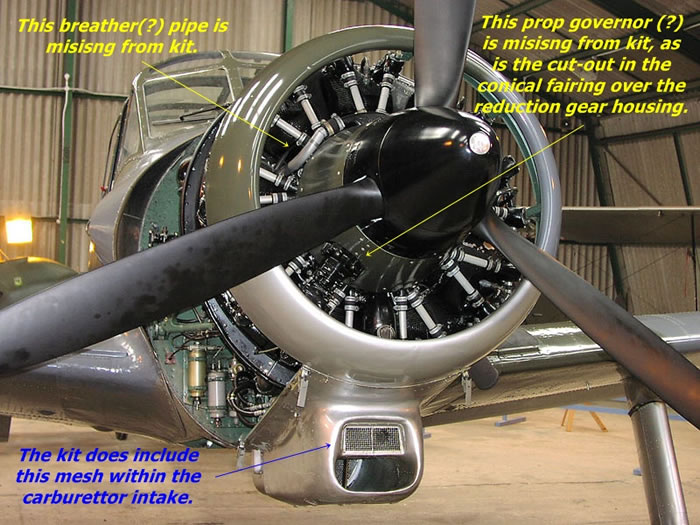
* I downloaded these images some time ago, and cannot recall from where. I have been unable to identify their owners to seek permission to use them, but believe their use here is consistent with spirit of the original poster’s intention of sharing publicly on the Internet.Â
To the fuselage is added the cowl’s front ring, tail-plane and wings; whilst the cockpit coaming, along with the instrument panel, is inserted from the top into the cockpit as well. For the airframe there remains to add the separate flaps with their PE hinges, the carburetor air-intake that sits below the cowl, where CMR has captured the small meshed intake just set back from its mouth; and of course the undercarriage legs.
The undercarriage’s main and tail legs are cast in a black resin that provides greater strength for fine weight-bearing parts than the green resin does. The main legs have PE scissor links and towing or perhaps jacking brackets, as well as clear resin landing lights at their base where they attach to the wings. The main wheels even have minute PE tie-down ring to fix to their hubs. The tail-wheel is a nicely done unit, with separate leg and wheel with anti-shimmy tyre, finished off with a PE mudguard.
Other resin items left to mention include a small venturi pitot, a single exhaust pipe, and the propeller that consists of three blades and a spinner. On my sample the prop blades each had a short-cast pinhole at the very tip, although this is easy to fix with a blob of superglue sanded to shape. There are some nicely done PE parts; elevator actuators, boarding step, grab-handles, along with a choice of PE “towel-rail” blade and whip antennae. These will all add an air of finesse and delicacy to the model. Some small clear resin navigation lights to round out the wingtips and tail.
There are two small PE strips to attach to both wing leading edges right in at the roots. I am guessing that these are post-design fix to improve stall behavior. Having looked at numerous photos of Provost it is apparent that there is a plate and a small ridge in this area of the airframe. The kit’s PE part certainly provides the plate, but some may wish to add a very short length of sprue to the plate to represent the ridge. The accompanying images show this point far more clearly than I can describe it.
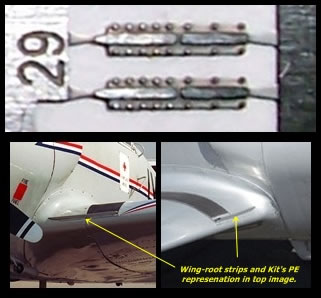
To be honest, I think a tiny ridge cast with the wing would have been quite adequate in this scale, and easier on the modeller.
The Canopy
I have reviewed many CMR kits over the years, and other than the odd little questioning niggle, I cannot recall having to criticize one in earnest. Well it is said that there is a first time for everything, and this is it. For some reason CMR chose to change the style and way that they represent canopy framing with this kit.
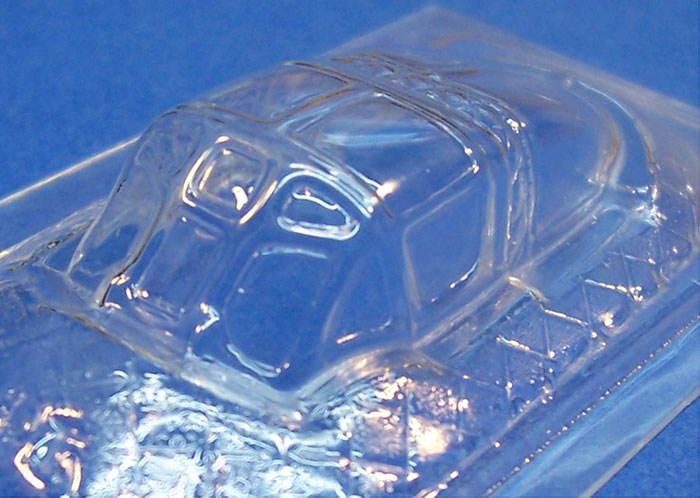
The Provost has rather rounded-section canopy framing in places, and this is a distinct characteristic that at glance make the framing appear thicker than it is. (See accompanying images.) It may be that CMR felt that it needed to capture this characteristic as the kit has very prominent, raised framing. The penalty is that this makes the flat clear areas look too small. (The old Matchbox canopy was worse in this respect.) I think that the limits of vac-forming has meant that the radii of the corners where the frames intersect are far too large; and so this has made the clear areas too small and the framing appear thicker than intended. The windscreen suffers the most from this problem, to the extent that the panels are the wrong shape as well as being undersized.
In the future, I hope that CMR returns to offering a far more subdued canopy framing. I note also that this is the first CMR kit in several years that has not included a pre-cut canopy mask by Eduard. Could this be due to the nature of the canopy itself?
In almost a case of trying to make a silk purse from a pig’s ear, there are some very fine PE wiper blades for the windscreen and a PE bracket for the port side of the sliding hood. I think that there is a lot to be said for modelling the canopy open to show off the interior and remove some need to look through the heavy framing.
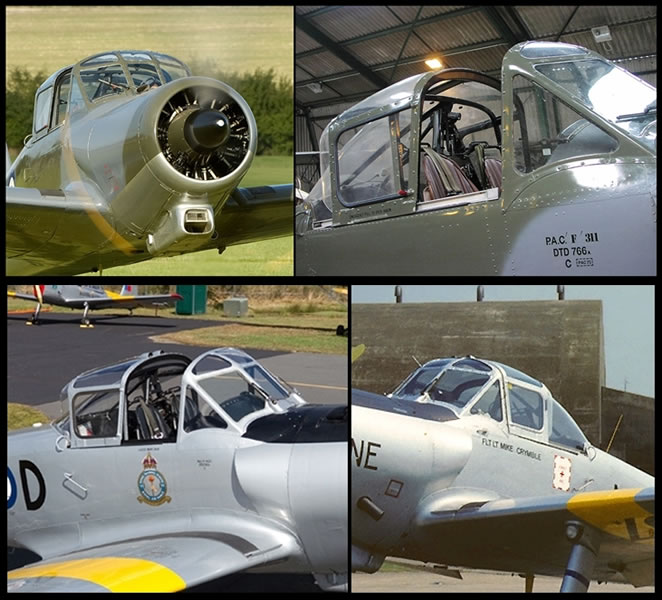
It is a pity that Aeroclub are more or less shut down, as I suspect that their vac-from canopy could have been used as a replacement. If you cannot live with the kit canopy I suggest filling it with Milliput, Epoxy Sculpt or similar; then sand off the framing from the plug you have created and polish it. Once scratch-free and highly polished, use your male master to plunge mould a new smooth canopy from acetate sheet and use painted decal film for framing. This process is far easier than many who have yet to try it may imagine. Just be prepared to have a few goes until you get it right.
Normal Service Resumes
I have left the armed version’s extra parts until last, rather the finish the airframe description on a negative. This version uses the gun-sight mentioned earlier and has two machineguns and two small bombs and their pylons. The bombs are similar to early WW2 British pattern, an have four slender fins surrounded by a tubular tail.
These items are provided as PE parts, and come with a PE jig to hold and align the fins before fixing to the resin bomb cases. Once this is done the tail fins can be rolled into tubes and places over the fins.
Despite having what appears to be a high parts count, thanks almost entirely to PE details. I should think that this kit should be a very easy and quick one to build; provided that is, that you are happy dealing with very small PE pieces.
Colours & Markings
Each of the five paint and markings guide consists of one A-4 page of shaded four-view drawings. An example of these can be seen here.
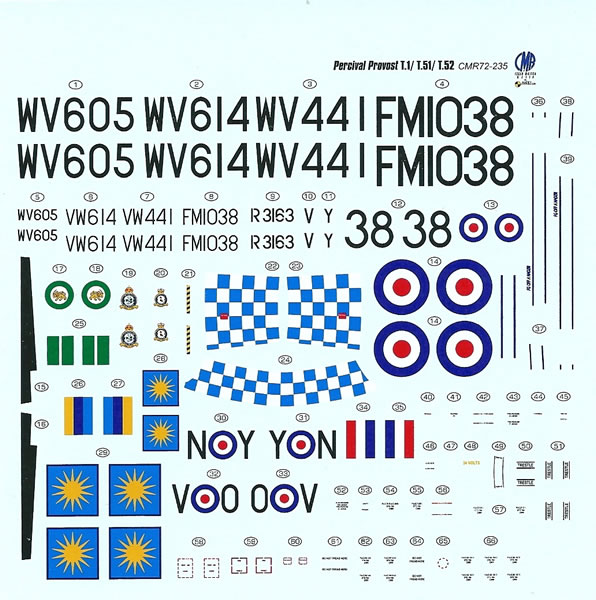
The five options and some stenciling are provided; the options being:
-
Provost T.1:
-
WV605, V-O, No.6 Flying Training School, RAF Ternhill, 1954
-
WV614, armed option, Aeroplane & Armament Experimental Establishment, Boscombe Down, October 1954
-
WV441, N-Y, No.7 Flying Training School, RAF Valley, 1956.
-
Provost T.51: FM1038, 38, Royal Malaysian Air Force, 1964.
-
Provost T.52: R3163, Rhodesian Air Force, 1967.
The decals look excellent. They have very good registration, and should have good opacity based on my experience of other CMR kits. Like many Czech decals, they are quite thin and adhere very well. Be sure to re-float rather than try to force them into position if the settle in the wrong spot. They are far from fragile, but do not like too much rough handling.
CMR’s Provost is a simple kit compared to some of their other recent releases. I think that it should build quite quickly and easily as far as multi-media resin kits go, although you will need to cope with some very small PE details. Despite the canopy, it is still a giant leap forward from the Matchbox kit, especially in terms of detail and refinement. This of course is reflected in its price.
Small model planes, in particular, must have delicate detail and good scale finesse to appear really convincing. This kit certainly offers this in all respects other than the canopy; which is rather horrible. At this price point you should expect a refined rendition of all the kit parts.
I normally recommend it CMR kits very highly, and I acknowledge that their Provost kit does have the potential to build into a stunning model. Â On this occasion my recommendation is conditional; it is a lovely kit with an inferior canopy. Either accept this or replace it by whatever means you can.
Thanks to CMR by Mark 1 Ltd for the review sample.

Review Text and Blue Background Images Copyright © 2013 by Mark Davies
Page Created 4 March, 2013
Last updated
4 March, 2013
Back to HyperScale Main Page
Back to Reviews Page
|
Home
| What's New |
Features |
Gallery |
Reviews |
Reference |
Forum |
Search