Typhoon Mk.Ib Late Production
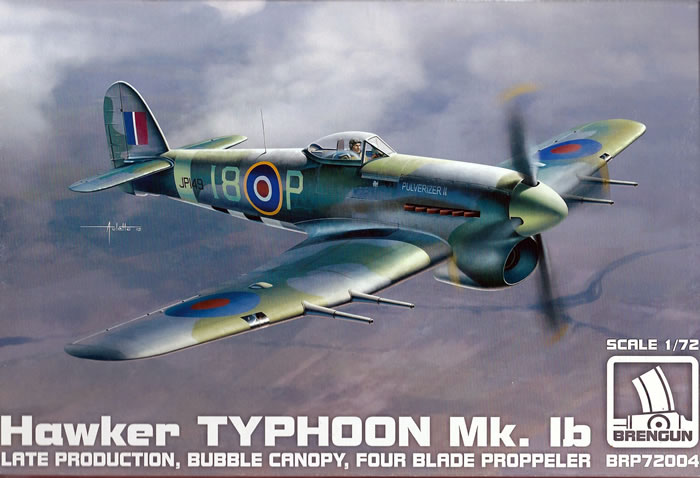
Brengun, 1/72 scale
S u m m a r y : |
Catalogue Number: |
Brengun Kit No. BRP72004 - Typhoon Mk.Ib Late Production |
Scale: |
1/72 |
Contents & Media: |
Ninety-two tan and seven clear styrene parts, one PE fret of five parts, and decals for four subjects. |
Price: |
Available on-line from these stockists:
|
Review Type: |
First Look. |
Advantages: |
Excellent detail, parts for many versions and choices, appears to be very accurate. Very nice cockpit and wheel well detail. |
Disadvantages: |
Fitting the late Tempest-tail requires fuselage amputation (no fishplate detail as a result); and the instructions completely fail to mention this surgery is required. |
Conclusion: |
This is the best injected kit in 1/72-scale of the Typhoon so far. A lot of effort has gone into providing plenty of refined detail and useful choices. There are clear pointers to other versions in the future (a car-door looks to be definite). It appears to be accurate in outline when compared to the Academy and CMR kits, as well as to A.L. Bentley’s plans.
The failure of the instructions to mention how to add the late version tail is very poor, and the way of doing so by hacking the early tail off is worse. Offering the missing fishplates as an extra in a separately purchased PE set is not a good solution to the problem. Providing alternate fuselages would clearly have been the best choice.
This kit is comparable to the better Czech limited run brands in terms of detail and quality; and it is a superb effort for Brengun’s third 1/72-scale release. I think it is very good value too. It will be interesting to compare it to the forthcoming new-tool Typhoon from Airfix; but seriously, don’t wait, buy Brengun’s now and the Airfix one later if it stacks up. You won’t be disappointed.
Highly recommended. |
Reviewed by
Mark Davies

Sword's 1/72 scale Ki 44 Shoki is available online from
Squadron.com
The Typhoon’s story began as a failed interceptor that was almost cancelled; yet the design was persevered with when its low-level performance proved useful against the Fw 190, and it went on to become the pre-eminent British ground attack fighter of WW2. This much will be familiar to most readers. So rather than recount the trials and tribulations of problems with its Napier Sabre engine, and how early aircraft were lost after their tails broke off in flight, I shall focus on detail differences between major versions. I think that this may prove helpful in guiding part choices based on colours scheme selection and aircraft serial numbers.
I will skip over the transition from solid fairing behind the canopy and the Mk.Ia with its twelve .303 machine-guns to the cannon-armed Mk.Ib. The most obvious external change to the Mk.Ib was the replacement of the early car-door canopy with a sliding bubble type. This change to the far superior canopy started with JR-serial airframes onwards. What does apply directly to the review kit is the choice of tailplane, three or four-blade props, and exhaust shrouds. An article by Arthur L. Bentley provided much of the information that follows (Scale Models magazine, November 1975).
The Typhoon had a thick wing to give the strength thought necessary for a four-cannon armament. However, the thick wing caused unanticipated compressibility problems, which limited speed above 10,000 feet to around 400-mph. This quickly led Hawker to return to the drawing board and design a thin-wing Typhoon, a design that became the Tempest. The Tempest had a slightly broader chord tailplane, making for a larger surface area overall. This tailplane was introduced to Typhoon production to as it improved handling when used with the four-bladed propeller. This started within the MN-serial numbered batch, and carried on being fitted from MN451 thereafter. The first Tempest-tailed Typhoons had their fuselages painted for the Typhoon tail, and so the leading edge of the larger tailplane is ahead of the sky recognition band’s rear edge. Later in production, fuselages would have the band moved forward slightly so that its rear edge aligned with the tailplane’s leading edge, as per specification (starting with MN798). However, problem with seals on the first four-bladed props meant that the new props were not always available to go with the Tempest-tailed airframes to begin with.
Four-bladed propellers began to replace the three-blade type shortly after the introduction of the Tempest tailplane. This prop change started with serial number MN524, but was not routine until MN601. Therefore, a four-blade prop with the big tail is almost, but not quite, a hard and fast rule. As with the three-blade props, both Rotol and de Havilland four-bladers were used, and were interchangeable. However, the Rotol prop’s propeller datum was slightly further forward than de Havilland’s was. As a result, the Rotol’s spinner was 2½-inches longer. In 1/72-scale this is a matter of a mere 0.9-mm or so, and can I think be ignored. Unfortunately, I cannot say which brands of propellers are represented in the kit.
There were several variations of exhaust used during the Typhoon’s service life as solutions to the problem of exhaust fumes entering the cockpit were sought. In 1943, the factory began to fit exhaust shrouds, although these were often discarded in frontline service to ease maintenance. I should think this was quite understandable given the amount of tinkering and attention needed by the Napier Sabre engine! Therefore, no firm rule other than check photos of your intended subject if you have them.
Just a small matter, but early aircraft had their gun camera mounted in the leading edge of the port wing just outboard of the landing light. Later on, the camera moved to the starboard cowling and fixed to an engine bearer. (This made later gun camera films of poorer quality due to vibration, but still adequate for verification purposes.) The cowl location for the cameras can I think be assumed for the review kit.
This covers most of the external changes made during the Typhoon’s production life; but there are few completely firm rules because production-line updates could be retrofitted during major service overhauls.
Previous 1/72 Scale Typhoon Kits
The Typhoon has been quite well catered for over the past few years in the One True Scale. I will deal first with the kits that do not rival the review sample due to age, kit type, or price and availability.
Old kits, now best regarded as collectables, came from Frog and Airfix. Frog offered car door and bubble-top kits (the bubble top is very old and basic). These older kits may well have been re-boxed under other labels as well; I think that SMER re-boxed the Airfix kit, whilst the Frog car-door kit has been issued by Maquette no-doubt has reappeared under brands like Novo and Eastern Express as well.
Then there are the limited run kits. These are of varying quality and buildability from Aviation USK (best avoided), High Planes (a lot of work I should think), and Pavla (car-door, bit of work needed, but nice resin details).
Academy and Hobby Boss provide us with two comparatively modern injected kits. The former is a good with fine panel lines, easy assembly and quite adequate detail. It has a three and four-blade props but overlooks to supply the Tempest-tail. The latter is compromised for simple assembly; but with engraved surface detail and quick assembly, it has it adherents. I think it has the same four-blade prop but no Tempest-tail problem as Academy. Both are well priced.
If you want all the bells and whistles in terms of detail, coloured PE etc as well as choices like the prototype, early car-door or night-fighter, then go the resin route with one of with Czech Master Resin’s (CMR) kits; but they do cost a lot more.
My personal favourites are CMR’s kits, but I have Academy’s as well. I think that it is a thoroughly decent kit and have yet to read of any major criticisms regarding its accuracy (the four-blade and small tail issue aside). Yes, it is perhaps looking just a little dated in terms of detail levels; but it will take more detail, a choice of tails, similar ease of assembly and price to beat it. Let us see if the new Brengun kit* has what it takes...
* The same kit is issued in two boxings; the other is a mid-production Mk.Ib with three-blade propeller.
Contents
The kit comes in a rather large box for a single-engine fighter in this scale. It has attractive enough artwork on the front and a colour scheme and markings guide on the rear. Paint colours use generic or RAF names where applicable. One large and two smaller sprues of brown plastic are contained in a zip-lock plastic bag, along with a further small cellophane bag enclosing the clear parts, decals and a small PE fret.
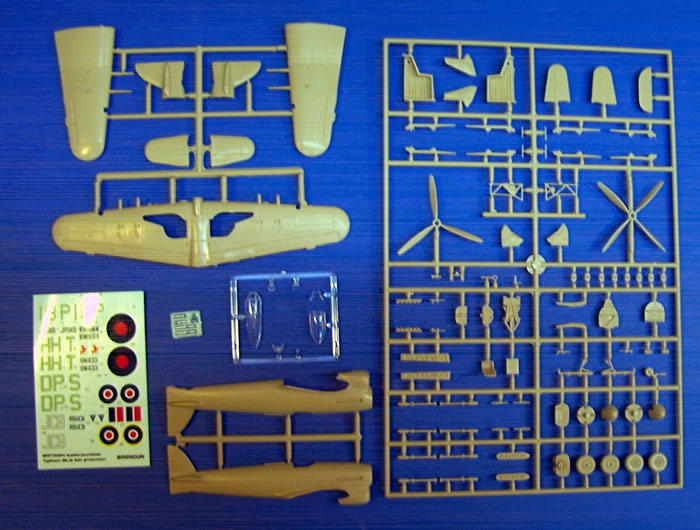
The parts are limited-run but crisply molded, with delicately recessed panel lines, and some acceptable raised detail on the wings. Also of note is the inclusion of the small cockpit vents either side of the fuselage found on mid and later production Typhoons.
I would rate the parts as similar in quality to the better Czech limited run brands. There is a very slight hint of lash in places, but this can be easily dealt with. The clear parts are good, but magnification reveals that they will still benefit from a polish and dip in Future®.
Versions
The two boxings announced so far are mid and late-production bubble tops, but the parts as supplied reveal more hints of more to come. There are:
-
Car-door and bubble canopies.
-
Early narrow-chord and Tempest-type broad-chord tailplanes.
-
Three and four-blade props.
-
“Regular “and shrouded exhausts.
-
Separate early un-sleeved cannon and fully sleeved cannon moulded with the wings.
-
Bubble canopy fuselage halves on their own individual sprue that implies different fuselage moulds for the car-door type.
-
60-lb rocket projectiles and Mk.I rails, bomb pylons (but no sign of 1,000, 500 or 250-lb bombs, 90-gallon or the early Hurricane-style 44-gallon drop tanks at this stage).
I note also that the wings and Tempest tail are on their own sprue, whilst the early narrow chord tailplanes are within the main sprue. Could this separate wing-sprue imply that a Mk.Ia 12-gun wing may be a possibility too?
The Kit
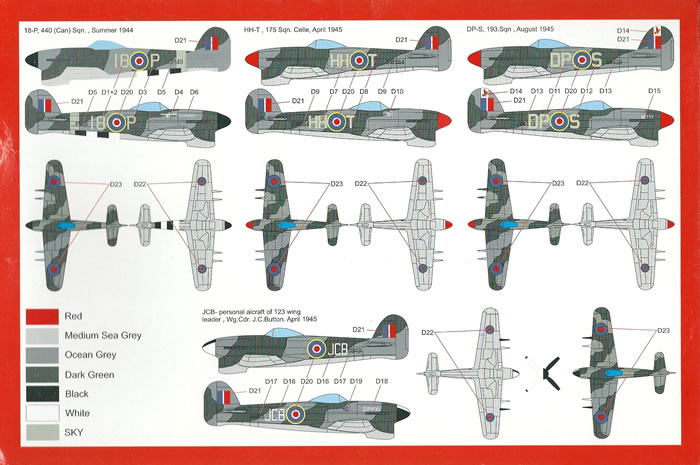
The instructions are a folded A4 sheet with a parts map and reasonably well-drawn assembly diagrams. Colour descriptions are restricted to generic and RAF names, and as with the markings guide, no paint system or brand codes are provided. This matters little as WW2 RAF temperate scheme colours are well known to most modellers. As I mention in a couple of places later however, beware of Brengun’s detail colour call-outs, as some seem a bit doubtful to me.
As review tradition almost demands, I shall begin with the cockpit. This kit beats all previous injection moulded kits, even bettering Pavla’s despite its use of some resin parts. The cockpit features tubular framework and open floor with heal-boards in true Hawker-fashion. Front and rear bulkheads brace this assembly. (They should be open framework too, but are virtually hidden from view and can have their flat surfaces painted matt black to simulate an open void.) The rear “bulkhead” includes the head armour, and this has what looks like a circular lump on its rear face. I could not see this feature in any photos, and suggest that it may be best to remove it. Nicely moulded rudder pedals, a control column and seat with PE belts complete this sub-assembly. A crisply moulded instrument panel locates within the fuselage halves that have further integral detail on the cockpit sides. There is a gun-sight mount to fit to the instrument panel, but sadly, no gun-sight. Two tubes that are not included braced the mount, but these can easily be scratch-built from rod or stretched sprue. Leave the glass reflector off if you add a gun-sight, as Typhoons with bubble canopies (and Tempests) projected the reticule image onto the windscreen.
Cockpit detail colours are given, but I am not convinced that a totally grey-green cockpit interior, as advised, is correct. I understand that Gloster, who built most Typhoons, finished their cockpits in matt black above waist level, with aluminium tubular framing, seat and lower panels. The preserved cockpit in the Imperial War Museum and illustrations in the Pilot’s notes support this. Hawker-built airframes may have had a grey-green finish where Gloster used black, but I cannot be sure.
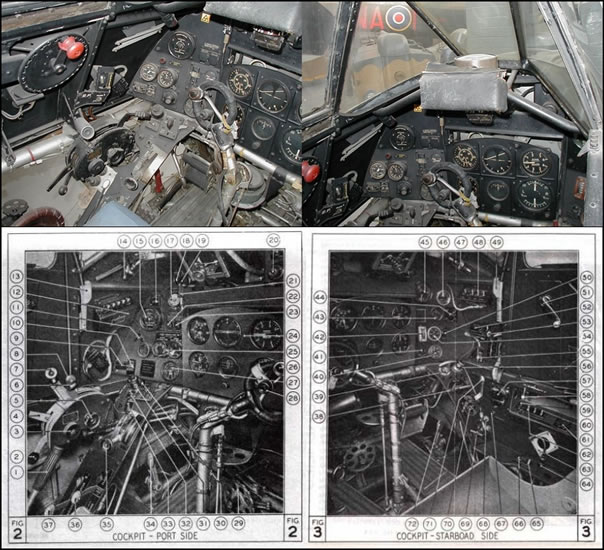
It looks as though the simple removal of the lugs that the cockpit cage sits on will enable this sub-assembly to be inserted after the fuselage halves have been cemented together and any seams cleaned up; worth doing to keep sanding dust out. Otherwise, it must be in place before the halves are joined as per the instructions. There is a separate rudder suits either tail choice.
It is also timely to mention the radiator and oil-cooler matrix as the fuselage encloses this too. This is supplied as front and rear faces, with a separate upper panel, complete with downward facing bulge. I think that these parts will look good once finished and enclosed.
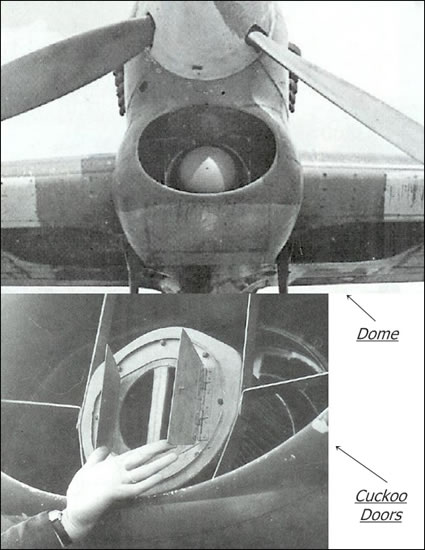
Some aircraft operating from forward airfields in Europe had problems ingesting dust and debris from the prop wash. The field-mod to reduce this consisted of a domed cover over the carburettor intake that made the engine breathe around the sides of the dome. The factory fix consisted of cuckoo doors covering a tubular filter braced within the radiator intake’s throat. These had the advantage of being able to blow open in the event of a backfire. “Cuckoo doors” are associated with late production Typhoons and should have been included in the kit, but their absence is not a major failing. You can see them in an accompanying image and can scratch-built if needed. A nice touch is the separate radiator vent, allowing it to be positioned open if desired.
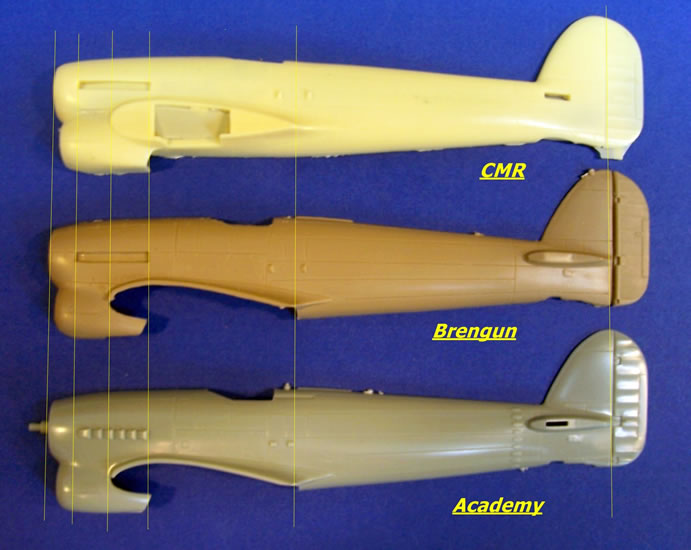
As mentioned earlier, the Tempest-tail had a broader chord than the original tailplane. This of course demands a longer root section on the fuselage. Brengun recognise this, and provide for it by supplying a separate tailfin and fuselage stub. This means that the fuselage has to have the early style tailfin and tailplane roots cut off. However, the kit instructions do not mention this despite this kit being for a four-blade late-production aircraft. This is a case of poor attention to detail.
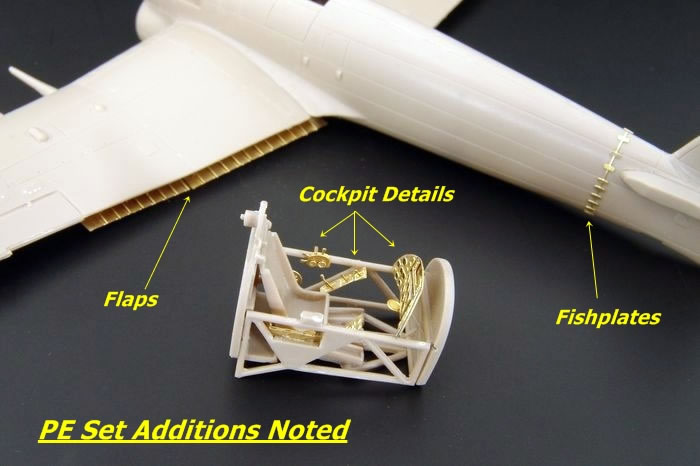
From looking at the parts, since the instructions do not address using the Tempest-tail, a perfect cut through the fuselage along the panel line just ahead of the tail is required, this being the transport joint on the real plane. Interestingly, this is where the fishplate strengtheners should appear in the surface detail, but they are in fact absent. The fishplates were the initial fix to stop tails breaking off in dives until the elevator flutter problem that caused this structural failure was determined. By then the fishplates were part of the production process and remained to give extra strength. Their presence is a subtle one (see the image accompanying this review), unlike the lumps on the Academy kit that need sanding down. However, most photos show evidence of their presence due to dirt accumulating along the fishplates’ outlines, especially when over-painted with the sky tail-band.
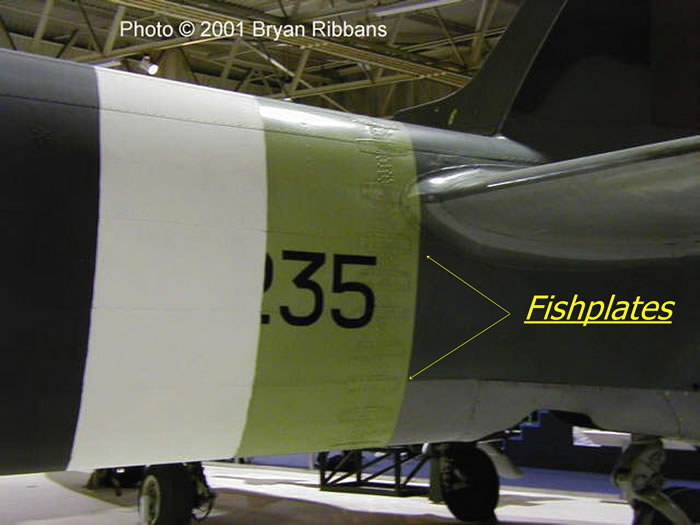
I think that Brengun should have included the fishplate outlines, but it seems that as they intend for the fuselage to be cut at this point they left them out. Obviously, a far better solution would be to provide two fuselages matched to the different sized tailplanes. Brengun’s website lists a PE detail set to compliment their Typhoon kits that includes fishplates! Their website says it is for the Tamiya kit. A case of poor attention to detail again. This is not an ideal solution at €6.70, but it is a fix of sorts. The set also supplies flaps and some cockpit details.
Brengun provides a choice of shrouded or un-shrouded exhausts, and the instructions do identify which exhausts type should be used with which decal option. These two are the most common styles of exhaust, although there were other variations.
Both of the three and four-blade propellers are fine enough, given the limitations of injection mouldings. However, both look a little undernourished when compared to CMR’s and Academy’s interpretations.
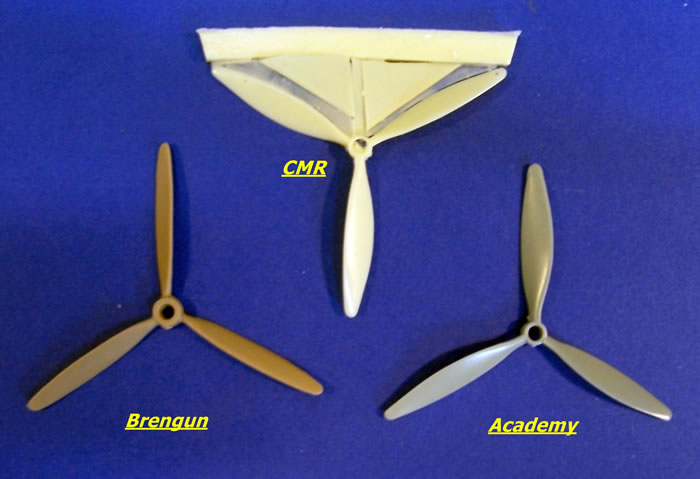
This may be case of de Havilland versus Rotol, but I cannot say. Furthermore, the four-blade one looks a little odd as it appears to be set in coarse pitch. Piston-engined aircraft take off and land in with fine pitch selected, and this is how their props usually appear on parked aircraft. I made a closer study of four-blade Typhoon images, and noticed that the prop blades are noticeably coarse in the first third near the root, and then they wash out to finer angle of attack towards the tips. I feel that Brengun has captured this look in part, but the blades do not have enough washout towards their tips. If it bothers you, then the blades could perhaps be gently twisted into a finer pitch towards the blade tips. Both of the spinners look fine to me.
Brengun have made quite an effort with the undercarriage. Commendably deep and detailed main wheel wells are separate three-side boxes that are closed in by a front piece representing the main spar. These mount to the wing underside ensuring that there is an undercut rather than walls that conform to the outline wheel well opening as on other kits. The oxygen bottles located in the wheel wells are provided, along with the main leg and ancillary door retraction jacks. The undercarriage doors are nicely done, with faceted internal panels like the original. The axles have the correct camber to the axles, rather than being perpendicular to the undercarriage leg. The colour call-out for the inside of the main undercarriage doors is medium sea grey. A friend of mine who spent a long time researching his 1/48-scale Typhoon project advised me that aluminium is the more likely colour here.
The main wheels consist of two halves, due to the limited run tooling. This reduces the risk of sinkholes often associated with thick parts, as well as eliminating ejector pin marks in the tyres. The tail wheel is simple and nicely done, but is the early pattern rather than the double-ridged anti-shimmy kind generally found on later Typhoons.
The wings are simple enough, but they will require some attention in two or possibly three areas. The cutouts for the landing lights really need to be closed in and a light added behind their clear leading covers, otherwise you will be able to see into the wing’s interior. The cutouts are quite square, whereas the clear light covers have rounded corners, so some filling and re-polishing will needed here. However, early in 1944 the starboard light was deleted. Moreover, some Typhoons had their lights plated over when carrying rockets, so check references for your selected colour scheme. The cannons are split horizontally along their tapered rear sleeves, and care will be needed to get a good round finish here. A dry fit of the main-wheel bay within the wing suggests it is just possible to close the upper and lower wing parts. I think that sanding or filing a little of the hidden face of the wheel bay away will make wing assembly easier. I found when dry-fitting the wings that the curved opening in the fuselage for the lower leading edge needs just a smidgeon more room for easy insertion of the lower wing.
Remember to make the holes for rocket launch rails if you plan to use them. These are indicated by partial holes on the inside face of the lower wing. Although not mentioned in the instructions for this boxing, the bomb-pylons are a flush fit, so there is no need to make any holes for these should you want to mount them. They mount just a little outboard of the inner cannon centrelines next to the case ejection chute, with their leading edge just back a few scale inches from the wing’s leading edge.
The rocket rails are nicely done within the general limits of the moulding process used. They are the steel Mk.I pattern that taper towards the tip, the aluminium Mk.III type was a little longer and un-tapered, but Brengun have not provided these as an option; although for late production example I feel that they should have. The rockets are also reasonable given the limitations of injection moulding. However, the separate rocket tailfins have several sink marks that will require filling. As mentioned earlier, there are no bombs with this boxing or sway braces for the bomb pylons. Nevertheless, the spares box and some scratch-building will fix these issues if building a “Bombphoon” is your thing.
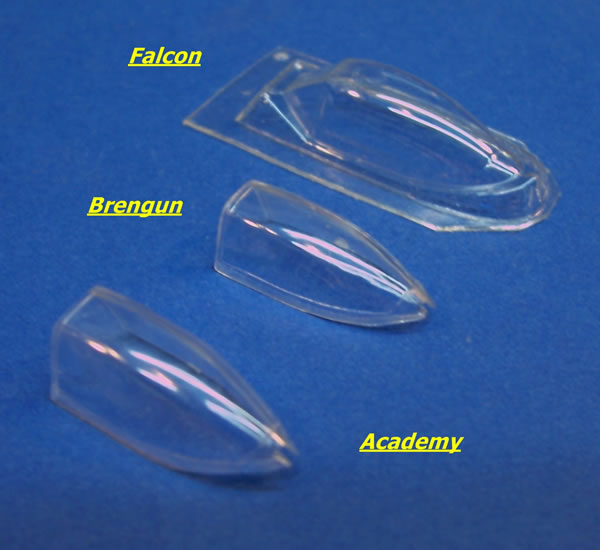
Not a lot remains to describe. There is a clear light to mount behind the pilot’s head armour, which I think, was a prototype feature and so should be left out. The bubble canopy and windscreen are separate so it can be modelled open; although the sliding canopy appears to be a little under-nourished, perhaps due to the limitations of two-piece tooling. I would opt for a Falcon vac-from canopy to make the most of this kit anyway. (Pavla may offer one as single item rather than in sets as Falcon does.)
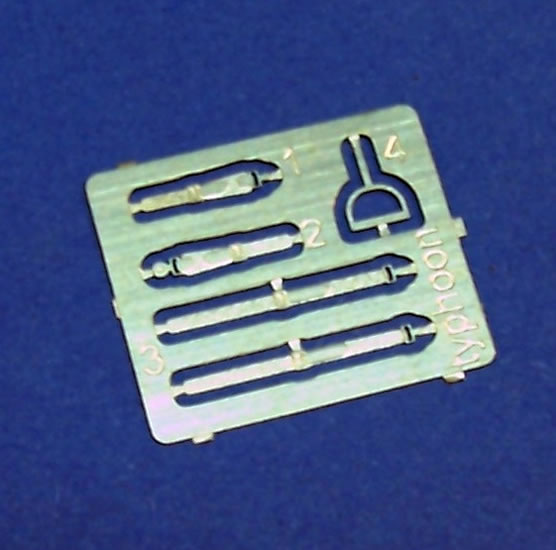
That just leaves an underwing pitot, and the retractable boarding step made from PE to mention. The step is not quite right, as the stirrup the pilot places his foot in should lie parallel with the ground when the step is extended, but the kit item will lie at an angle as supplied. This is easily fixed by making new wire step, so nothing to lose sleep over.
Generally, I think that this kit should be a straightforward build. Dry-fitting the major parts, and a close examination of the assembled model images from Brengun, suggest that it may not be as faultless as the Academy or Hobby Boss kits to assemble; but by no means will it be a limited run battle either.
Accuracy
I usually restrict any accuracy assessments to comparison with previous kits, especially ones that have garnered few criticisms, rather than rely on plans, which can be of questionable accuracy. In this case I found that Brengun’s parts are virtually interchangeable with Academy’s, and that both of these brands and CMR’s Typhoons correspond precisely in outline to Arthur L Bentley’s beautifully drawn plans (I cannot say how accurate they are, but they look to be thoroughly researched. Suffice to say, Brengun’s kit agrees with the best 1/72 kits of which I am aware. Brengun’s images of the competed kit included with this review certainly suggest that they have captured the looks of this pugnacious looking fighter.
Marking Options
I am no expert on Typhoon colours and markings, but I do know that late-war Typhoon squadrons generally specialised in either carrying bombs or rockets. This had less to do with pilot practice and skill levels, but was more about the work involved for the armorers in changing between rocket rails and bomb pylons on the aircraft. So check the main weapon fit for the squadron you model. Far from being a hard and fast rule, the “Bombphoon” squadrons often received four-bladed aircraft before rocket squadrons, as this prop helped with heavily loaded takeoffs (as well as speed and climb-rate improvements). Some late-war Typhoons also wore Type-C rather than Type-B roundels on their upper wings (the kit has only Type-B).
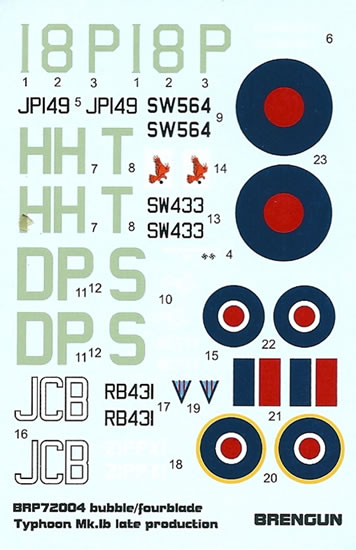
With these points in mind, I would advise doing your homework; Brengun is a real new-comer to the injected aircraft kit game, and may not be quite up to speed on colour scheme research. After all, this is only their third aircraft kit after the obscure Bachem Ba 348 Natter and Waserfall surface-to-air missile.
The decals look well registered and appear to have good opacity; the options they cover are:
-
18-P, No 440 (Can) Sqn, Summer 1944;
-
HH-T, No 175 Sqn, Celle, April 1945;
-
DP-S, No 193 Sqn, August 1945; and
-
JCP, No 123 Wing, April 1945.
This would be an excellent kit from any of the limited run manufacturers; but as only the third by Brengun, I rate it is a superb effort. I suspect that they are using a third party producer with established tooling experience; but Brengun can presumably take the credit for research and design. I have mentioned a few nitpicking issues throughout the review, but in fairness, I have also made a much more researched examination than is usual for a “First Look”. This was because of my interest in the subject and my having plenty of references to hand; and it was clear that Brengun had done more homework than those responsible for previous 1/72-scale Typhoons kits (except for CMR who went further). The result is that there are more points, good and bad, to be noticed.
This kit has very nice surface detail, and is accurate in outline; if the lack of criticism of the other two Typhoon kits I have compared it with is a reasonable basis to make this call. The cockpit and wheel well detail surpasses what has gone before, and even the radiator area has an edge as well. I think that buildability will fall a little short of its mainstream competition; but only just, and not by enough to be any sort of obstacle to producing an excellent model.
Despite my mentioning some missed opportunities, the actual criticism of the parts makes for a very short list. No gun-sight or sight-bracing, perhaps the wrong tail wheel style, the canopy shape maybe not quite blown enough, empty spaces behind the landing lights, no cuckoo doors, only early Mk.I rocket rails, and an unnecessary lump and light behind the head armour. None of these is of any real consequence, and all are easy to remedy.
I have only one real criticism, and even that is linked to a plaudit. Ten from ten for offering both types of tail, five from ten for requiring the fuselage to be chopped off to build the Tempest-tail option, rather than providing two different fuselages; and a further two points off because this production decision means the fishplate detail is absent. For an extra €6.72, you can buy a separate PE set that has fishplates included, but they should be moulded with the fuselage in the first place. I said one criticism because my next point is still linked to the tail issue. How could the instructions overlook to mention the Tempest-tail and the need to chop up the fuselage? This does seem a fundamental point that should be covered. Not all modellers have familiar with the foibles of Typhoon variations.
In fact, if there is a general weakness, it is that the instructions sometimes fail to guide the accurate use of the kit’s options as well as they should do. This said; there are some limited run manufacturers with far more kits in their catalogue with worse instructions. I repeatedly find that limited run manufacturers are guilty of poor instruction proofing, perhaps in a rush to get to market; or maybe their familiarity with the project blinds them to the needs of some builders. Yet checking that their instructions are useful and error-free is one of the least expensive areas that they can add quality to their products.
Despite the tail choice issue, this is by far the best injected kit of the Typhoon to 1/72-scale to date. Priced attractively, it has all of the right elements to build into a stunning model. I look forward to more variations on this tooling, a car-door being a given at least. As to Future Brengun releases, I just hope that they keep the momentum going.
Definitely recommended.
Footnote
We are due to see a new-tool 1/72-scale Typhoon with three and four-blade options from Airfix later this year. I would guess that it should build very well, possibly have a slight price advantage, and be on par for accuracy with heavier surface detail. I do not think that this prospect should stop or delay you from buying a Bregun Typhoon however; it is a known quantity, and the best available now.
Thanks to Brengun for the review sample.
Review Text & Blue Background Images Copyright © 2013 by Mark Davies
Page Created 24 February, 2013
Last updated
24 February, 2013
Back to HyperScale Main Page

|
