|
Hawker Typhoon Mk.IB
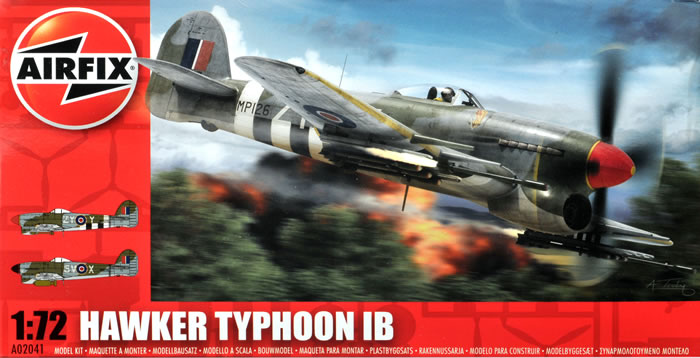
Airfix, 1/72 scale
S u m m a r y : |
Catalogue Number: |
Airfix Kit No. A02041 - Typhoon Mk.Ib |
Scale: |
1/72 |
Contents & Media |
72 grey and two clear styrene parts; markings for two subjects. |
Price: |
Available worldwide including online from these stockists:
|
Review Type: |
First Look. |
Advantages: |
Appears to be accurate, good wheel well detail, nice clear parts, a good way of providing for a rotating prop after painting, and a comprehensive decal sheet. |
Disadvantages: |
Crude decal for an instrument panel. |
Conclusions: |
This is a good effort from Airfix. The moulding is not quite up to the standard of the better brands from the Far East, but it is a real advance on the first new tool releases by Airfix under Hornby’s ownership.
Its main competitor for this subject is Brengun’s Typhoon kit. Price considerations aside, I am tempted rate the two brands equal best for a four-blade Typhoon in 1/72-scale. Chosing one over the other comes down largely to a preference between detail refinement versus ease of construction. Brengun’s kit remains the best choice for a three-blade Typhoon however, as Airfix does not cover this option.
This is a very nice kit from Airfix. I am sure it will be well received by many. If they would just refine their panel lines a bit more, Airfix’s new products could be up there with some of the best. Despite this, I still think that Airfix is the best four-blade Typhoon choice for the majority of modellers in the One True Scale.
I recommended this kit highly. |
Reviewed by Mark Davies

Airfix's 1/72 scale Typhoon Mk.IB is available online from Squadron.com
Background
The Typhoon’s story began as a failed interceptor that was almost cancelled; yet the design was persevered with when its low-level performance proved useful against the Fw 190. Its stability as a gun platform, heavy cannon armament and prodigious payload capacity, led to it becoming the pre-eminent British ground attack fighter of WW2. This much will be familiar to most readers.
For more information on the various external changes that occurred through the Typhoon’s production life please see my February 2013 first look article on the new Brengun kit here on HyperScale.
Previous 1/72 Scale Typhoon Kits
The Typhoon has been quite well catered for over the past few years in the One True Scale. I will deal first with the kits that do not rival the review sample due to age, kit type, or price and availability.
Old kits, now best regarded as collectables, came from Frog and Airfix. Frog offered car door and bubble-top kits (the bubble top is very old and basic). These older kits may well have been re-boxed under other labels as well; I think that SMER re-boxed the Airfix kit, whilst the Frog car-door kit has been issued by Maquette no-doubt has reappeared under brands like Novo and Eastern Express as well.
Then there are the limited run kits. These are of varying quality and buildability from Aviation USK (best avoided), High Planes (a lot of work I should think), and Pavla (car-door, bit of work needed, but nice resin details).
Academy and Hobby Boss provide us with two comparatively modern injected kits. The former is a good with fine panel lines, easy assembly and quite adequate detail. It has a three and four-blade props but overlooks to supply the Tempest-tail. The latter is compromised for simple assembly; but with engraved surface detail and quick assembly, it has it adherents. I think it has the same four-blade prop but no Tempest-tail problem as Academy. Both are well priced.
If you want more bells and whistles in terms of detail, coloured PE etc as well as choices like the prototype, early car-door or night-fighter, then go the resin route with one of with Czech Master Resin’s (CMR) kits; but they do cost a lot more.
Brengun recently released Typhoon kits covering mid and late production Mk.Ib’s* (the same parts for either version in different boxes). I rated these as the best 1/72-scale injected kits of the Typhoon to be released so far, despite a major criticism the late version needing to have the early tail cut from the fuselage and replaced with the late-style tail. My personal favourites are CMR’s resin kits, but Brengun remains the best option for an injected kit of a mid-production three-blade Mk.Ib, since the new tool Airfix kit is for a four-blade version with Tempest tail.
* Brengun has just released a car door Typhoon at the time of writing.
The question is then: Which is the better four-blade option, Brengun or Airfix’s new tooling?
The parts are moulded with reasonably fine recessed panel lines, and some acceptable raised detail on the wings. Unfortunately, the panel lines are almost the same width as the hinge lines for the control surfaces, the gap being about right for the latter. The panel lines on the wings and cowl seem finer than those on the rear fuselage. The finer lines approach the standard set by some better brands. Some of the sprue gates are extremely chunky and limited-run in nature, leaving some large lumps to be cleaned up from parts like the wing leading edges. There are some quite fine parts; although again, these are not quite up with the best.
The clear canopy parts are thin with good clarity, although the windscreen is not as polished as the sliding hood.
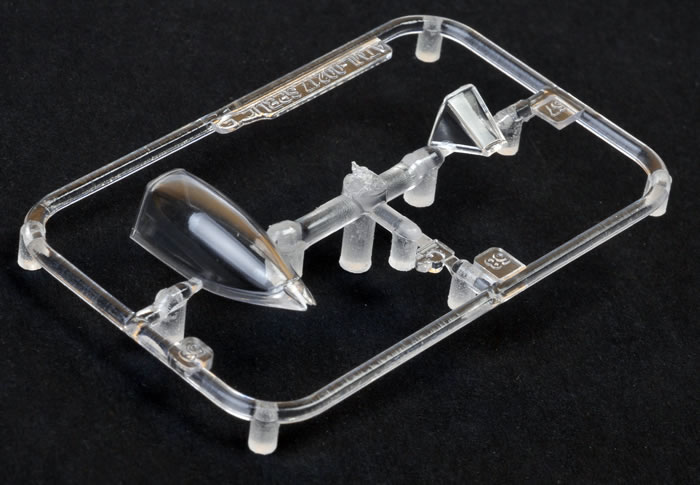
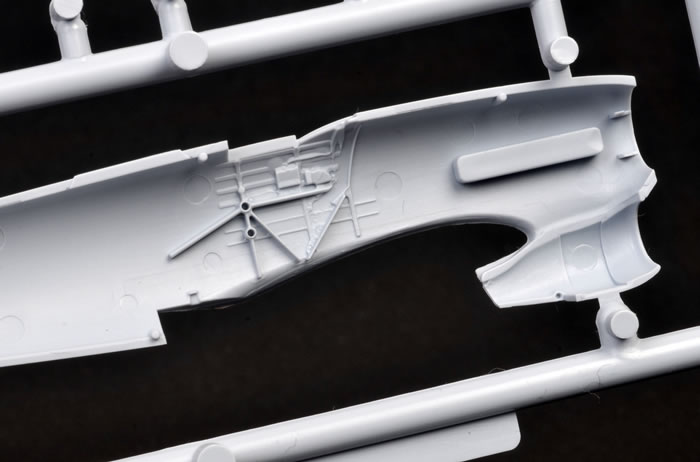
This kit’s cockpit detail betters all previous long-run injection moulded kits, but is not as good as the Brengun or Pavla short-run kits. The cockpit features tubular framework and other detail moulded integrally with the fuselage halves. It has an open floor with heal-boards in true Hawker-fashion.
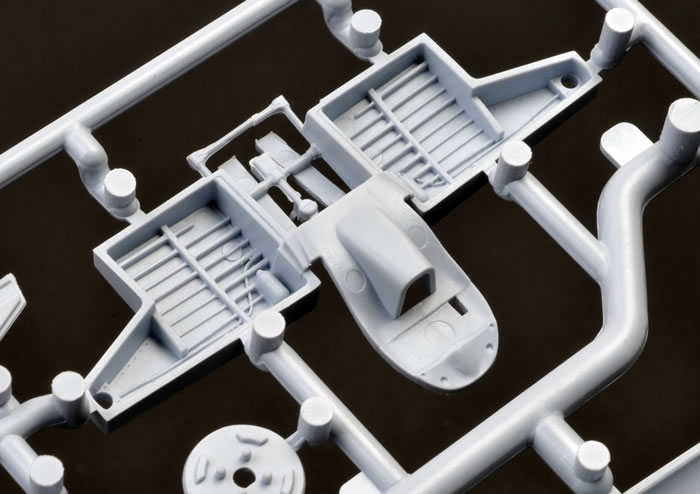
Rather unusual is the way the floor is moulded with the wheel wells and part of the radiator ducting to form a single assembly. This tooling approach gives the best rendition of the upper radiator ducting I have seen in this scale.
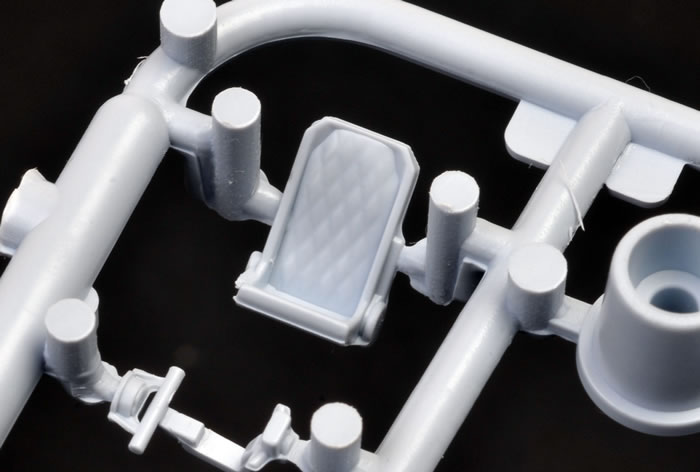
The seat is quite nicely done with quilted leather back-padding and separate armour, although the seat pan looks a little short; perhaps due to the thickness of the plastic edge. There is no seat harness, but this is can be added easily enough.
The instrument panel is smooth and uses a crude decal for instruments; where all of the dial outlines on the panel are white on black. This may have passed muster in the 1980’s, but thirty years on I expect better. This is something I feel should have been an option to a moulded instrument panel, as it lets the kit down a bit. Rudder pedals, a control column and gun-sight complete this sub-assembly. Two tubes that are not included braced the mount, but these can easily be scratch-built from rod or stretched sprue. There is no clear gun-sight reflector, which is correct, as Typhoons with bubble canopies projected the reticule image onto the windscreen.
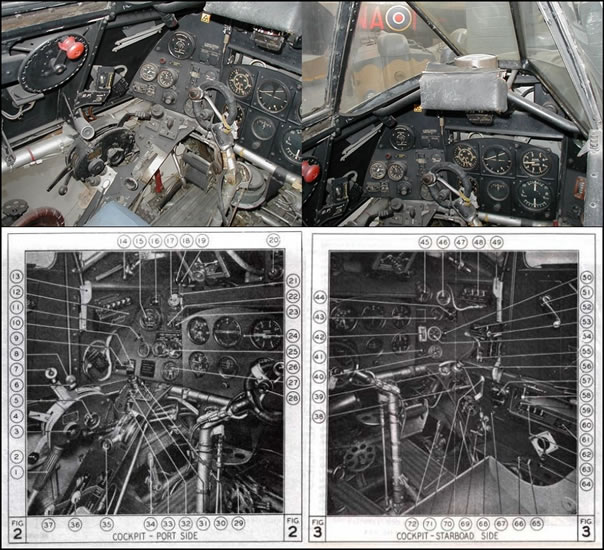
Cockpit detail colours are given, but I am not convinced that a totally grey-green cockpit interior, as advised, is correct. I understand that Gloster, who built most Typhoons, finished their cockpits in matt black above waist level, with aluminium tubular framing, seat and lower panels. The preserved cockpit in the Imperial War Museum and illustrations in the Pilot’s notes support this. Hawker-built airframes may have had a grey-green finish where Gloster used black, but I cannot be sure.
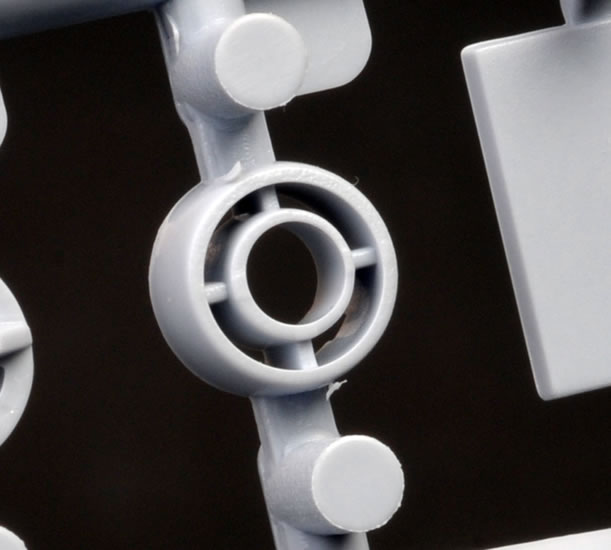
The radiator and oil-cooler matrix comes as one part, with a separate carburettor intake. The matrix is very finely represented.
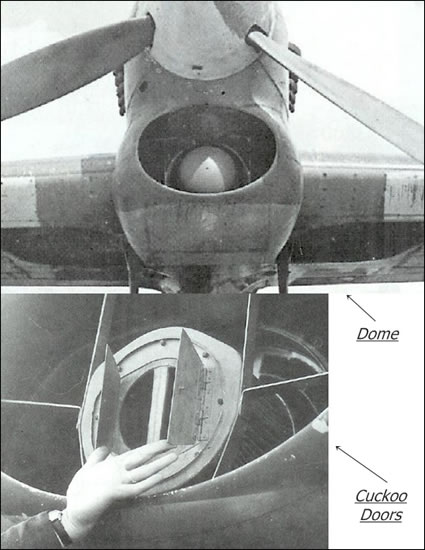
Typhoons operating from forward airfields in Europe had problems ingesting dust and debris from the prop wash. The field-mods to reduce this problem included a mesh grill or sometimes a domed cover over the carburettor intake that made the engine breathe around the sides of the dome (backfires however could cause the dome to be blown off). The factory fix consisted of cuckoo doors covering a tubular filter braced within the radiator intake’s throat. These had the advantage of being able to blow open in the event of a backfire. “Cuckoo doors” are associated with late production Typhoons and should have been included in the kit, but their absence is not a major failing. You can see them in an accompanying image and can scratch-built if needed.
The wheel-well/cockpit floor assembly mentioned earlier also provides the ducting roof for the rear of the radiator. A nice touch is the separate radiator vent, allowing it to be positioned open if desired.
Interestingly, and I think a first for Typhoon kits, Airfix have included a tropical air filter that mounts behind the radiator between the main wheel wells. This filter was fitted to late production Typhoons, but its location makes it very hard to see in period photos (and I have yet to see published plans featuring it either). It is not the same as fitted to earlier Typhoons used for tropical testing, nor is it the same as the albeit similar arrangement applied to the Tempest Mk.VI, which has appeared in published plans. Presumably, there was some arrangement to close off the annular intake in the radiator when the engine breathed through the ventral filter on the ground, but I have no idea how this looked. If readers are aware of how the intake air was rerouted please e-mail me with the details.
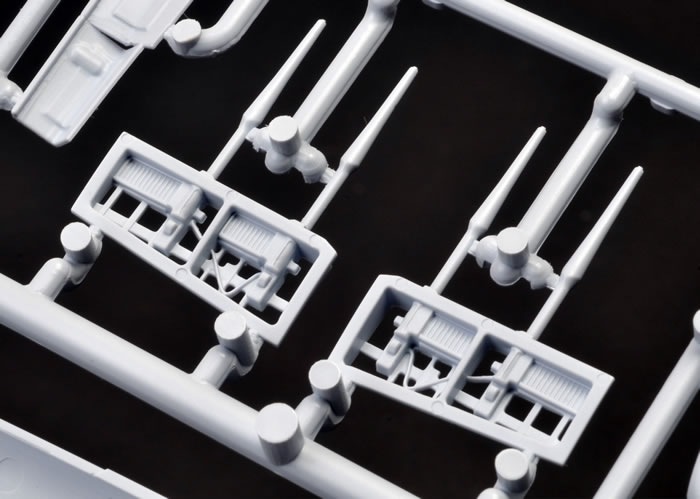
The fuselage halves enclose the cockpit, radiator matrix and tail-wheel, leaving the wheel wells protruding either side of the assembled fuselage. These in turn serve to help locate the wings. The wings include the option of cutting open the gun access panels to display the cannon and their ammunition boxes. Some nicely moulded open doors are provided to replace the sections cut out.
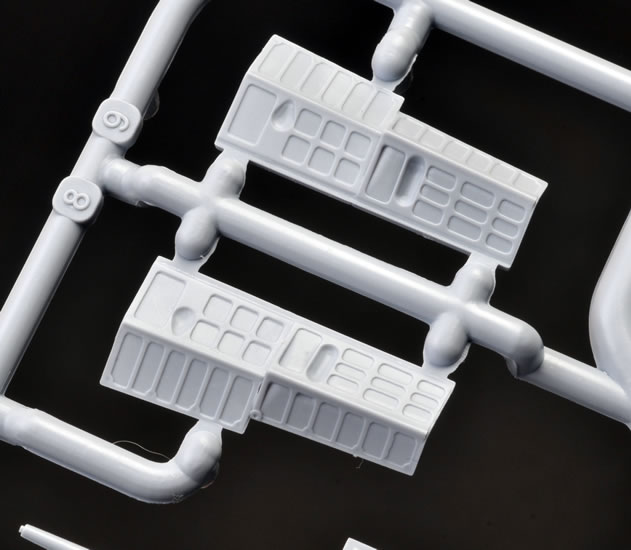
However, the gun breech and ammo-feed detail is basic, and I feel this is a bit of gimmick; but it may appeal to some, including younger modellers. However, no harm is down as the wings come with the access hatches moulded shut.
The wings lack landing lights; however, early in 1944 the starboard light was deleted, and some Typhoons had their lights plated over when carrying rockets, so check references for your selected colour scheme.
Continuing with the fuselage, the curvature of the fin does not quite look right to me, as it finishes almost horizontally, rather than on a slight downward curve where the top meets the rudder; but this is a very slight issue. The fuselage is also around a 2-mm or so shorter than the Brengun, CMR and Academy Typhoons, and A.L Bentley’s plans as well. The difference appears to be in the length of the fuselage forward of the cockpit, but I think that this variation of a scale 6-inches matters little. The fishplates are moulded as raised detail, and so are somewhat exaggerated, although a little better than Academy in this regard (se image accompanying of the real thing).
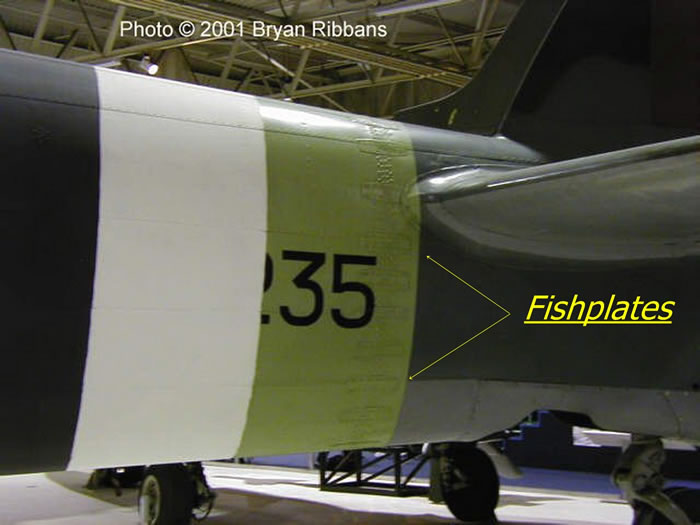
I think some light sanding will improve their appearance. Airfix provides only un-shrouded exhausts. These, and the shrouded type, were the most common styles of exhaust used, although there were other variations; so check your references.
The four-blade propeller looks good. I also like the way the prop, mounts to a separate collar that can inserted to the fuselage after painting is complete, as this enables a rotating propeller to be modelled without it being in the way during assembly and painting.
Airfix have made a nice job of the undercarriage. The commendably deep and detailed main wheel wells mount to the wing underside, ensuring that there is an undercut rather than walls that conform to the outline wheel well opening as on some other kits. The oxygen bottles located in the wheel wells are provided, along with the main leg and ancillary door retraction jacks. The undercarriage doors are nicely done, with faceted internal panels like the original. The axles have the correct camber to the axles, rather than being perpendicular to the undercarriage leg. The colour call-out for the inside of the main undercarriage doors is medium sea grey. A friend of mine who spent a long time researching his 1/48-scale Typhoon project advised me that aluminium is the more likely colour here.
The main wheels consist of two halves, with a complete hub on one half, which can serve to aid painting a little. The tyres have flats moulded in place to simulate weight- bearing, and location keys that ensure these are at the correct angle to the undercarriage legs. The tail wheel is simple and nicely done, and is the anti-shimmy kind generally found on later Typhoons, although the deep groove in the centre tread area is missing due to moulding limitations; so this needs to be added for the tyre to look correct. There are separate single-piece doors to cater for a retracted undercarriage, which is a nice touch.
Rocket launch rails or bomb pylons mounting holes are indicated by partial holes on the inside face of the lower wing and the instructions identify which should be drilled through for rockets or bombs. The rocket rails are okay, but possibly a little too chunky. They and are the steel Mk.I pattern that taper towards the tip, the aluminium Mk.III type was a little longer and un-tapered, but Airfix have not provided these as an option; although it would be nice to have for late production example. The rockets are reasonable given the limitations of injection moulding. Airfix includes two 1,000-lb bombs, and these are also reasonably well done.
Not a lot remains to describe. The bubble canopy and windscreen are separate so it can be modelled open. That just leaves an underwing pitot, and the retractable boarding step. This last item will benefit from some refinement, as it is perhaps a little chunky in appearance.
I think that this kit should be very straightforward to build, certainly far more so than its closest rival by Brengun.
Colours & Markings
I am no expert on Typhoon colours and markings, but I do know that late-war Typhoon squadrons generally specialised in either carrying bombs or rockets. This had less to do with pilot practice and skill levels, but was more about the work involved for the ground crews in changing between rocket rails and bomb pylons on the aircraft. So check the main weapon fit for the squadron you model. Some late-war Typhoons also wore Type-C rather than Type-B roundels on their upper wings, and I note that Airfix include these as an option.
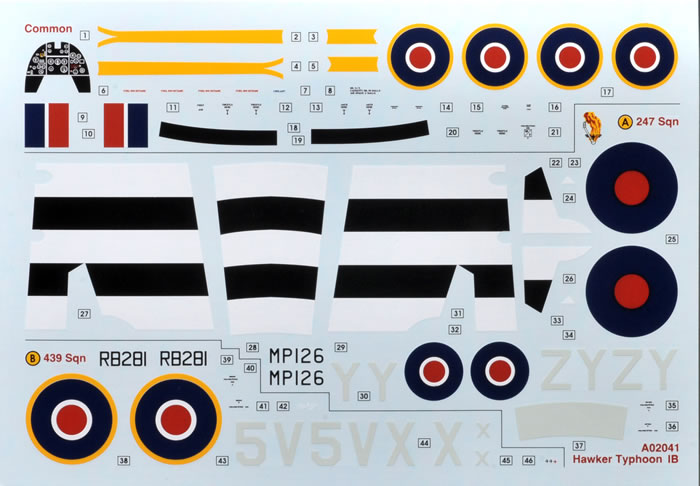
The decals look very well registered and appear to have good opacity. They include invasion stripes, yellow recognition bands for the leading edges and stencil markings. The two options covered are:
-
Squadron Lead3er Basil Gerald 'Stampe' Stapleton DFC, No.247 (Chino-British) Sqn, RAF Eindhoven 1944.xx
-
Flying Officer A 3H Fraser, No.439 (Westmount) Sqn, No.143 Wing (RCAF), RAF Eindhoven, 1945.
Accuracy
My review of Brengun’s Typhoon kit established that its outline shape and dimensions compared very closely to the kits from Academy and CMR, both being brands that have been well received with little criticism (Academy’s lack of a Tempest tail aside). They all also correspond in outline to Arthur L Bentley’s beautifully drawn plans (I cannot say how accurate these are, but they look to be thoroughly researched.)
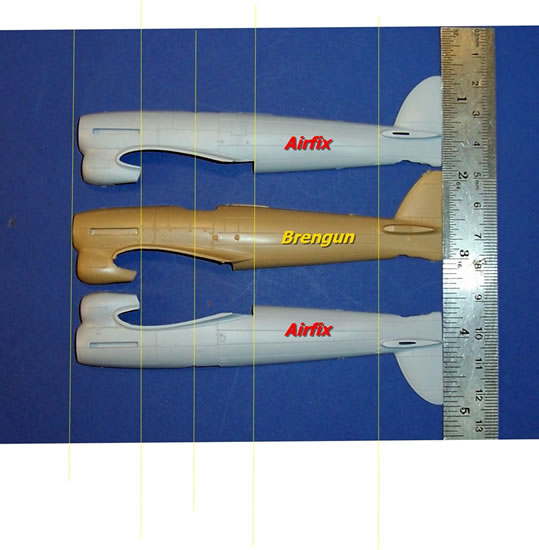
The new Airfix Typhoon is very close in outline to all of the above kits, other than a slightly shorter fuselage; the difference seems mainly to lie forward of the cockpit. The difference is fairly minor and of no real consequence, as I cannot say who is correct. The only thing I would be inclined to alter is the slightly horizontal rather than rounded finish to the fin where it meets the rudder. Overall, I think that Airfix has captured the essence of this pugnacious looking fighter.
Airfix vs. Brengun
My February 2013 review of Brengun’s Typhoon kit had this footnote:
We are due to see a new-tool 1/72-scale Typhoon with three and four-blade options from Airfix later this year. I would guess that it should build very well, possibly have a slight price advantage, and be on par for accuracy with heavier surface detail. I do not think that this prospect should stop or delay you from buying a Bregun Typhoon however; it is a known quantity, and the best available now.
I was wrong about Airfix offering a three-blade option, so Brengun remains the best option for injected kit of this version. Unless Airfix tool a new fuselage and prop, or an aftermarket three-blade conversion for the Airfix kit is produced.
The price advantage of Airfix over Brengun has proved to be a more than slight, but if you only plan to build one or two, the actual difference is probably not of major concern. Airfix’s surface detail is heavier than Brengun’s, but not as much I expected. There is not much difference in terms of finesse for the panel lines on the wings and cowl of each brand, but Airfix’s rear fuselage panel lines are noticeably deeper. However, I think that many will accept Airfix’s surface detail as reasonable in appearance.
As discussed above, from an accuracy standpoint Airfix matches Brengun’s outlines very closely, and I cannot say which is the more accurate in terms of forward fuselage length, although Brengun does agree with Academy, CMR and A.L Bentley’s plans, so Airfix is possibly a bit of a loner on this point.
The new tool Airfix kits have a good reputation for fit, and I am confident that Airfix will better Brengun here, especially as Brengun requires a complete tailectomy in the case of its four-blade version. Moreover, Brengun has no fishplate detail at all, unless you resort to their separate PE set for a solution; this adds more cost in the process, but you do get PE flaps and some interior details. (I would not be surprised if Brengun release a PE set for the new Airfix Typhoon, as no doubt will other detail set producers.)
Brengun provides better cockpit detail, but I think that the Airfix canopy looks better as Brengun’s appears a bit under-nourished. Airfix’s wheel wells have a reasonable amount of detail, but are not as good as Brengun’s in this respect, as moulding in one piece has precluded any detail of the main spar’s tubular structure being included. The rocket rails are okay, but are not as refined as those by Brengun. However, unlike Brengun’s kit, Airfix include 1,000-lb bombs, and these are also reasonably well done. Airfix’s aileron trim tabs are shorter in span compared to Brengun’s, and I think Brengun is more accurate here. It is easy to fix the Airfix kit if I am correct.
I almost rate the two brands about equal best for an injected kit of a four-blade Typhoon in 1/72-scale. Technically, Brengun is the best basis for the most refined and detailed model OOB; but for most of us Airfix will be the best choice because of its buildability, near equal levels of detail, and price advantage. I leave it to individuals to weigh up the pros and cons for each.
This is a good effort from Airfix. The moulding is not quite up to the standard of the better brands from the Far East, but it is a real advance on the first new tool releases by Airfix under Hornby’s ownership.
Its main competitor for this subject is Brengun’s Typhoon kit. The Airfix kit’s surface and cockpit detail almost as refined as the Brengun kit; but its big advantage is that it avoids the Czech kit’s very undesirable need for major tail surgery that results from the same fuselage moulds being used for three and four-blade options. The Airfix kit is much easier to build in this regard; and in fact, I would expect it to build better all-round. I suspect that many will regard its scale finesse is close enough to Brengun’s anyway. Approaching half the Czech kit’s price, the more readily available Airfix kit is sure to be a winner.
Price considerations aside, I am tempted rate the two brands equal best for a four-blade Typhoon in 1/72-scale. Chosing one over the other comes down largely to a preference between detail refinement versus ease of construction. Brengun’s kit remains the best choice for a three-blade Typhoon however, as Airfix does not cover this option.
This is a very nice kit from Airfix. I am sure it will be well received by many. If they would just refine their panel lines a bit more, Airfix’s new products could be up there with some of the best. Despite this, I still think that Airfix is the best four-blade Typhoon choice for the majority of modellers in the One True Scale.
I recommended this kit highly.
Airfix kits are available from hobby shops worldwide and online.
Review Text and Reference Images Copyright © 2013 by Mark Davies
Sprue Images Copyright © 2013 by Brett Green
Page Created 10 June, 2013
Last updated
11 June, 2013
Back to HyperScale Main Page
Back to Reviews Page

|
