Supermarine Scimitar F.1
3 Kits & Wing-Fold Set
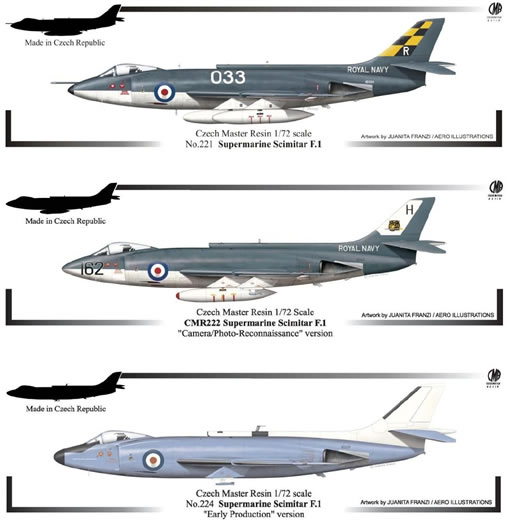
Czech Master Resin, 1/72 scale
S u m m a r y : |
Catalogue Number: |
CMR-221 Supermarine Scimitar F.1
CMR-222 Supermarine Scimitar F.1 “Camera/Photo Reconnaissance” version
CMR-224 Supermarine Scimitar F.1 “early Production” version
CMR-DS06 Supermarine Scimitar F.1 “Folding Wings” |
Scale: |
1/72 |
Contents & Media |
Common to all three kits:
44 x resin parts, 1 x pre-coloured PE Fret of 23 parts, 1 x plain PE fret of 55 parts, 2 x vac-form canopies, 1 x pre-cut canopy paint mask, decal sheet of aircraft & payload stencils.
In addition to the above:
- CMR-221 has 3 additional resin wheels.
- CMR-222 has 3 additional resin wheels and 5 clear resin parts for camera ports and nose light.
Payloads & Pylons:
- CMR-221 - 70 x resin parts
- CMR-222 - 34 x resin parts.*
- CMR-224 - 27 x resin parts.*
* Plus 24 Sidewinder fin parts from the common to all PE fret.
Decals:
- CMR-221 & 222 – Decals for 8 Colour Schemes each.
- CMR-224 – Decals for 5 Colour Schemes.
Wing-fold Set :
- CMR-DS06 - 4 x resin parts, 1 x plain PE fret of 15 parts.
|
Price: |
Available online from these on-line stockists: |
Catalogue Number |
Hannants |
West Coast Hobbys |
Aviation Megastore |
CMR DS06 |
£ 18.58 |
Can$ 29.00 |
|
CMR-221 |
£ 66.66 |
Can$ 87.00 |
€ 74.75 |
CMR-222 |
£ 66.66 |
Can$ 87.00 |
€ 74.75 |
CMR-224 |
£ 66.25 |
Can$ 85.00 |
€ 73.91 |
Click here for currency conversion, and here for CMR distributors. |
Review Type: |
First Look |
Advantages: |
The definitive Scimitar kits in any scale. They are produced to very high standards, thoroughly researched, have superb instructions, a good blend of different media, a good payload selection, and are extremely complete packages in every way. |
Disadvantages: |
Not really a disadvantage as such, but the use of PE in some areas of the airframe, whilst greatly adding to scale finesse, may be quite challenging for some. |
Conclusions: |
The definitive Scimitar kits in any scale. They are superbly researched with excellent production quality. They should be more straightforward to build than a quick glance would suggest, provided care is taken with the PE parts - Highly recommended. |
Reviewed
by Mark Davies

HyperScale is proudly supported by Squadron.com
Background
The Scimitar was derived from a series of concepts and prototypes stemming back to the years just after WW2 ended. At this time the British were considering, and in fact tested, carrier-borne jets which lacked undercarriages and belly-landed on flexible rubber decks. This was an attempt to keep aircraft weights down when only relatively low-powered jet engines were available. Successful landings were made on a land-based simulated deck, but no doubt the nightmare of deck-handling a wheel-less plane, and the development of more powerful engines, killed the nutty idea off. Supermarine's concept for this system was to be powered by two Avon engines, and this was a feature that remained through all subsequent development stages leading to the Scimitar.
100 Scimitars were ordered in 1952, although this was later reduced to 76. There were three prototypes, the first of which flew in January 1956, whilst the first production Scimitar F.1 flew a year later. Apparently an American pilot is said to have remarked that only the British could design such a powerful and streamlined fighter that was still subsonic! Despite conforming to area-rule principles the Scimitar was subsonic in level flight due to its relatively thick wing, although in a shallow dive it was supersonic.
From what I have read the Scimitar was loved and loathed in roughly equal measure. FAA pilots loved the sheer performance and superb climb rate after transitioning from Seahawks, but maintenance crews found it demanding to service, and were forever having to deal with copious fuel leaks when parked. The Scimitar also had an unfortunate attrition rate with just over half of the production run being lost to accidents. Some claim this was due to it being too large an aircraft for small British carriers, but I have also seen this reason discounted in other commentaries.
In its redemption the Scimitar did introduce to the FAA swept wings, blown flaps, supersonic dives and a nuclear strike capability. It was in many ways a multi-role fighter with a superb rate of climb for interceptor duties, a useful strike payload, and a long-range photo-reconnaissance capability. It could also serve as a tanker. Despite some problems the Scimitar’s performance was a huge leap forward compared to the Seahawk it replaced, and it’s capabilities were well-rounded and flexible; always an important consideration for carrier aircraft.
The Scimitar lacked intercept radar however, and so the interceptor role was primarily performed by the Sea Vixen. Much of its strike role, including nuclear, was assumed by the Buccaneer once it came into service. In fact it the Scimitar was to serve as a tanker for the early Buccaneers because they lacked the power to take off with adequate fuel and a full weapons load.
The Scimitar served from 1958 until 1969, and so was the last in a line of Supermarine designs to see service.
Previous 1/72 Scimitar kits
I’m aware of four previous Scimitar kits to 1/72 scale. Skybirds released a limited-run injected multi-media kit with PE, white metal, plastic-card and resin parts. Magna Models released an all-resin kit, as did CMR quite some time ago before they had obtained all of the research material used for their latest Scimitar kits (It is now rather dated and not as accurate as their latest Scimitar kits.). I should think that all three kits would be rarities now and mainly confined to the second-hand market. Xtrakit’s relatively recent limited-run kit manufactured by the MPM group is in most outline respects very similar to CMR’s old resin kit, although of course it is made of styrene.
The New CMR Kits
The latest Supermarine Scimitar releases by CMR are completely new toolings and have no relationship to their earlier kit, CMR-126. They are typical of CMR’s products for the last few years in that they are multi-media offerings with highly detailed resin airframes, clear vac-form canopies, complimented by plain and pre-coloured PE, plus pre-cut paint masks. The masks and PE are made by Eduard for CMR.
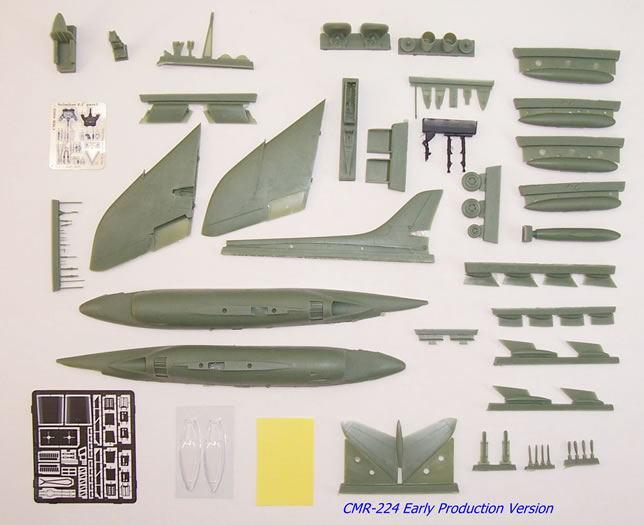
A fairly large and very sturdy top-opening box contains all of the above media, plus two sheets of water-slide decals and several sheets of A4-sized paper. A small sheet of paper is included to acknowledge the assistance of several Scimitar experts, as well as the key references used. Included is a special thanks to Andy White who was also a key figure in the research associated with CMR’s Buccaneer kits several years ago. It’s worth focusing on the paperwork first as this really serves to underpin just how thoroughly researched these kits are.
Instructions etc
As you’d expect the instructions contain a parts map, but what is immediately apparent is just how crisp and well drawn the graphics are. This becomes more obvious as you move on to view the assembly diagrams. In fact I’d rate the constructional diagrams some of the best instructional graphics I’ve seen, mainstream kit brands included. Instructions are in English, and generally confine themselves to colour call-outs and simple clarifying statements where diagrams alone will not suffice. Where appropriate notes indentify features specific to the colour schemes offered with the kits. The colour scheme guides are black & white shaded diagrams. They are replete with numerous stencil locations in addition to major national and unit markings. Whilst clearly printed I think some, like me, might wish to enlarge the markings guide applicable to their selected colour scheme when decaling time comes around. Colour call-outs use standard British military colour names and cross-referenced to FS-595 numbers.
There is an additional page that relates the colour schemes options to photographically verified payloads that each aircraft was observed carrying at the time it wore the markings offered by the kit. Of course it’s likely that other weapons would have been carried as well with the same markings, but for purists it does serve to give advice on a 100% authentic payload for the markings they choose. A further page with each kit goes on to give a painting and stenciling guidance for payloads and their pylons, and again these are cross-referenced to the markings options.
Yet more pages, 5 ½ in fact, provide in-service photographic images of the aircraft represented by the kit markings, and various walk-around details. Each is numbered and cross-referenced to captions listing aircraft number, place and date. In the case of the walk-around images the captions explain what is being illustrated and have a note to the applicable assembly diagram number in the instructions.
Kit Contents
The kit parts are packed in CMR’s usual heat sealed plastic pouches which separate the various resin parts broadly by size and fragility. PE parts, paint masks and canopies are further sealed and protected, as are the decals. Then the whole kit and paper-work are then sealed in an all-encompassing bag. So there’s no real chance of anything going missing until the kit is unpacked. However I do advise care when opening the pouches containing resin, just in case some small parts have broken off their casting blocks or have been damaged.
The resin parts are cast in green resin, with the exception of the undercarriage legs which are black. CMR changed to this green resin recently as it reveals fine detail better than their previous cream-coloured resin. Casting blocks have thin attachment points and will be easily removed, leaving only minimal cleanup afterwards. Detail levels are superb, with some incredibly fine casting. I only noticed one very small flaw when perusing all of the kit parts, and that was a tiny bubble in one of the flaps, although it was fully skinned and should not cause any problems. Bubbles, pin-holes and the like are such a rarity now with top quality resin kits such as CMR’s that frankly I’m surprised when I do find any.
The undercarriage is cast in a stronger black resin common to most weight bearing pasts in CMR kits. The trade-off is that this resin sometimes has a little flash to be cleaned away. The regular and colour PE frets are produced to Eduard’s usual high standards, as is the paint mask. Two vac-form canopies are provided, meaning you get to practice cutting it out or have an insurance copy depending on how you look at it. The canopies are very clear and well formed.
Common Kit Features
All three kits share a majority of common airframe parts, so the following observations apply equally to each.
Before commencing assembly it really is worthwhile deciding which markings option you wish to build and becoming familiar with any related parts and detail painting options that apply to it. Most choices seem to be related to payloads and their pylons, but there are also different wheel types (CMR-221 & 222) and painting options that need to be attended to during assembly.
The resin ejector seat has nice frame, pack and cushion detail, and this is garnished with various coloured PE harnesses and straps, along with two back & yellow firing handles.
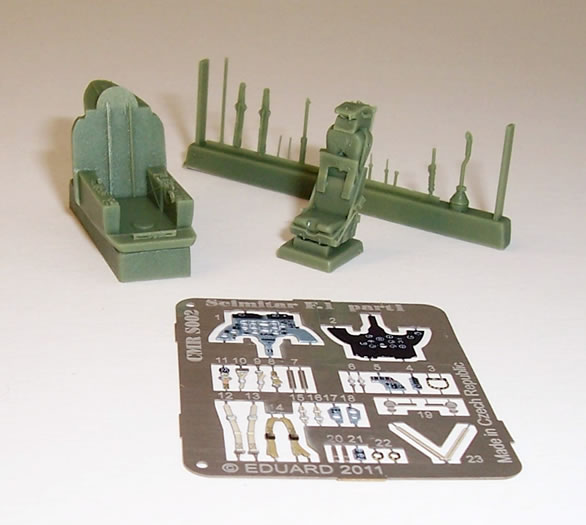
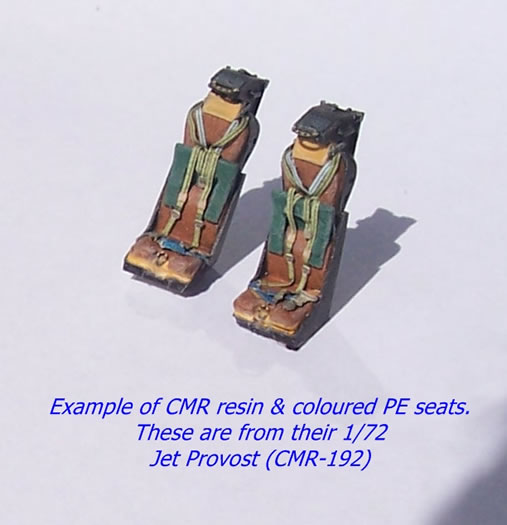
I have completed similar seats for my CMR Jet Provost, and can attest that the finished result of this resin and coloured PE combo is very pleasing (see accompanying image of my Provost seats).
The seat is sits in a resin cockpit tub with fine switch detail that is further enhanced by PE throttles and rudder pedals. A very convincing multi-piece coloured PE instrument panel attaches to the resin forward cockpit coaming, and should look fantastic.
The fuselage halves need to be fitted out with the cockpit and a few other items before being joined. These include a detailed arrestor hook compartment, nose and main wheel wells and engine intakes.
The arrestor hook compartment has the internal structure nicely cast, and is further enhanced with PE detailing. A substantial looking arrestor hook and extended tail-bumper with its piston are in resin.
The nose wheel well is very convincing, with extensive structural detailing and a fairly complex roof shape. The main wheel wells within the fuselage will be barely seen because they are enclosed by their large doors. The only purpose of the wells that I can see is to blank off being able to see through the tiny gap that exists where the closed main wheel door meets the smaller open part in the main undercarriage bay in the wing.
The resin engine intakes are very nicely cast and include delicately detailed compressor faces. There are boundary layer control plates consisting of three PE parts. These need to be carefully bent, in particular the finned plate supports which must be turned through 90 degrees. The finished result should look excellent in terms of scale refinement.
The instructions mention the need to add weight to ensure the model sits on all three wheels, but not how much. I would do some taped assembly of major components to test where the model’s centre of gravity is to determine how much ballast is needed.
The instructions show the jet exhausts with their nicely detail turbine faces being installed before the fuselage halves are joined, although they are inserted from the outside. If you see an advantage in installing them later (perhaps using the engine cavities to receive a dowel to assist with handling and painting) then I think they could be left out of this stage of construction. However if you do this I suggest making some supports inside the fuselage for the tubes to assist their location when they are inserted later on.
Once the fuselage halves are together it only takes the addition of four parts (wings, fin and tail-plane) before you can grant yourself permission to make aeroplane noises and take a quick flight around the modeling bench. The wings are one-piece but without flaps. They only need a thin casting skin over the flaps area to be removed and the wing root mating edge to be cleaned up before joining to the fuselage. The flaps are very authentic, with thin side section that fit into rebated areas in the wing undersurface. The instructions show that the flaps should either be fitted closed or extended at 45 degrees, in which case their resin actuating pistons will need o be fitted. The detailed undercarriage bay is cast integrally as you’d expect. The fin and tail-plane need to be removed from thin casting blocks, and the instructions indicate the correct angle of anhedral should the resin part need tweaking at all.
The undercarriage legs may need a little bit of very fine translucent flash removed as this seems to be a bi-product associated with this stronger type of resin. The wheels are nicely cast, and in the case of CMR-221 & 222 there is a choice of early and later style wheels. The main legs have PE scissor-links and brake lines. Delicate and detailed undercarriage doors finish this are of the model off.
One very noticeable feature of the fuselage’s external detail is the internal structure around the engine exhausts where the petal air-brakes open. Although usually closed I can see many modelers choosing to model these petal-type brakes open, There are six of them, each made from two PE pieces, and will make for an unusual and highly detailed area of the model (see accompanying image of the real thing viewed from the rear) . I think that modeling them open may also be an easier option than achieving a precise fit with three slightly curved PE air-brakes on each side, and I wondered why CMR did not provide some closed brakes in resin to simplify the closed option. I contacted CMR to ask why only PE brakes? CMR explained that closed resin brakes had been considered, but several Czech modelers who completed pre-production Scimitar builds for them indicated that only PE brakes were needed, as a good closed fit was easier to achieve than appearances might suggest.
All that is left airframe assembly-wise is to cut out and fit the canopy which has a resin insert in the part behind the seat. Many will be tempted to have the canopy open to show off the highly detailed cockpit, but such is its clarity that little will be lost if the canopy is left closed. There are of course one or two small detail parts like a pitot on the port wing and a spine blade antenna to add.
Some markings options offered with CMR-221 & 222 also make use of the nose-mounted refueling probe, and this part is common to all three kits, and in some cases under-fuselage air scoops are to be removed.
CMR-222 (Photo-Reconnaissance)
CMR-222 has some additional camera ports made from clear resin and the fit into holes that must be opened in the nose (these holes are skinned over and common to all three kits). There is also a large clear nose cone to represent the Harley light fitted to some machines used to simulate attacks against warships (it makes the attacking plane more visible when viewed head-on). This replaces the tip of the solid nose.
Payload Options
Wheel choices, recon-nose and Harley light aside, the area that the three kits really differ is in their payload options and their associated under-wing pylons. In fact it is here that careful attention needs to be paid to the instructions to ensure the correct stores are matched to correct type of pylon and in the right location. The instructions also advise that many Scimitar stores were handed, and accordingly give direction on this aspect for applying stencil decals, as most stencils were intended for viewing when looking from the wingtip toward the fuselage. Because of the variety of payloads there are no locating holes for pylons, but the instructions do indicate their locations in a plan view. The instructions also advise placing under-wing code number decals before fitting the pylons.
The resin weapons and other payloads are all well cast with some very fine practice bomb racks. The Sidewinder missiles consist of resin fuselages and have PE fins. A handy PE alignment tool is provided to assist with fixing the fins, but it’s fair to say that this will be fiddly and some real care will be needed with a total of 12 PE parts per missile. However I think some very worthwhile scale finesse should result. Payload options for each kit are as follows:
CMR-221 Supermarine Scimitar F.1:
- Early-Style' Mod.5003 Weapons Pylons
- Drop Tank Mod.5072 Weapons Pylons
- Mod.5072 Weapons Pylons + Adaptor for: 1,000lb Bomb
- 200-Gallon Drop Tanks
- 150-Gallon Drop Tank
- AIM-9B 'Sidewinder' Air-to-Air Missile
- Sidewinder (Aero 3B) Launcher + Adaptor Rail
- 25lb. A.P. No.2, Mk.1 Shot, 3-inch 'Unguided' Rocket Projectiles
- 12lb. Shot, 3-inch 'Unguided' Rocket Projectiles
- Mk.12, Type 3, Rocket Projectile Installation
- 2,000lb Practice (Inert) Store / 'Red Beard', 15kT 'Target Marker Bomb' Thermo-Nuclear Weapon
- 1,000lb H.E.M.C. Mk.6, 'Freefall' Bombs / 1,000lb. H.E.S. 'Freefall' Practice Bombs
- 25lb Twin Bomb Carriers
- 25lb No.2, Mk.1, Practice Bombs
CMR-222 Supermarine Scimitar F.1 (Photo-Reconnaissance):
- Drop Tank Mod.5072 Weapons Pylons
- 200-Gallon Drop Tanks
- 150-Gallon Drop Tanks
- 100-Gallon Drop Tanks
- Mk.20 HDU Flight Re-Fuelling Pod
- Martin Marietta Bullpup ASM-N-7A/AGM-12B 'Bullpup-A', Air-to-Surface Guided Missiles
- Bullpup (Aero 5A) Launcher + Adaptor Rails
- Sidewinder Mk.1A/AIM-9B, Air-to-Air Missiles
- Sidewinder (Aero 3B) Launcher + Adaptor Rails
- Sidewinder Training Rounds
- 25lb Twin Bomb Carriers
- 25lb No.2, Mk.1, Practice Bombs
- Camera Pod
CMR-224 Supermarine Scimitar F.1 (Early Production):
- Early-Style Mod.5003 Weapons Pylons
- Drop Tank Mod.5004 Weapons Pylons
- Drop Tank Mod.5072 Weapons Pylons
200-Imp. Gallon Drop Tanks
- 150-Imp. Gallon Drop Tanks
- Palouste Portable Air Starter
- Twin Bomblet Carriers
- 25lb Practice Bomblets
- 28lb Practice Bomblets
Colours & Markings
Scimitar models can be finished in a variety of schemes, provided that they have Extra Dark Sea Grey upper surfaces and white undersides; that is unless you opt for the overall pale roundel blue with white fin option offered with CMR-224. This special scheme was applied to Scimitar XD229 serving with the RAE Weapons Flight in 1964/65, and had black leading edges to all flying surfaces and a black anti-glare panel. Fortunately, in my opinion at least, the FAA’s Extra Dark Sea Grey over white scheme is a smart one, especially when brightened up with roundel, aircraft numbers, unit codes and sometimes colourful tail markings.
The painting and markings guides provide colour call outs using the colour name and equivalent FS-595 number. In some cases they also indicate the degree of gloss finish applicable to the machines (some were completed in polyurethane paints imparting a very high gloss finish). Also in some cases an indication as to how dirty panel lines were is mentioned.
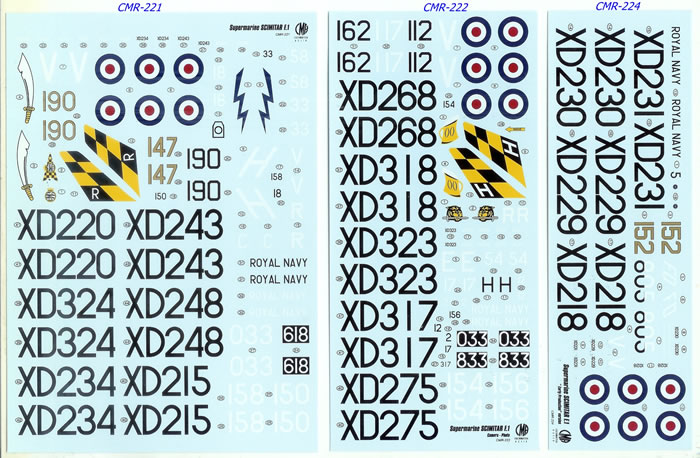
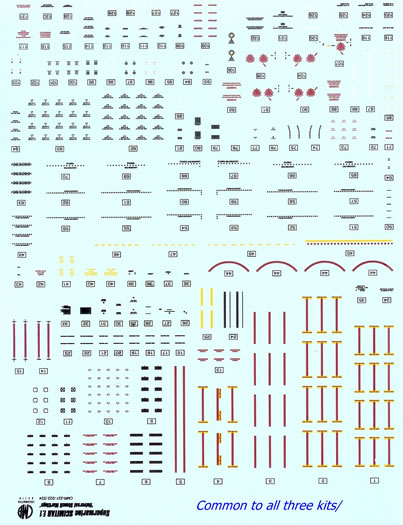
CMR provides a good selection of markings options with each kit, and these are detailed below:
CMR-221 Supermarine Scimitar F.1:
- XD243 — '190/R', No.807 Squadron, R.N.A.S. Lossiemouth, 1958
- XD234 — '147/V', No.803 Squadron, H.M.S. Victorious, 1959
- XD215 — '150/V', No.803 Squadron, H.M.S. Victorious, 1961
- XD215 — '150/H', No.803 Squadron, H.M.S. Hermes, 1962
- XD248 — '190/C', No.807 Squadron, H.M.S. Centaur, 1962
- XD220 — '618', No.736 Squadron, R.N.A.S. Lossiemouth 1965
- XD324 — '158/R', No.803 Squadron, H.M.S. Ark Royal, 1965
- XD324 — '033/R', No.803 Squadron, H.M.S. Ark Royal, 1966
CMR-222 Supermarine Scimitar F.1 (Photo-Reconnaissance):
- XD323 — '162/H', No.804 Squadron, H.M.S. Hermes, 1961
- XD268 — '156/V', ex-No.803 Squadron, *A&AEE, Weapons Flight, West Freugh, 1961
- XD317 — '112/R', No.800 Squadron, H.M.S. Ark Royal, 1963
- XD318 — '154/H', No.803 Squadron, H.M.S. Hermes, 1963
- XD275 — '117/E', No.800B Flight, H.M.S. Eagle, 1966
- XD317 — Airwork Fleet Requirements Unit, Hurn, November 1966
- XD317 — '033', Airwork Fleet Requirements Unit, Hurn, November 1967
- XD317 — '833', Airwork Fleet Requirements Unit, Hurn, May 1969
CMR-224 Supermarine Scimitar F.1 (Early Production):
- XD218 — 7th Production aircraft, SBAC Show, Farnborough, September 1957
- XD230 — '805/FD', No.700X Squadron, Scimitar Intensive Flying Trials Unit, R.N.A.S. Ford, 1958
- XD231 — '152/V', No.803 Squadron, R.N.A.S. Ford, August 1958
- XD229 — 18th Production aircraft, Vickers-Armstrong, Wisley, 1960
- XD229 — Royal Aircraft Establishment (RAE) Weapons Flight, West Freugh, 1964/65
The decals look to be very good quality, with good registration, and my prior experience using CMR’s decals would suggest good colour density as well.
CMR-DS06 Wing-Fold Set
Much interest can be added to a naval aircraft model when the option of folding wings is available. Some modelers also like the fact that like the real aircraft a model with folded wings needs less space. With this in mind CMR has provided a separate wing-fold set. Obviously a separate wing-fold set serves to keep the cost of the standard Scimitar kits lower than would be the case if these extra parts were included as standard. The set may also perhaps be adaptable to the Xtrakit injected offering for those who feel so inclined.
Packaged in a small sturdy top-opening box, the parts are packaged in CMR’s standard manner. The instructions provide a parts map, excellent graphics, and close-up photo images of the real wing-fold which are keyed to the PE parts numbers. Colour call-outs use British names and are cross-referenced FS-595. Two A-4 pages of colour images of Scimitars with their wings folded are also provided.
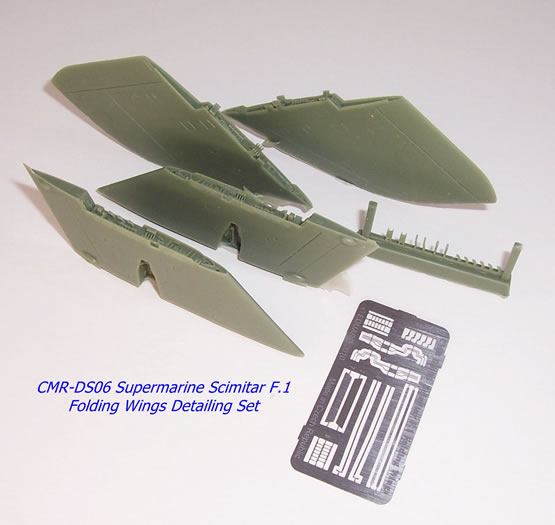
As expected the wings are in four resin parts (flaps are cast with the wings in their up position, unlike for the aircraft kits), with the internal detail of the fold mechanism nicely captured. A plain PE fret provides additional detail in the form of internal plumbing, the piping hinges, a section of the upper wing skin that folds over the hinge area, and wing stays. Some may prefer to use the PE wing stays as a pattern for slightly thicker more 3-dimensional parts. However I think most will stick with the rather complex PE piping loom, although no doubt there will be some really skilled and patient builders who elect to use this as a pattern from pipes fabricated from wire.
The standard of the resin and PE parts the same as for the three Scimitar kits – superb.
These three Scimitar F.1 kits are fine examples of just how good resin multimedia kits can be. CMR in particular obviously undertakes considerable research using wide ranging network of people who volunteer their expertise to ensure a very detailed and accurate kit results. The quality of packaging, instructional graphics and additional information is excellent, and both adds to the enjoyment of the kit, and hopefully the finished results. Resin kit manufacture is a very labour-intensive undertaking, and the nature of the multi-media contents means that these types of kits will never be at the bargain-basement end of the modeling budget. But if you want one of what are surely the definitive Supermarine Scimitar F.1 kits, and I’m allowing for the very good Dynavctor 1/48 vac-form when I write this, then look no further than these new-tool kits from CMR.
At first I thought these kits looked almost as complex as CMR’s earlier Buccaneer offerings, but in fact if you ignore all of the weapons parts they have a fairly low resin parts count, and appear to be surprisingly straightforward to build. There will undoubtedly be some who will curse during some fiddly moments where the use of PE, which whilst ensuring scale finesse will be quite challenging for some. As it stands you will need to be fairly competent with PE when dealing with air-intake boundary control layer plates, the curved air-brakes and Sidewinder fins.
These are superb kits that represent a giant leap forward from all previous Scimitar kits. Of course the much cheaper Xtrakit injected offering will continue to be bought, but for those who want real accuracy, superb detail, scale finesse and a wide range of payloads these kits offer a one-stop solution. And if having folded wings appeals then you can purchase the wing-fold set as an additional item.
It should come as no surprise that I highly recommend these kits.
Thanks to CMR for this review sample.
Review Text and Images Copyright © 2011 by Mark Davies
Page Created 28 October, 2011
Last updated
22 November, 2011
Back to HyperScale Main Page
Back to Reviews Page
|
Home
| What's New |
Features |
Gallery |
Reviews |
Reference |
Forum |
Search