|
Bronco Models 1/35 scale
Seehund XXVIIB/B5
by Stephen Shaner
|

|
Seehund XXVIIB/B5 |

Encore's 1/32 scale Fokker Dr.I is available online from Squadron
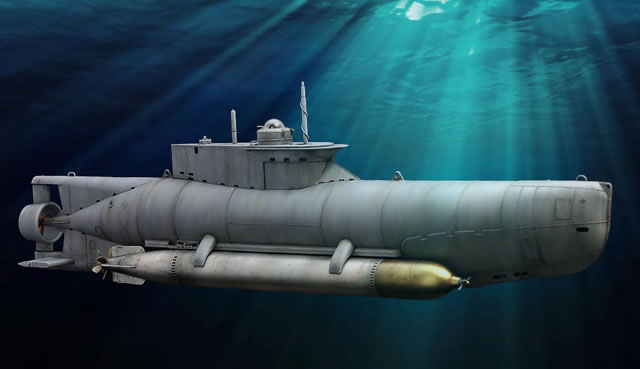
The Type XXVIIB Seehund (Seal) was a two-man German midget submarine appearing late in the war with prototypes launched in 1944 and limited operations beginning in January of 1945. Of short range and duration, the boats were intended for use in coastal operations where groups of Seehund would be directed to attack a specific convoy or target.
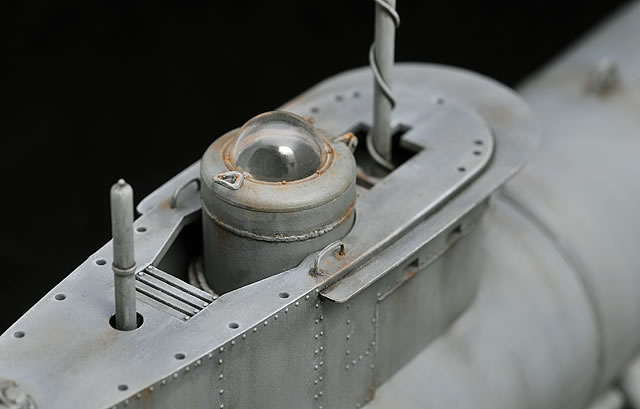
Powered by a small diesel for surface operations and a 25 hp electric motor for submerged maneuvering, the pilot was equipped with a periscope and could navigate via the distinctive plexiglass dome atop the sail. Armament consisted of two standard G7e torpedoes mounted externally on the hull. Later variants were fitted with saddle tanks for additional fuel, a simplified rudder arrangement, and other minor modifications.

Operationally, the boats saw little success and only a few targets were destroyed. References state that out of 142 sorties, nine ships totaling 17,000 – 18,000 tons were sunk and a further three damaged. The cost was the loss of 35 Seehund, some of these to bad weather, and, of course, effort and resources that might have been used more effectively elsewhere poured into a project of limited significance.
A number of Seehund were captured by the allies at war’s end and some were supposedly used by the French post-war. Several surviving examples are currently on display in museums.
The Kit
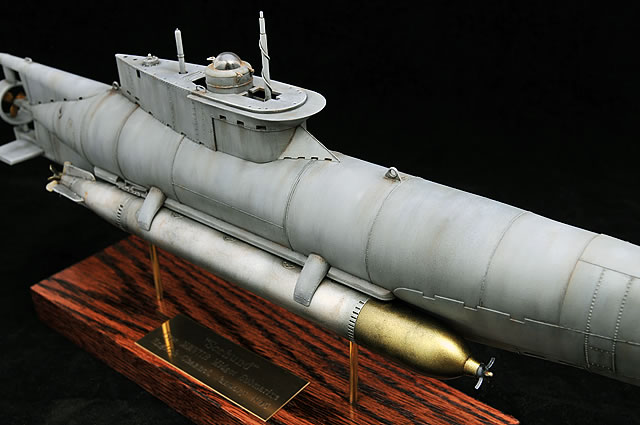
In 1/35 the model is quite large, about 12 inches long, and impressive in the display case when completed. Parts count is low consisting of a few sprues for the sub, two sprues for the G7 torpedoes, a clear sprue for the dome, a small PE fret for torpedo detail and nameplate, a decal sheet, color instructions and a separate painting and marking guide. Also included is a sheet with several corrections to the instructions.
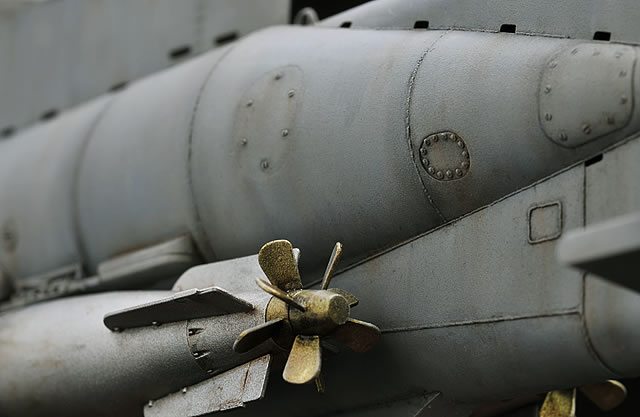
Detail and crispness of the moldings is excellent with superb weld lines, open flood holes and raised rivet and bolt heads. There’s no interior detail, however, and this could be problematic given the clear dome. The torpedoes are miniature kits in themselves with PE details and separate inspection covers.
Hull halves are divided into port and starboard sections. My kit had slight shipping damage to the delicate bow eye, but nothing that wasn’t easily fixed with a little putty. Overall fit is outstanding and the halves mesh perfectly. I spent time making sure the seam would be completely invisible and used Tamiya Liquid Surface Primer and some delicate sanding to smooth it all out. A tiny amount of putty was needed near the rudder.
Bronco gives the option of early and late versions with saddle tanks and simplified rudder. I chose the early model with its distinctive shrouded rudder. Be sure to make note of the correction sheet as several holes need to be opened in the hull and torpedo sides before they’re joined.

I added additional detail in the form of weld lines on the sides of the lifting hooks, a weld seam around the hatch tube, and a few handles made from copper wire.
I’ve read online Bronco may have made taken patterns from a boat that saw service and modification post-war and this is reflected in the top of the coning tower. Reference photos aren’t abundant and there was quite a bit of variation in wartime examples, so I left that part of the kit alone. One period photo showed a periscope wrapped with cable, possibly to reduce wake turbulence like on larger U-Boats, and I replicated that for visual interest. It may not be 100% accurate, but I like the look.

The torpedoes were built separately and, like the sub, care was taken with the seams. The join lines will be mostly hidden once on the finished boat, but I wanted a natural metal finish so the surface needed to be perfectly smooth. The counter-rotating props have individual blades that require finesse and fine PE “whiskers” are fitted to the tips of the warheads.
After applying Tamiya primer from a rattle can, I pre-shaded with black along weld lines then Tamiya acrylics were mixed for the grey base color. I lightened the mix to add highlights and vertical streaking and finally shot a few thin spots of white for subtle mottling on the topsides.
Next, homemade oil-based filters of various shades were applied to weather the paint and add depth. I used blue, white, grey, brownish rust, and even a green below the waterline. Small dots of white, black, burnt umber, and blue oil paints were added with the end of a toothpick and I streaked these down the hull with a clean brush dipped in thinner. This process was repeated until there were many variations in the paint.

A mist of Future allowed a pin wash of black and brown along weld lines and details, and then thinned Tamiya smoke was sprayed to darken and highlight areas. After a flat coat, pastels were used to accent panel lines and add rust effects. I wanted it weathered but not overdone; these boats didn’t see much service and weren’t at sea more than a couple days. Any remaining detail was painted with Vallejo acrylics and the hull was dry brushed to pop raised rivets and bolts.
I chose to build a “generic” Seehund and didn’t use kit supplied decals or marking schemes. Balkenkreuz applied to the sail might have added a nice contrast, but most of my references show rather plain boats devoid of insignia.

The torpedoes received a natural metal finish, so after priming I painted them black to give a base for the steel and brass. Testor's Metalizer enamels (non-buffing) were used and went on without incident. It was the first time I’d used them and was pleased at how easy they were to work with and how great they look – Metalizers will definitely become part of my modeling routine! I also used Alclad magnesium for subtle variation. I weathered with Tamiya smoke and pastels and the torpedoes were attached to the hull.
The Seehund is an impressive kit and looks menacing with its torpedoes slung alongside. Out of the box it builds into a fine example of the type but there’s certainly room for additional detail and great potential for dioramas. References are not abundant, however, and I felt at a bit of a disadvantage in that regard. I plan to add a crewmember for scale in the open hatch, but need to locate a suitable figure.
While some may see this as a quick weekend project, I spent several weeks adding small details, making sure the build was just right, and spent a lot of time on the various weathering steps. This was my first marine project and I’ve since completed a 1/144 Type XXIII U-Boat.
Model and Text Copyright ©
2011 by Stephen Shaner
Page Created 28 April, 2011
Last Updated
28 April, 2011
Back to
HyperScale Main Page

|
Home
| What's New |
Features |
Gallery |
Reviews |
Reference |
Forum |
Search