Hasegawa 1/72 scale F-101A Conversion
A Bentwaters Bird
by Gregory Conterio
 |
F-101A 92nd TFS, 81st TFW |

Academy's 1/48 scale Spitfire Mk.XIVe is available online from Squadron
 Have you ever become a little obsessed with a particular modeling subject? Wait a minute, who am I talking to? Okay, a little more obsessed than normal? Have you ever become a little obsessed with a particular modeling subject? Wait a minute, who am I talking to? Okay, a little more obsessed than normal?
I’ve always had a really wide array of interests in modeling, so much so that I have a hard time picking favorite subjects. But this past year, I found myself overcome with an all-encompassing infatuation with the McDonnell F-101 Voodoo. It’s not like I’d just discovered the Voodoo, I have been well-acquainted with the plane since I was in grade school, and have always liked it. But this is a different thing for me, becoming so obsessive over a single type. I found myself scouring the internet for photos and accounts from people who flew and maintained it, haunting Ebay, bidding on long out of production kits and decals, even considering artifacts, like old parts! I don’t recall ever being so focused on a particular type before. Usually I would eventually get bored with the subject, or have my interest torn away by something else, especially when I had a project languishing on the bench for a while, but not this time. I figured I’d just go with it!
The Airplane
The F-101 has a really fascinating history. Its lineage begins with the XF-88 penetration fighter project launched by the Air Force in the late 1940s, which was looking for the jet-version of the P-51. The XF-88 was determined the winner of a flying competition between three prototypes, including the Lockheed XF-90, and the North American XF-93, which was a development of the Sabre. Even though the McDonnell airplane won the competition, no order was forthcoming, despite what to all appearances was a promising design with great development potential. Interestingly enough, McDonnell designed and developed their own afterburner for the XF-88 when Westinghouse, the maker of its J-34 engine declined to develop one themselves. This was installed and successfully flown on the second of the two XF-88 prototypes.
In 1951, the Air Force changed its mind, and decided to ask McDonnell to develop an updated version of the XF-88 when SAC issued a minimum set of requirements for a fighter to escort their intercontinental bomber force. SAC had not been happy with the cancellation of the XF-88, and events over Korea were proving that existing types were poorly suited to protect the B-29s, prompting McDonnell to re-design of the Voodoo. The resulting fighter was envisioned to fulfill not only the role of bomber protection, but also as a nuclear strike fighter, which as it happened was a very fortuitous decision. The emerging design was exceptionally versatile, variously fulfilling the roles of nuclear striker, air defense interceptor, and low-level photo-reconnaissance over its long service life, even though its principle role as an escort was never realized.
The first models of the Voodoo entering service were the A and C, which were outwardly identical according to my sources. The initial production run featured an airframe stressed to withstand 6g. The plan initially was to upgrade these airframes later to the specified requirement of 7g, but this proved unworkable, and when the 7g airframes started coming off the line, they were designated as F-101Cs.
While the Voodoo was well-liked by pilots, it did possess one vice that was not ever overcome. The F-101 was particularly prone to a pitch-up when accelerating at high AOA due to the horizontal tail being masked by the wing. The airplane could easily depart controlled flight and become unrecoverable. The problem was addressed by automatic controls and special training designed to make the pilot aware of the threat, but was never completely eliminated.
The Kit
My obsession with the Voodoo was a bit of a two-edged sword. Due to my self-imposed rule about building jets only in 1/72nd, I could not avail myself of the readily available, and by all accounts excellent Revell-Monogram F-101B in 1/48th. This meant I had three options available to me: the generally bad Matchbox kit, the ancient but still very good Hasegawa kit of the RF-101C, and the excellent but little-known pantograph of the Revell-Monogram kit in 1/72nd. Unfortunately, these are all long out of production, especially so the R-M kit, which I don’t think has been re-released since 1996. It did however mean I had two basic versions to work from, instead of just one, and as the single-seat Voodoos are more interesting to me, this was a good thing. It also meant some serious time on EBay, where I eventually acquired three(!) each of the Hasegawa and R-M offerings. A second problem is a serious scarcity of marking options in 1/72nd scale. In this instance, and quite by accident, I discovered that Hannants actually has quite an excellent stock of legacy aftermarket stuff for the F-101 in 1/72nd including the Airwaves F-101A/C conversion set! Major happy dance! Being as I have a genetic condition which renders me completely unable to build any kit without some (usually lots!) of aftermarket parts and markings, this was a huge score! I have several Voodoos ahead of me, but for this particular project I chose to convert one of the older of the three Hasegawa RF-101C kits into an “A.”

One of the things I discovered is there has actually been two slightly different kits of the Hasegawa RF, the distinction being in the nose, and the arrangement of the camera windows. After checking references and determining the older one to be less-accurate, and being as it would be receiving a major rhinoplasty, this was the kit I picked.
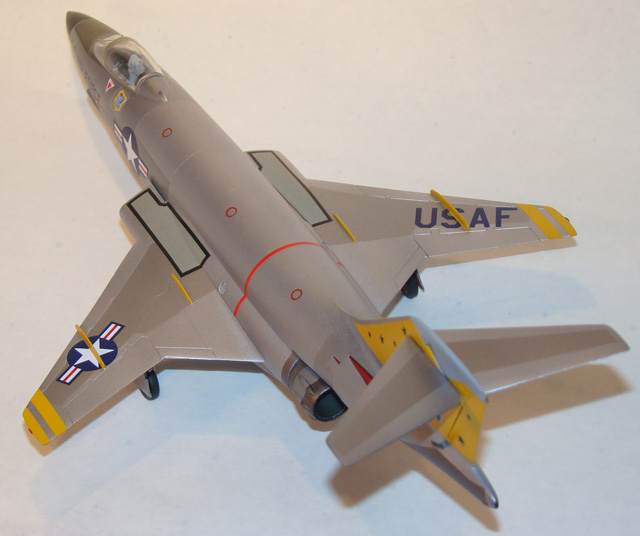
Back in the mid-1970s, during my early years in High School, I took some time off from being as socially un-cool as possible to build a Hasegawa RF-101C, which was not a new kit even then. I do remember it coming out especially well though, and being really impressed with it. The Hasegawa kit is really good in dimension and outline, even if really old, with sparse detail in many areas, and raised panel lines. This was my first effort at re-scribing an entire kit, which was not such a bad experience. I used the Dymo tape method, cutting sections of the rigid plastic self-adhesive tape, and using it as a straight-edge to guide my scriber. It’s because of model kits like this Hasegawa developed the reputation they have today. Despite its age, the fit is not at all bad. It took a little filler and sanding here & there, but really no big problems. I decided to dress-up the wheel wells just a bit by removing some of the detail within the main wheel area, and replacing it with parallel stringers of strip styrene perpendicular to the fuselage, which based on photos is a more accurate representation. I also dressed up the cockpit by adding a reasonable facsimile of an instrument panel, a control stick, some side console detail, and a replacement seat, compliments of Hannants. As the canopy would be closed on this model, I judged this to be acceptable. I also lopped-off the rearmost tip of the vertical tail, glued-on a chunk of clear styrene, and sculpted it into a clear light housing. The main gear legs are inaccurately portrayed as simple, straight posts, so I dressed these up into a more accurate representation, replacing the actuator arms with telescoping brass rod cut and bent to shape. I had originally intended to close the speed brakes, but completely forgot about them until after I had commenced the finishing process, so I elected to position them only slightly open, again replacing the actuators with brass. This helped conceal their fanciful internal detail. I don’t know if this is an accurate portrayal, but I like to pretend they are in the act of being closed by the invisible pilot! The nose gear of the F-101 had a prominent pair of lights mounted facing forward, the right one characteristically mounted slightly higher than its mate. I used MV lenses to reproduce these, and also added the prominent springs on either side of the upper-main gear, which can be readily seen in many photos.
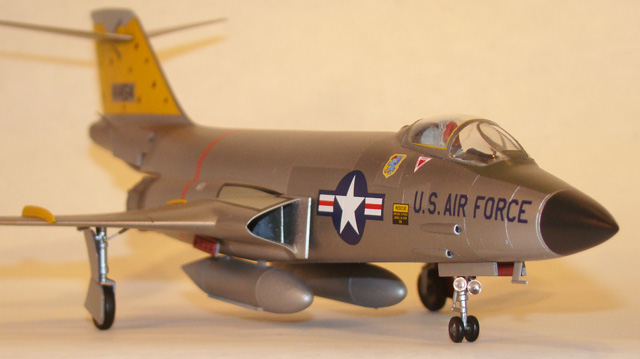
By far the biggest change was to the nose of the kit. The RF nose had to be carefully removed by cutting along a vertical panel line just in front of the cockpit, including the front sill of the windshield. The resin replacement nose must then be glued to the front of the model and blended into the fuselage, which really isn’t at all difficult. One must take special care though to make sure it’s aligned correctly. The biggest challenge was carefully blending the windscreen into the resin sill, which required much patience, and several rounds of filling and sanding to achieve the desired result. The bulges for the four 20mm canons provided by Airwaves are cast in white metal, and represent the closed-up ports found on later aircraft, as a common modification was to remove one or more of the rarely used canons. Since I wanted to represent an early aircraft retaining all four canons, I fashioned my own bulges from plastic tube, carefully cut at a very fine diagonal, and sanded to shape. My final modifications to the kit included the addition of an emergency arrestor hook, constructed of strip styrene, and mounted in the appropriate location, and the addition of a longitudinal strake made from sheet styrene to each external fuel tank.
One of the other challenges inherent in this project is that reference material is as long out of production as the kits are, so acquiring the titles I was looking for took some time and persistence. If you go on Ebay right now in fact and search for “F-101 Voodoo” you will likely find a couple of yahoos trying to sell the old Bert Kinzey Detail & Scale title for fairly astronomical prices. I may be obsessed, but there’s no way I’m paying between $80 and 160 for an old, used copy of Detail & Scale! I did manage to find my copy at an online aviation book seller for a more reasonable $30.
In sadly typical fashion, I decided the markings I had to do were not covered by any available decals, real or wished-for, despite having found three different sets of old but perfectly acceptable markings from Almark and Expert’s Choice. I was thus forced to create some of my own decals.
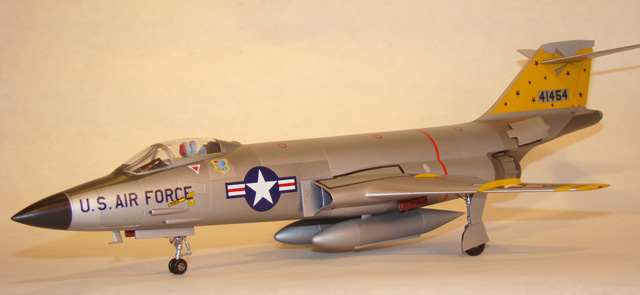
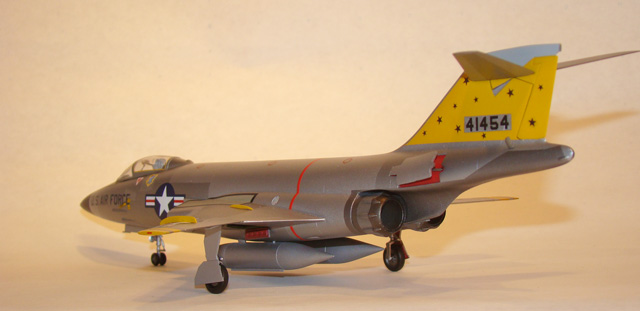
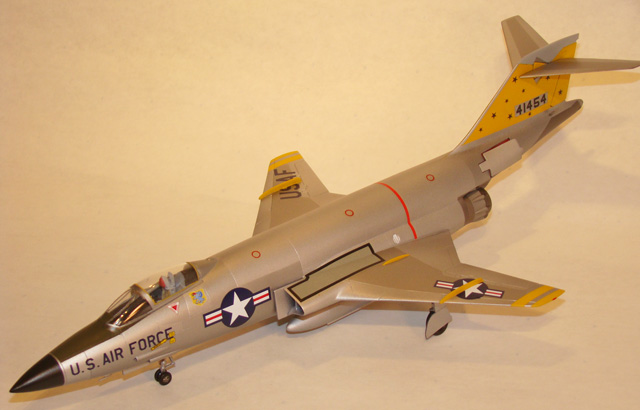
The A and C models of the Voodoo really only had one possible mission, delivery of tactical nukes, and thus had a very short career. In this role, they were deployed to Europe, based at RAF Bentwaters & Woodbridge, where they formed three squadrons under the 81st Tactical Fighter Wing. The three different squadrons featured flash colors of red, blue and yellow, with several of the well-documented wing commander’s birds sporting a fin flash of all three. Needless to say, the one that appealed to me is the rather poorly documented 92nd squadron, with yellow markings. I have come up with precisely two photos of 92nd squadron birds, one fortunately in color, on page 33 of the D&S book.
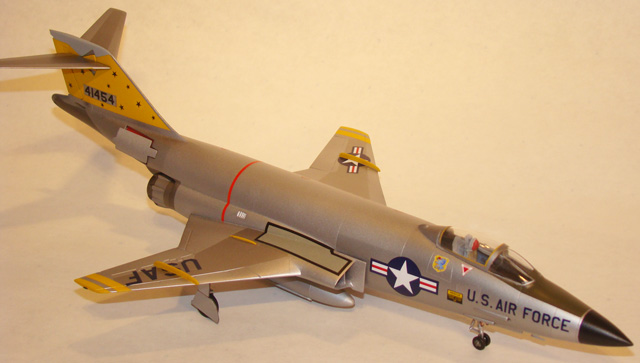
A and C model F-101s were left in natural metal in nearly all cases I can find, so the model was finished in Alclad II, utilizing at least four different shades to reproduce the different panels, based on photos. The yellow markings were masked off and painted with a custom mixed shade of PollyScale acrylic, with the radome, anti-glare panel and fin cap also getting the PollyScale treatment. The markings are a hodge-podge of different decals, and after the obligatory layer of Future, I started on these. The stars on the tail, and the 81st TFW badge under the cockpit were custom made by yours truly. The tail number ironically came from the Almark sheet, where it was incorrectly attributed to a red-tailed C model. The rest of the markings came from the kit decal sheet, or Expert’s Choice. The whole thing got a final coat of Aeromaster clear in a custom mix of gloss/flat. I haven’t yet applied any weathering, as the Bentwaters Birds appear to have been kept pretty clean in the pics I’ve seen, but I will probably go back and add a little bit of powdered pastels to give it just a bit of interest and added depth.
Well, it’s not perfect, but it was actually one of the most enjoyable builds I’ve done in a while, and I’m very happy with how it came out. Despite an extended time on my bench, and interruptions waiting to acquire references, blank decal material, and other items, I never lost interest or enthusiasm for this project. It really is too bad the Voodoo does not receive more attention in the modeling world today. It was an iconic cold warrior, and presents a wide array of very interesting and colorful marking possibilities. I of course will be doing more of them, with five kits waiting in my “inventory” and one of the very lovely R-M F-101Bs already in progress. I think I may well have to do another conversion though, because this one was just too much fun!
(Note, as I was preparing to send this off to Brett, I found a listing for a soon to be re-released Hasegawa RF-101C in Sun Run markings, so Voodoo fans, rejoice!)
References
-
Detail & Scale No. 21 by Bert Kinzey
-
Air Force Legends No. 205 – McDonnell XF-88 Voodoo by Steve Pace
-
Aerofax Minigraph 5 – McDonnell F-101B/F by Kevin Keaveney
-
Osprey Air Combat – McDonell F-101 by Robert F. Dorr
-
Wings Magazine Vol. 29 No.4
-
Many, many different Internet sites.
Model, Images and Text Copyright ©
2011 by Gregory Conterio
Page Created 13 July, 2011
Last Updated
14 July, 2011
Back to
HyperScale Main Page

|
 Home
| What's New | Features | Gallery | Reviews | Reference | Resource Guides | Forum |
Home
| What's New | Features | Gallery | Reviews | Reference | Resource Guides | Forum |