Sopwith Pup Decals
Review and Full Build
Pheon Models,
1/32 scale
S u m m a r y |
Catalogue Numbers: |
Three sets:
32013 Sopwith Pups of the RFC
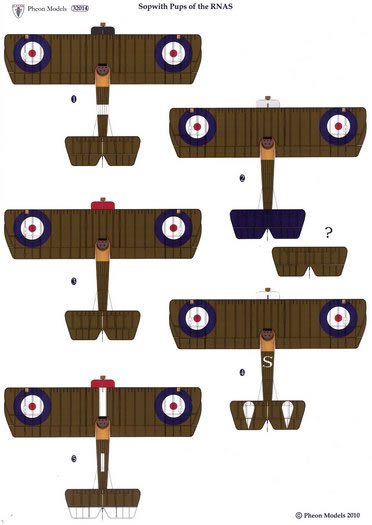
32014 Sopwith Pups of the RNAS
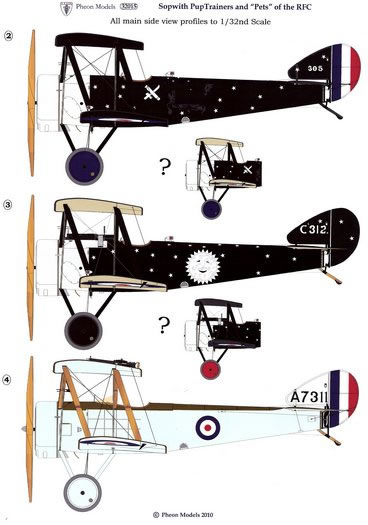
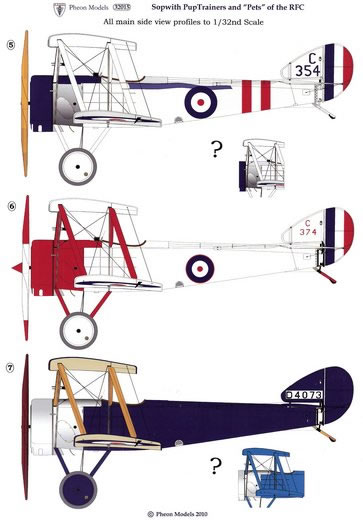
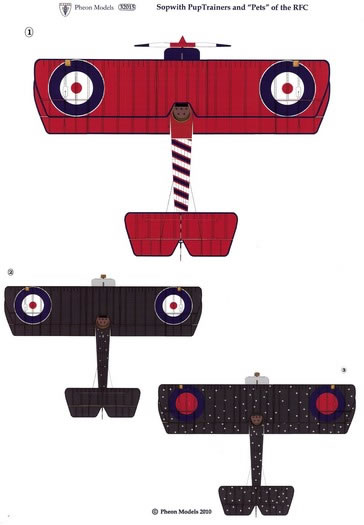
32015 Sopwith Pup Trainers and “Pets” of the RFC |
Scale: |
1/32 |
Contents and Media: |
Waterslide decals, colour profiles, instructions and notes |
Price: |
32013 & 32014 GBP £10.50 each
32015 GBP £17.50
Post & packing:
1st Class £3.60 to the UK & Europe, £4.95 to the rest of the world.
2nd Class: £2.52 to the UK & Europe, £2.70 to the rest of the world.
Payment by Paypal.
Ordering is by email to pheon.models@hotmail.co.uk |
Review Type: |
Build |
Advantages: |
Extensive selection of markings, well researched |
Disadvantages: |
|
Conclusion: |
Interesting options for finishing your Wingnut Wings Sopwith Pup differently to the rest. The “Trainers and Pets scheme” is particularly eye catching. |
Reviewed by James Fahey

HyperScale is proudly sponsored by
Squadron.com
Pheon Models have just released three decal sets for use with the Wingnut Wings Sopwith Pup. Each set comes with full colour A4 sized profiles showing decal placements and an instruction booklet describing service history, any kit modifications required for specific aircraft, general colouring notes, references, and decal application guide for each aircraft and pilot.
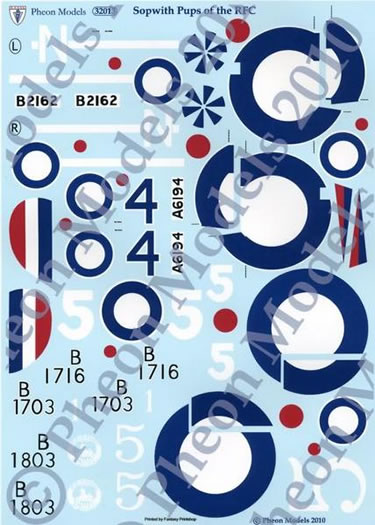
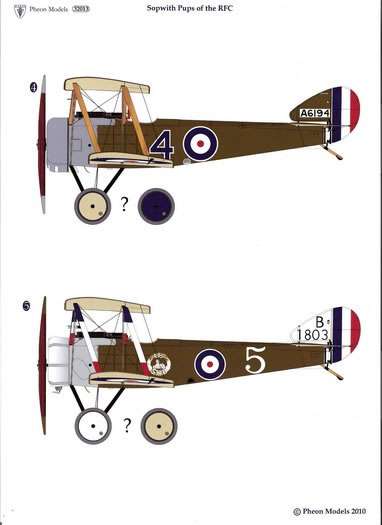
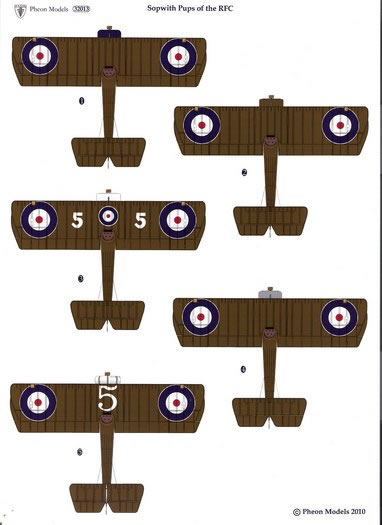
#32013 Sopwith Pups of the RFC
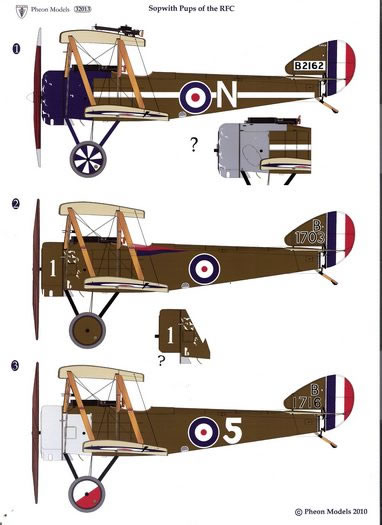
Five fighting Pups:
1. B2162 Whitehead-built. Lt Pritt 66 Sqn., September 1917 With additional over-wing Lewis gun.
2. B1703 Standard Motor Co built. Capt.J.O.Andrews 66 Sqn., June 1917.
3. B1716 Standard Motor Co built. 2/Lt F.B.Barager 46 Sqn., June 1917
4. A6194 Whitehead-built. Capt.L.H.Smith 66 Sqn., May 1917.
5. B1803 Standard Motor Co built, fitted with Gnome Mono 100hp engine and ventilated, horseshoe cowling. 2/Lt A.B.Garnon-Williams 113 (HD) Sqn, Throwley, England August 1917.
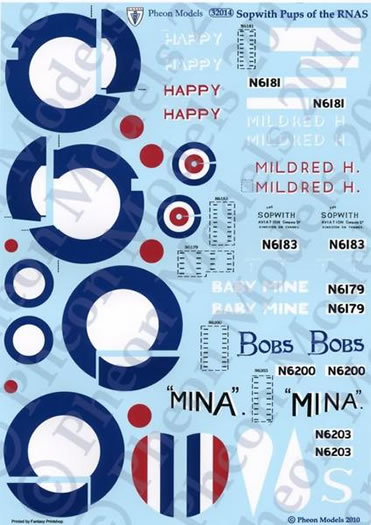
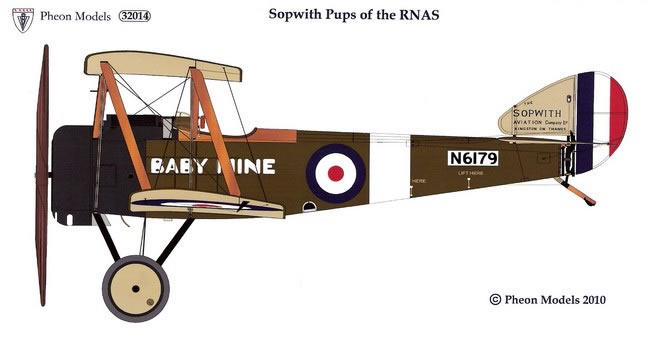
#32014 Sopwith Pups of the RNAS
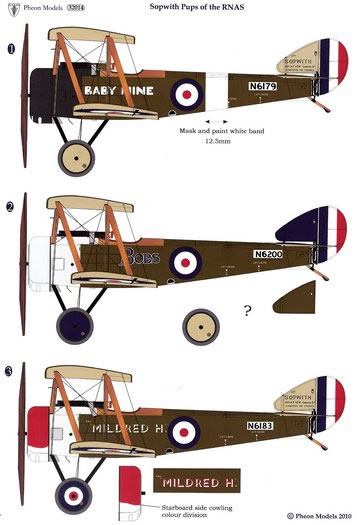
All Sopwith-built Pups:
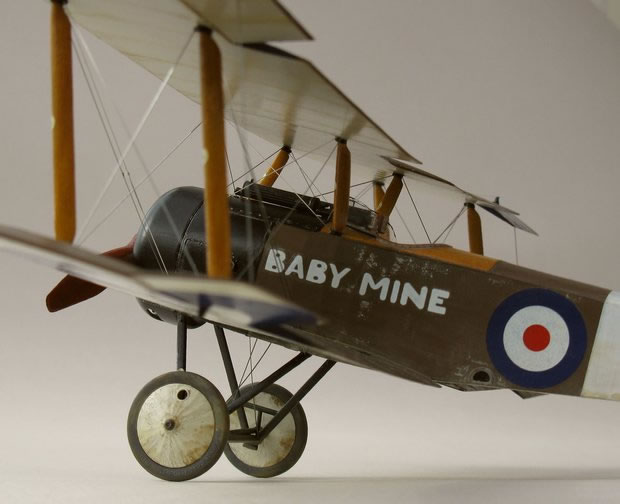
1. N6179 "Baby Mine" Sub-Lt. J.J.Malone, 3 Naval Squadron, April 1917
2. N6200 "Bobs" Flt.Cdr.A.M.Snook, 4 Naval Squadron, May 1917
3. N6183 "Mildred H" Flt.Cdr. J.A.Glenn, 3 Naval Squadron, April 1917
4. N6203 "Mina" Flt.Cdr.L.H.Slatter, Seaplane Defence Flight, Dunkirk, July 1917
5. N6181 "Happy" Flt.Cdr.L.S.Breadner, 3 Naval Squadron, April 1917
Note that two of these aircraft featured non-standard windscreens that are not included in the WNW kit. Pheon provide an acetate sheet printed with outlines of the two windscreens that just need to be cut out and folded.
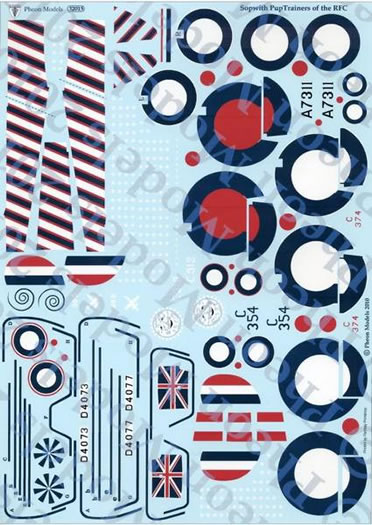
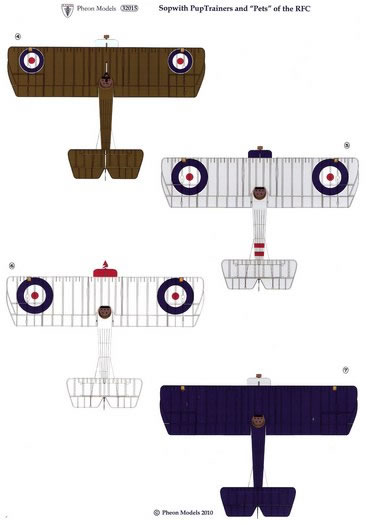
#32015 Sopwith Pup Trainers and “Pets” of the RFC
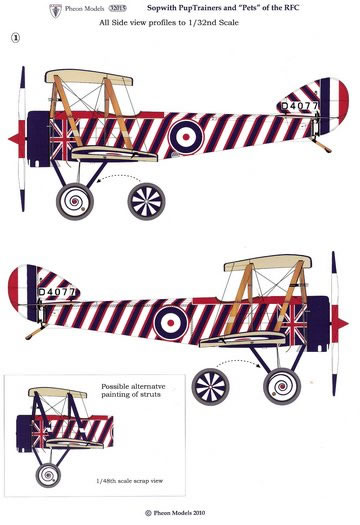
Seven options, some of which are really spectacular and others have little more than a serial number:
1. D4077 Whitehead-built. 70 Training Squadron, Central Flying School Upavon. This patriotic "Union Jack" Pup is absolutely spectacular! Note that all the blue edging is provided as decals.
2. C305 Standard-built. 189 (Night) Training Squadron, Suttons Farm 1918. Black with white stars. Some modifications are required to the kit: a large access hatch, night flying lights and the cockpit opening was reduced in size.
3. C312 Standard-built. 189 (Night) Training Squadron, Suttons Farm 1918. No fuselage locker on this one and features a nice smiling moon face and a sprinkling of white stars over the black fuselage and flying surfaces. Nice!
4. A7311 Standard-built. James McCudden’s famous Gotha hunter. No Vickers machine gun but has an overwing Lewis instead. Features a non-standard windscreen for which a template is provided.
5. C354 Standard-built. Overall aluminium-doped with redfuselage bands and a blue cowling
6. C374 Standard-built. Overall white with red nose and struts.
7. D4073 Whitehead-built. Overall blue (conjectural) and devoid of national markings.
A reference sheet is included in this set with details of the Neame illuminated sight, lights and Holt flares beneath the wings, which will need to be scratch built.
Each set includes tiny serials to be applied under the wings.
Additional sets of national markings (only) are available separately from Pheon to enable multiple versions to be completed from the three main sets.
I have reviewed all Pheon Models’ decal releases as ‘First Looks’ here at Hyperscale but happily the release of this set coincided with a group build of the Wingnut Wings Sopwith Pup at the local IPMS club, so this review is my first ‘Build’ review.
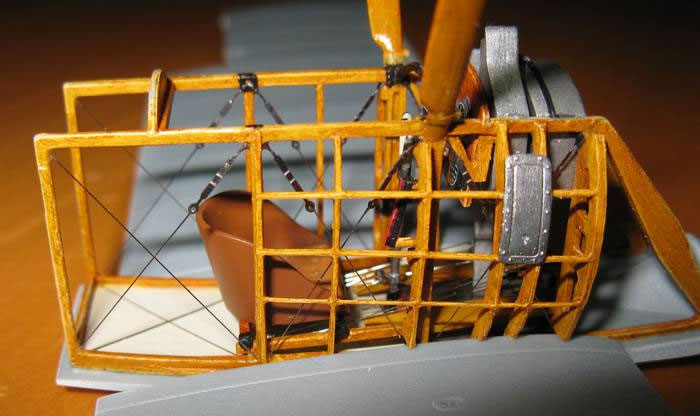
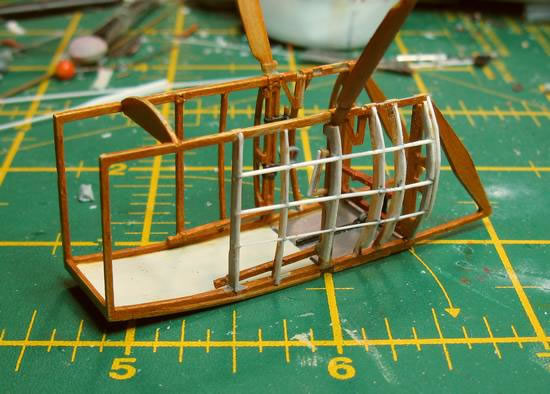
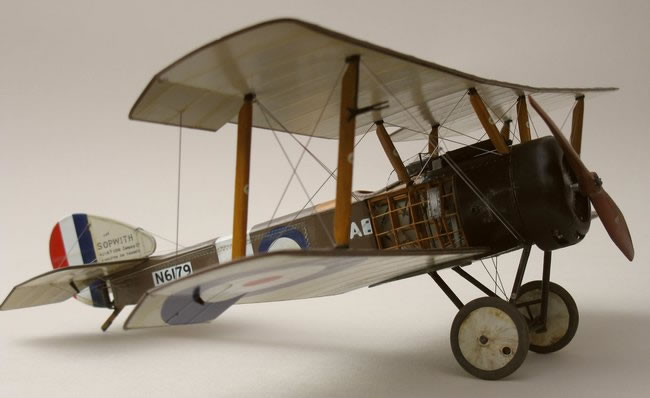
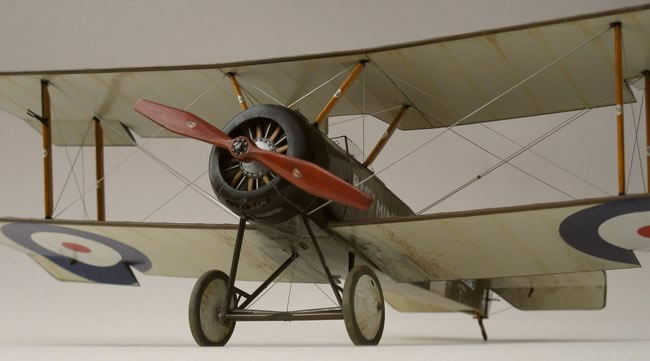
In order to show off more of the detailed cockpit interior I decided to partly cut away one side of the fuselage. Its relatively straightforward to do in this case, basically just some additional fuselage framing made up from plasticard.
Two new vertical frames need to be added on the left side and three on the right side (there is an extra one by the ammo can inspection hatch). Three horizontal stringers were added on the cutaway, of the thinnest square section rod available (I heat stretched some 60x60 thou). It’s a bit fiddly getting these to run in a straight line on each of the upright frames without bends. A bit of trial and error here getting the width and bow of the vertical frames right. I also had to widen up the two kit vertical frames to compensate for the missing thickness of the kit fuselage.
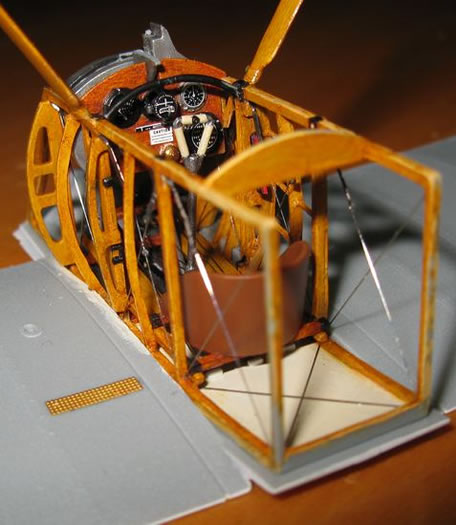
The main challenge with a cutaway is that the kit has thick fuselage walls made of plastic not linen, and the interior has been designed to fit accordingly.
Annealing the seat belts over a candle makes them much more malleable, but be careful not to overdo the heating, especially on the fine clips, as it is possible to melt the metal (ask one of the other IPMS chaps!).
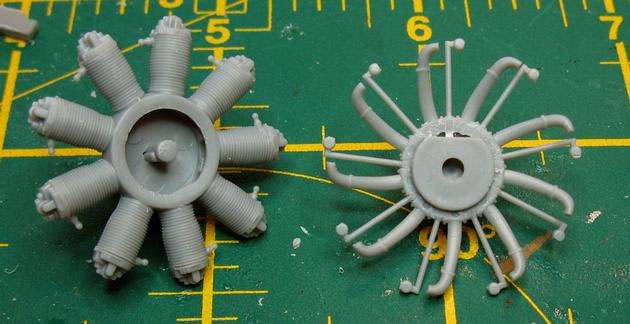
Some modellers have noted that the Le Rhone engine inlet manifolds aren’t long enough to reach the valves on the cylinder heads. Actually the problem is that front half doesn’t align exactly with the rear half – it needs to be rotated slightly, which is easy enough to do once the flat cutout on the inside is enlarged (see attached photo).
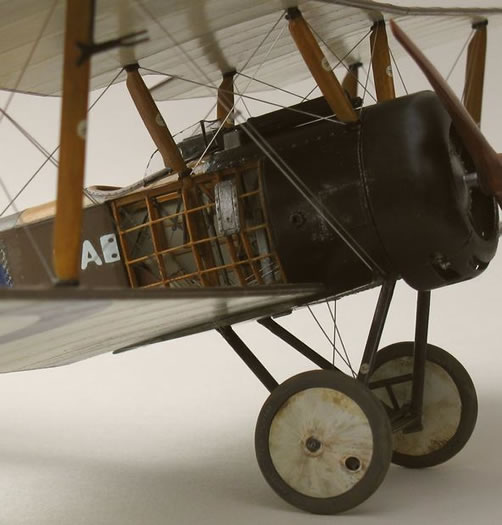
Replicating Wear & Tear
Looking at The Vintage Aviator Limited’s (TVAL) aircraft over at Hood Aerodrome and looking at some of the photos in the WNW instruction booklet I thought some heavier weathering would be in order. Its difficult to get rotary engine castor oil residues off fabric without stripping the dope off, easier to keep the metal panels somewhat cleaner. After flight a rotary engine covers the undercarriage and lower fuselage in glossy dark grey/green oil, positively dripping! I know the ground crew would have given the aircraft a wipe down but over time the exhaust residue shows significant build up. On top of that there is mad splatters thrown up by the wheels. Many period photos show very muddy fields. Even the TVAL aircraft at Hood Aerodrome have lots of mud splatters. Of course these would a different colour to the castor oil.
On the fuselage sides and top surfaces I used different types of clear coats to break up the finish. The overall finish is semi-gloss with random areas of matt, especially where pilots and ground crew would have stood, clambered over or grabbed on to (centre section of top wing). Some chipping of the PC10/12 finish would be evident where fabric panels would be regularly unlaced or boots repeatedly scuffed.
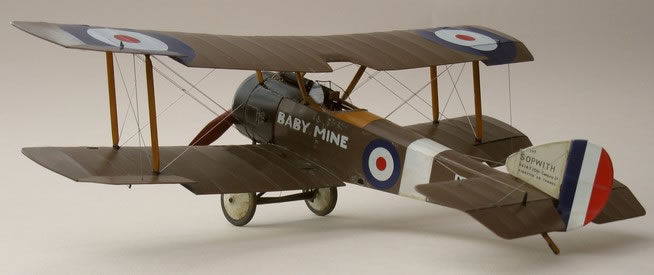
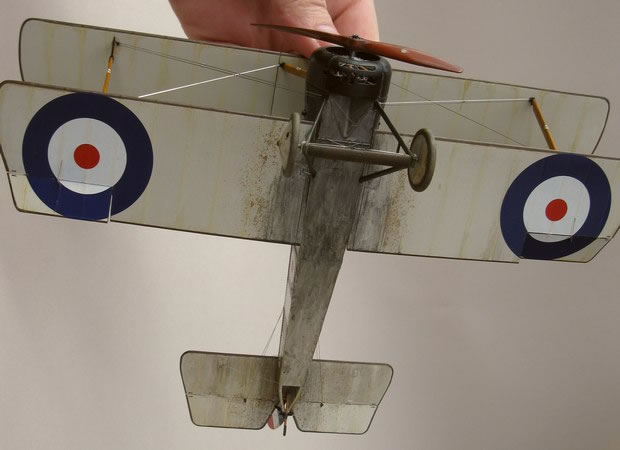
Applying the Decals
I chose ‘Baby Mine’ from the RNAS set because I liked the Sopwith company logo on the fin combined with the black nose.
I used a little Micro Set (the weaker solution) on the decals and carefully followed the instructions about not leaving them too long in the water. Unfortunately I didn’t wait long enough for the Future/Klear gloss coat to cure before putting the decals on. One day is not long enough! There was some clouding visible under the clear sections of decal film. Rats! I tried putting more Future/Klear on top but it made no difference. Problem partly solved by muddy weathering around the Lift Here markings.
Next problem unintentionally proved to be the ultimate decal strength test. I used Tamiya masking tape on either side of the rib tapes to paint a matt coat, to make the rib tapes stand out slightly. When I carefully removed the masking tape the roundels became unstuck and in one place ripped off. Double Rats! Fortunately for me I also had a set of Pup national markings from Pheon which meant I could replace the roundels. Second time around I laid the roundels down on top of a wet coat of Future/Klear. I have read of modellers using this technique but this was the first time I have tried it myself. Great results! The decals sucked down hard, no softening solutions required. I will definitely do this again. I noticed the opacity of the white was improved using this technique as well.
One of the fuselage roundels also struggled with the handling it received during the rigging process and half of the roundel came unstuck. Easily fixed by brushing Future/Klear under the loose bit and smoothing it back down.
One roundel was applied over the fuselage lacing – it needed slicing across the lacing strip to help it settle down.
Rigging
I used RB Productions RAF streamline rigging wires for all the rigging and 0.005” stainless steel wire for the control cables. Having built the WNW LVG I was very aware of the risk of bowed/sagging wires. I think the mistake on my LVG was using PVA white glue for the main rigging wires, which could pull if the wings are flexed. So I opted for using CA to glue all the rigging wires. I tried making up the tiny terminal pieces from RB Productions but it was just too difficult, they are TINY and while I am a fairly patient modeller (I have rigged a Taube, a Felixstowe, a Short 184 and a Zeppelin Staaken) this was too much for me. The terminal attachments are not complete in any case, they still need a mounting plate to fit to.
There is a fair bit of trial and error as far as measuring the length goes because some areas are too difficult to get the dividers into. The streamlined wire is relatively easy to cut compared to the stainless steel wire. I am still not 100% happy with the results, some the wires did still bow slightly. Richard Alexander from Wingnut Wings advocates using elastic thread.
Pheon’s thorough research is very evident in the notes on each aircraft and the detailed colour profiles. The problems I had with the decals were all my own fault. They are thin, have minimal clear film, and settle down well. I have no hesitation in recommending them.
The Pup “Trainers and Pets” set is so colourful and attractive that I have ordered another Pup, to be finished in the patriotic Union flag and stripes finish. As a plus, most of the trainer schemes don’t have a Vickers machine gun fitted so the lovely instrument panel won’t be hidden from view.
Thanks to Pheon Models for the review samples.
available from pheon.models@hotmail.co.uk
Text and Images Copyright © 2010 by James Fahey
Page Created 11 August, 2010
Last updated
12 August, 2010
Back to HyperScale Main Page

|
 Home
| What's New | Features | Gallery | Reviews | Reference | Resource Guides | Forum |
Home
| What's New | Features | Gallery | Reviews | Reference | Resource Guides | Forum |