|
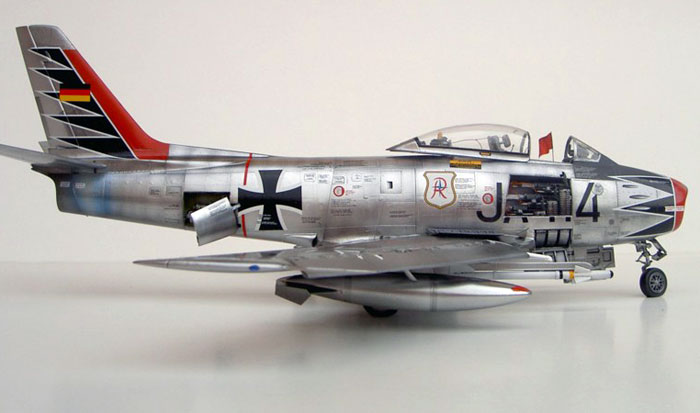
Hasegawa's 1/48 scale F-86
Canadair CL-13 Sabre Mk.6
by Hubert Ortinger
|
Canadaire CL-13 Sabre Mk.6 |

Revell's 1/48 scale Sabre Mk.6 is available online from Squadron.com
Background
In 1943 the project team of North American Aviation began to develop a jet fighter on the substructure of the successful P-51 (Mustang), but as recently as in 1944, when the U.S. NAVY announced a contract for a new fighter/bombers and fighter aircraft, North American came into play with its design NA-134.
After a while they engaged again with a more developed draft (NA 136) for the US Army Air Force, which need a similar aircraft.
Although in May 1945 the USAAF already ordered three prototypes and issued the production, the technicians of NA again revised the draft on its own authority. They incorporated experience from German engineers available after the end of the war, and even obtained evidence in the wind-up.
As a result, the NA-140 was designed with 35° swept wings and the profile of the Me 262 (the first series-produced fighter jet) was even used. Over the entire span there are now extending slats.
For the FJ-1 Fury designated Navy machine they couldn´t achieve this, because with straight wings the Navy hoped for better landings at low speeds on a carrier deck. An error as it turned out…
About a year after the Fury, at 1.Okt.'47 the XP-86 lifted for the first time and even reached Mach 1.
From 1949 onward 554 examples of the aircraft were delivered, now designated as F-86A - just in time for the Korean War to turn the tide for the aerial combat. It was the only model which was at least a match for the Mig-15 and the UN allies success with a rate of 4:1!
In 1949, the Canadian Air Force Sabre got attention, and the company Canadair North American deal with a contract for the license and produced in an initial series 100 F-86A for the Royal Canadian Air Force under the designation CL-13 Sabre Mk.1. It was followed by several versions, which are almost exclusively made by other engines. For the Mk.VI the most powerful Jet engine (Orenda 14)was used and made it the ultimate jet fighter of his time.
German Air Force
Commencing on April 1st. 1956 the new German Air Force needed a fighter and the Army chose the Canadair Sabre Mk.6, also because the Canadian Air Force used Mk.5´for the training for free. (but spare parts were very expensive!)
After initial training for technicians and flight instructors (220 former pilots of the Reichsluftwaffe) who are still held in Canada, in'57, the operations began in Germany.
The main tasks of the Luftwaffenschule LW 10, the first flying unit was to deploy the squadrons: JG 71/72/73 and train them.
The Sabre certainly was already outdated from its introduction and had no chance in simulated battles against the latest American designs like the F-100, F-102 or the British Hawker Hunter, also because of the lack of a after burner. For the proposed role to defence against Soviet bomber, they would not have been appropriate because the speed of the Sabre was roughly the same as the bomber. On the other side you must remember that the first pilots of the new German Air Force had no experience with newer models, simply since the end of the 2nd World War although no more than 10 years had passed. But the planes were quick and easy to obtain, quick and easy to learn new experiences. Because of its very good flight characteristics the Sabre was also the ultimate dream aircraft for many pilots.
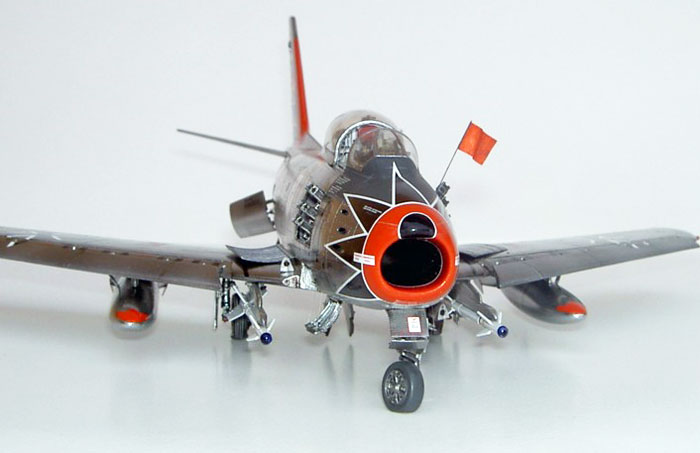
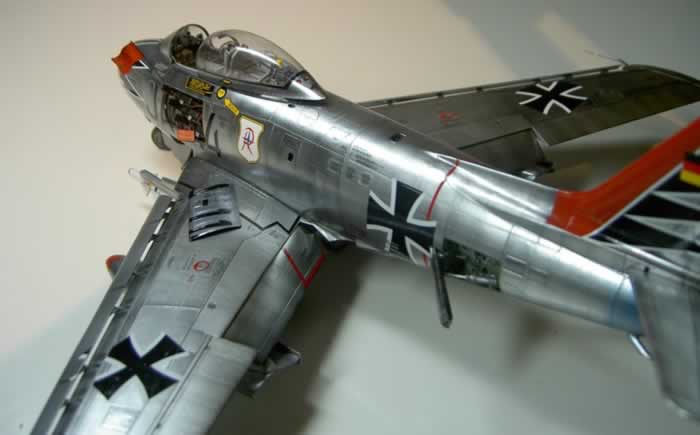
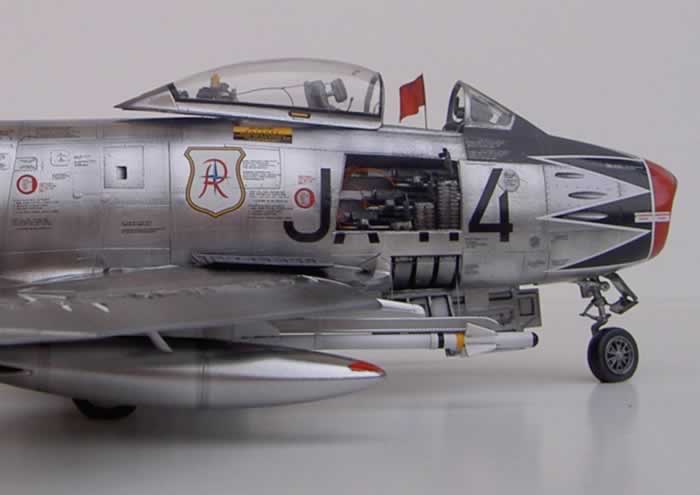
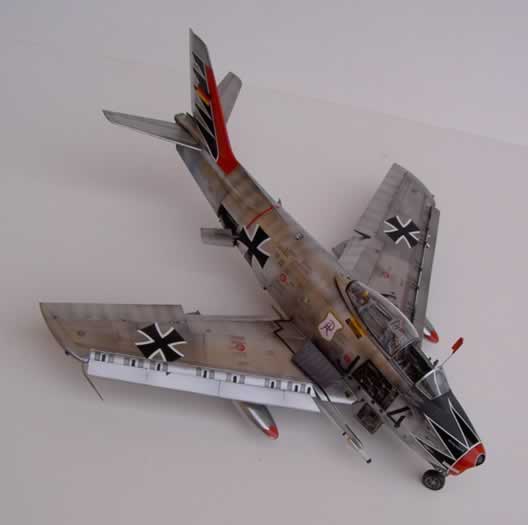
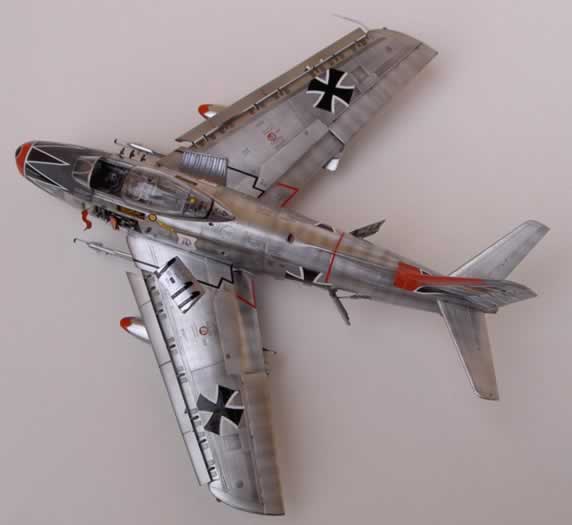
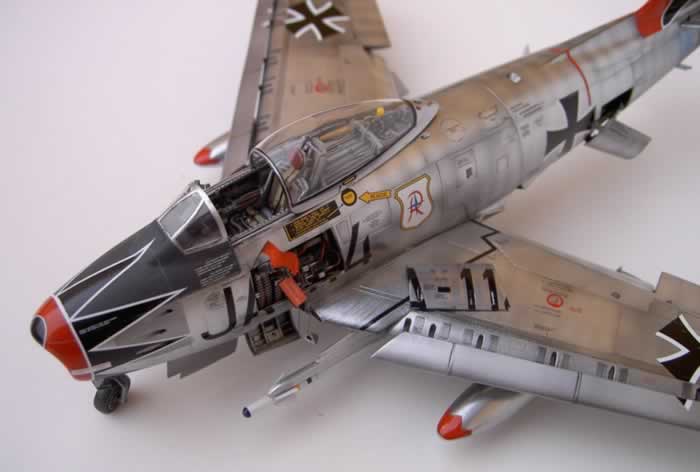
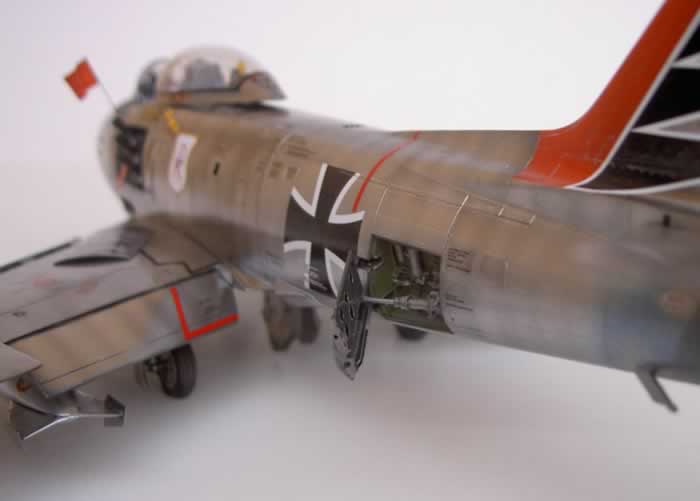
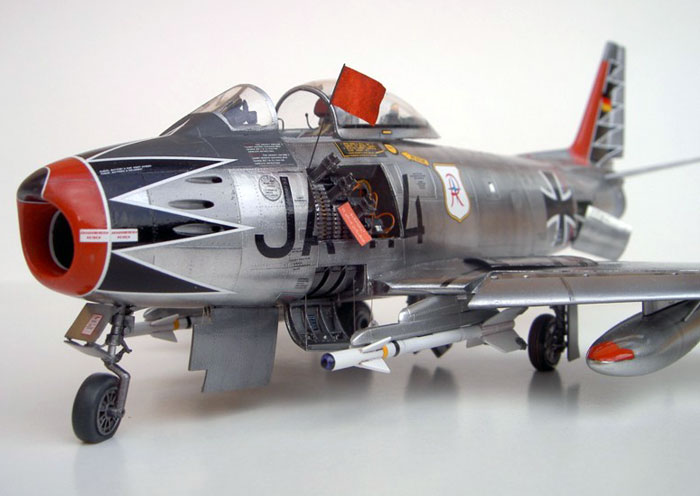
For armament most Sabres, as well as planes of the Bundeswehr, had six 12.7 mm Browning machine guns in the fuselage sides below the cockpit. Each gun had about 267 rounds. Furthermore, the German machines were authorized for use as a fighter-bomber to carry bombs, napalm, rocket launchers and similar 2x 500 kg suspensions under each wing. At up to eight stations on the outer wings could also carry eight missiles launchers for 16 HVAR rockets 5" or 56 2.5" rockets. Later, launch rails for AIM-9B Sidewinder were boarded. By default, also 2 external fuel tanks for 455 or 800 l of kerosine were fixed.
Hasegawa's 1/48 scale F-86F-30
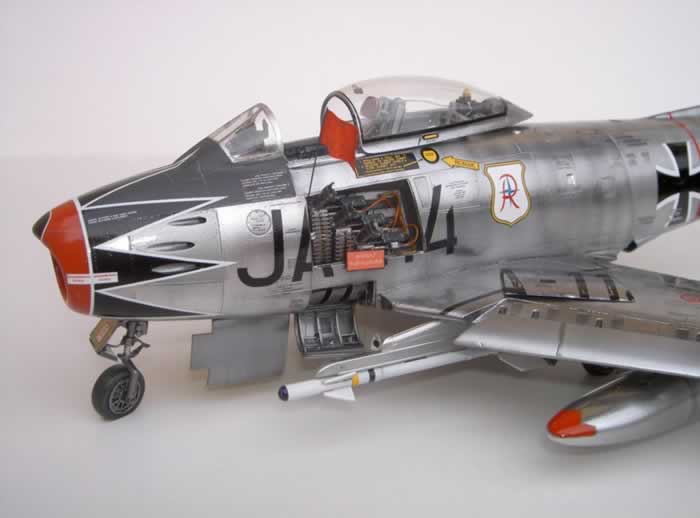
With the excellent 1/48 scale Hasegawa kit probably easily a U.S. F-86 F-30 Sabre with Korea markings can be build, but who wants to give ones a run for his money? I wanted a aircraft with the “Hartmann tulip” and for the first time I wanted "bare metal"!
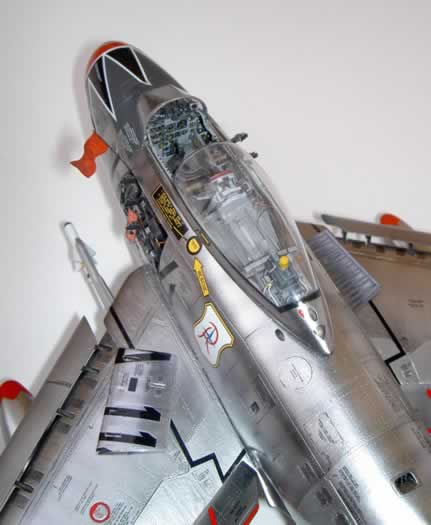
What I needed was wheels with profile from True Details, the conversion set for the slats from Cutting Edge, the colored etched Set 49236), from Eduard, the Undercarriage- and Armament Set from CMK (because of the air brakes and ammunition drawer only), the decal sheet # 48185 from Eagle Strike and a modest cockpit.
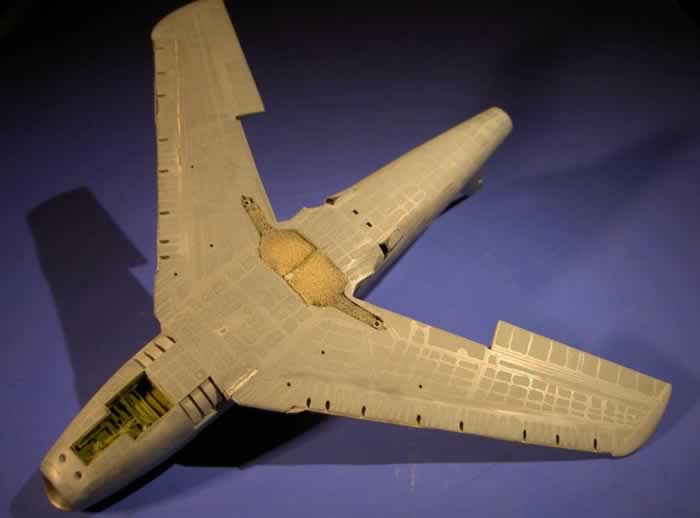
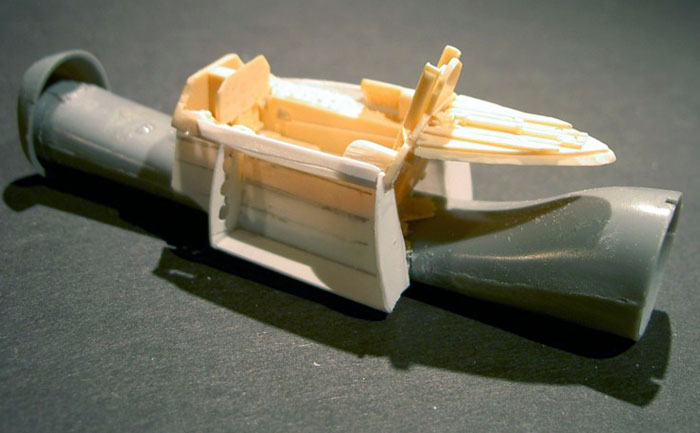
This came long before in form of a Jaguar Detail Set which contained also flaps, all the control surfaces, and the left weapon compartment. Except for the cockpit, rudder and landing flaps nothing else had to be used, but has rapidly matured the desire in me to open and represent both bays and after I immediately saw out the flaps there was no turning back!
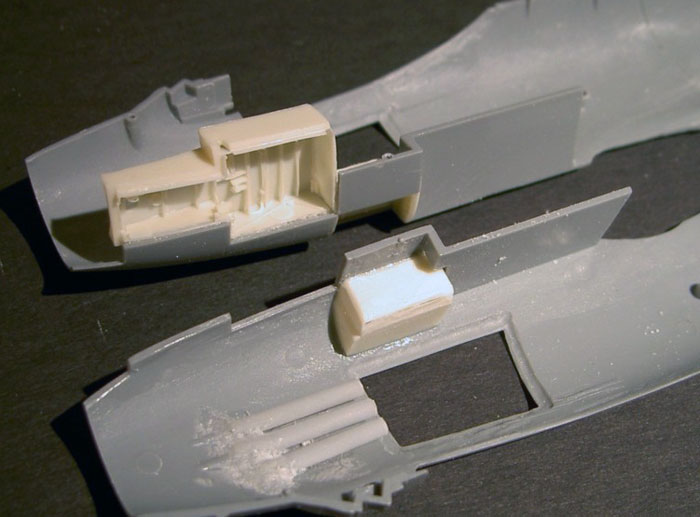
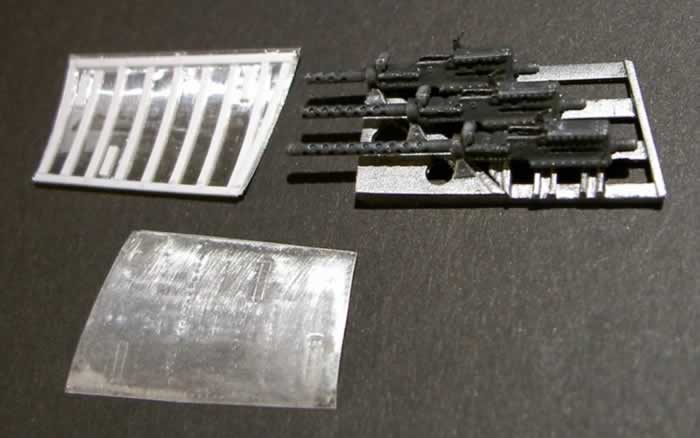
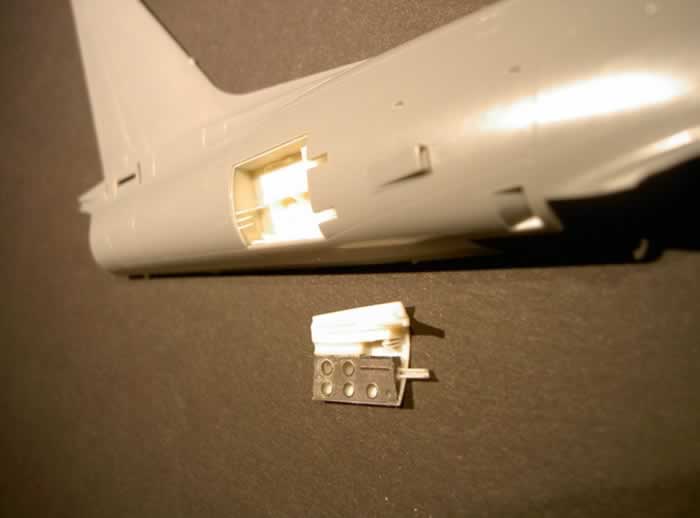
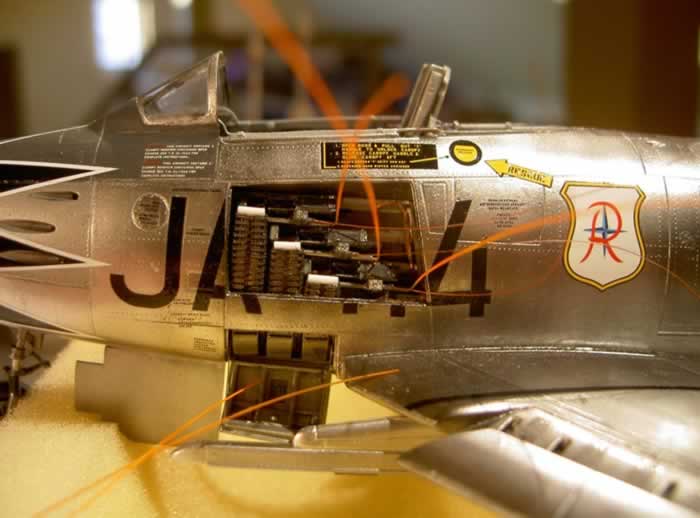
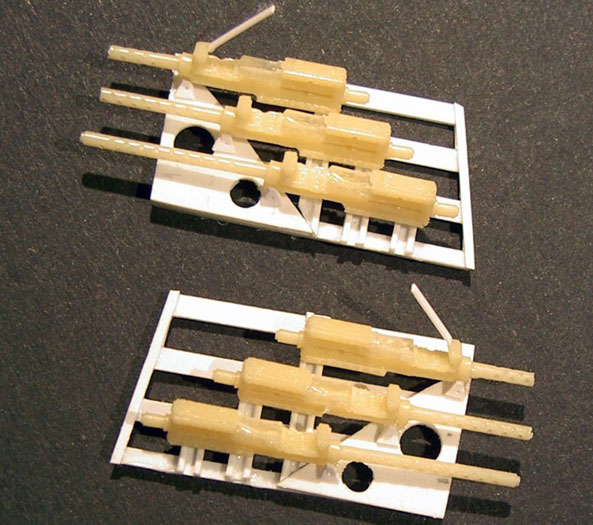
At this time there was no weapon Set from CMK aviable, so I had to design the bays from thin plastic cards, like you can see in the pictures. I was to make sure, that the place in the depth is really enough for three machine guns from Aires and found the exact distances to concerned the muzzle with the outlet holes. For this I stuck small plastic tubes to the insides of the front fuselage to served as a duct like the original. Since I had no cubic measure, there was no end in adjusting to find the perfect round to glue the parts plan to the fuselage.
For placing the boxes left and right next to the engine inlet the consoles on the sites had to be milled and grounded extremely thinly and also on the outer walls thickness was reduced to effect external scale. Moreover, one could really require the clearance as it was fairly close, which means that my enthusiasm quickly faded away and I put the model aside for several months.
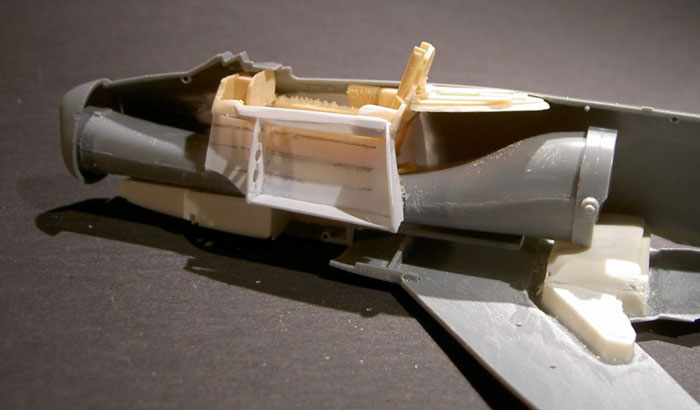
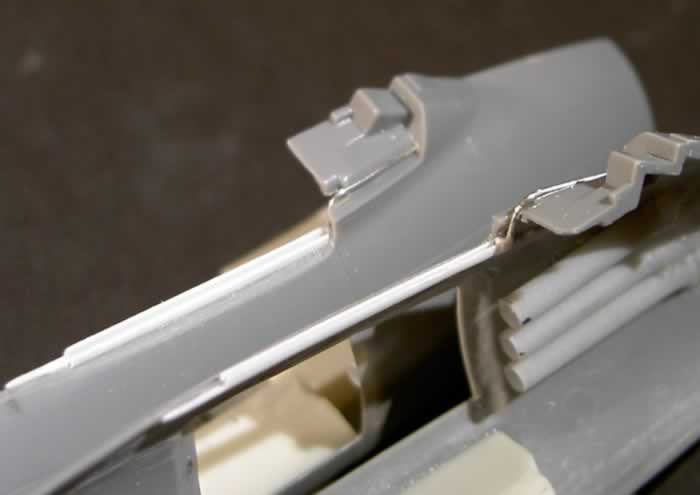
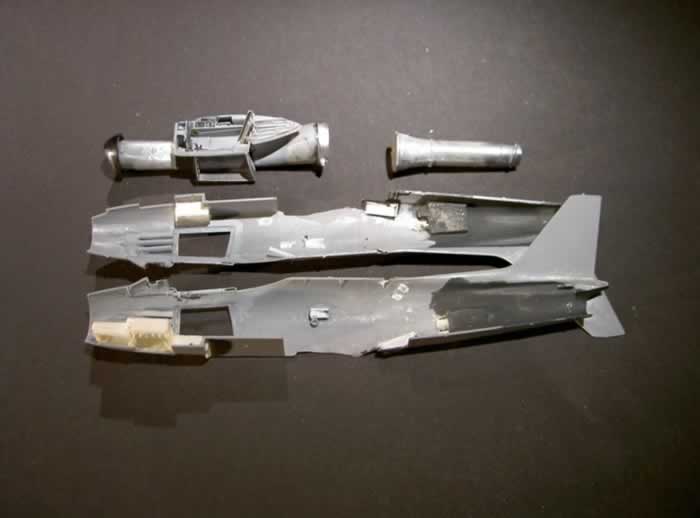
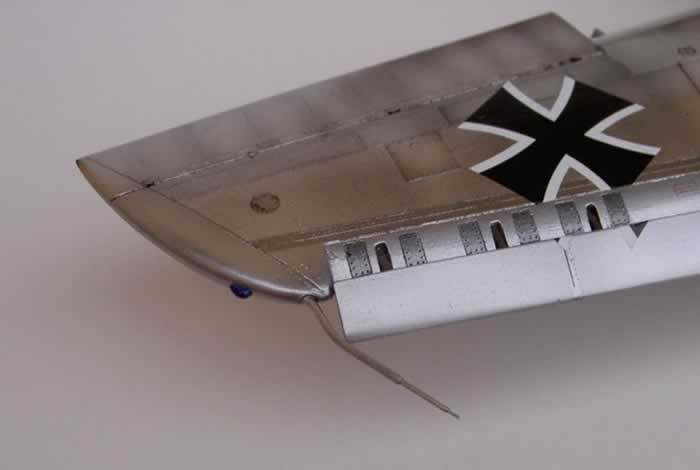
Initial, when the two CMK Sets fell into my hands work went on. First with sawing and milling the front part again because it was even more closely with the installation of front weel well and the ammunition store now! The same to the flaps which are directly linked limitless to the main weel well. Thanks to the accessories industry, because now they have a realistic depth, but also requires more space so that in this area the wings material must be removed. Fortunately, Cutting Edge has a conversion Set for nose flaps in his program, with it the slats can be shown extended like a typical Canadian Sabre. There must only cut off just a third of the front wing on almost the entire length and instead the spare part with the slots to accommodate the slat sticks were glued. Of course Since it is not off without columns, I didn´t save super glue and the remaining gaps were filled with Tamiya Two-Component-Filler. The surface had to be milled with rising grain and the disappearing engravings will be inscribed. Later I also engraved the slats openings for maintenance.
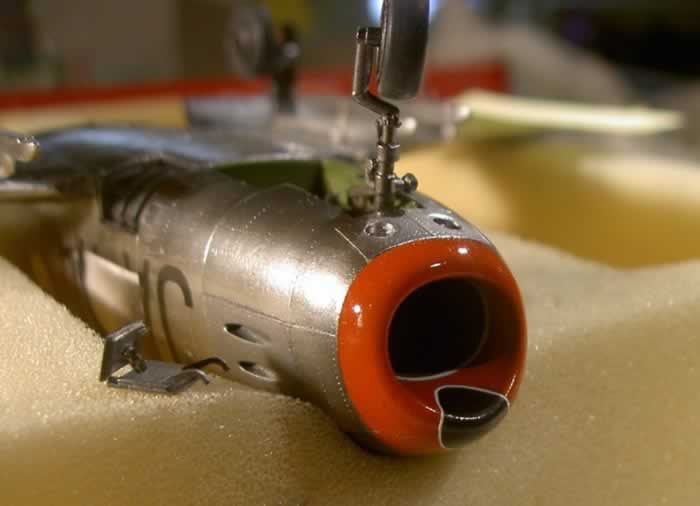
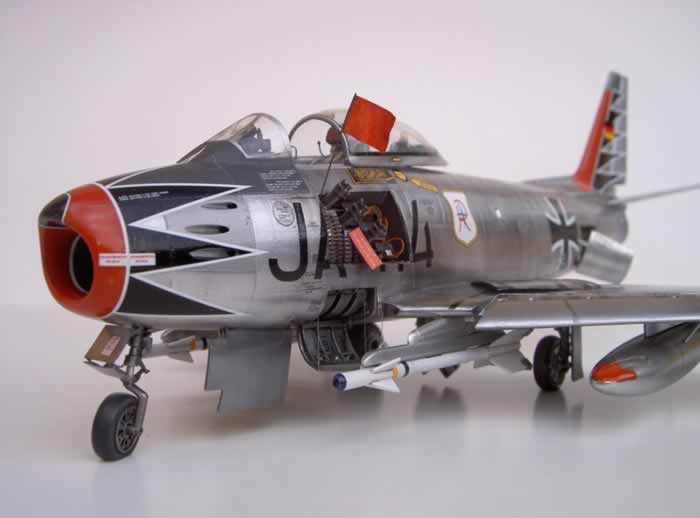
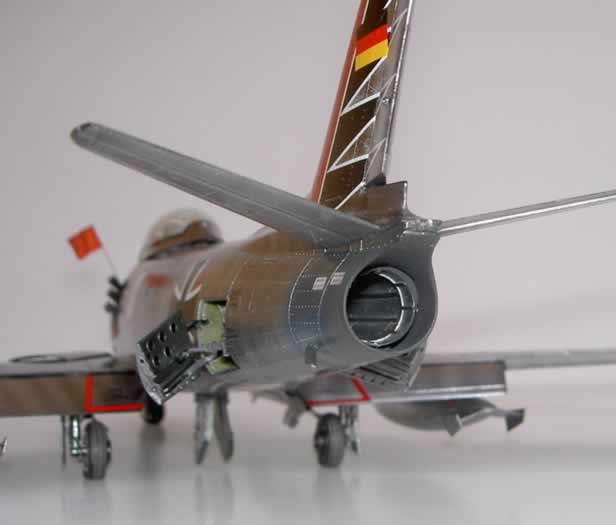
The installation of the CMK air brake bays isn´t a problem, and the brake flap themselves are quickly refined with a perforated etched part. Factory made its already constructed that they not only spread to the outside, but also still slanted out to the bottom like the original! It's pretty close again and tricky because the jet duct exactly runs between. To imitate some structure, I glued thin plastic profiles in the inner smooth nuzzle. I primed these and the air intake with flat black, painted it with Humbrol Steel and then polished to high gloss using a piece of foam on a skewer. For the first impeller, I used Alclad "Polished Steel" on glossy black.
Even the empty weapon bays were trimmed on metal this way. The gate where the cannons are "bolted" were manufactured separately, to paint them as a unit before inserting. The weapons with the shortened muzzles I sprayed flat black and dry brushed with GunMetall. The cover bolts will be painted separately because they are glued to the final. Ultimatelly, I wanted them open and braced.
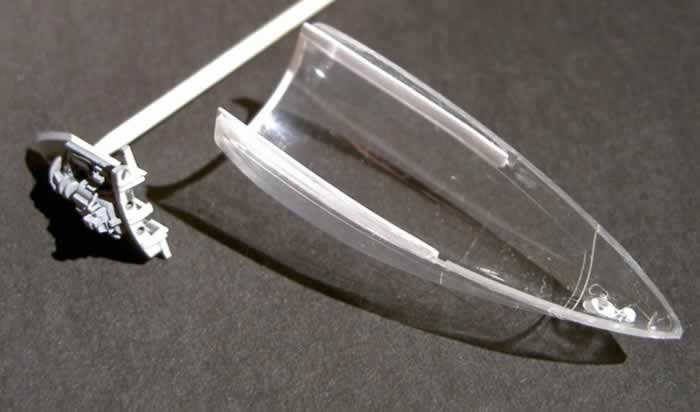
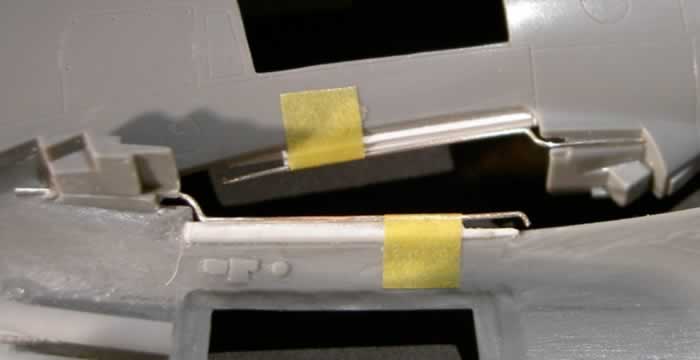
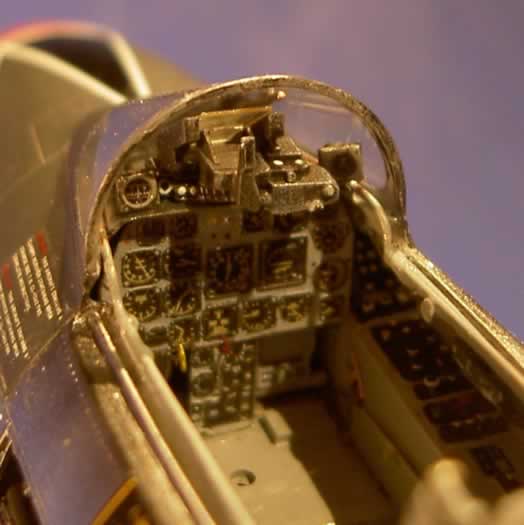
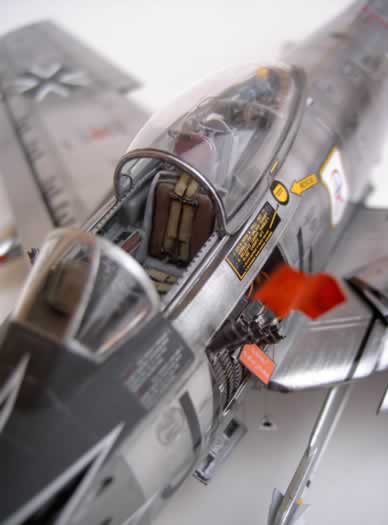
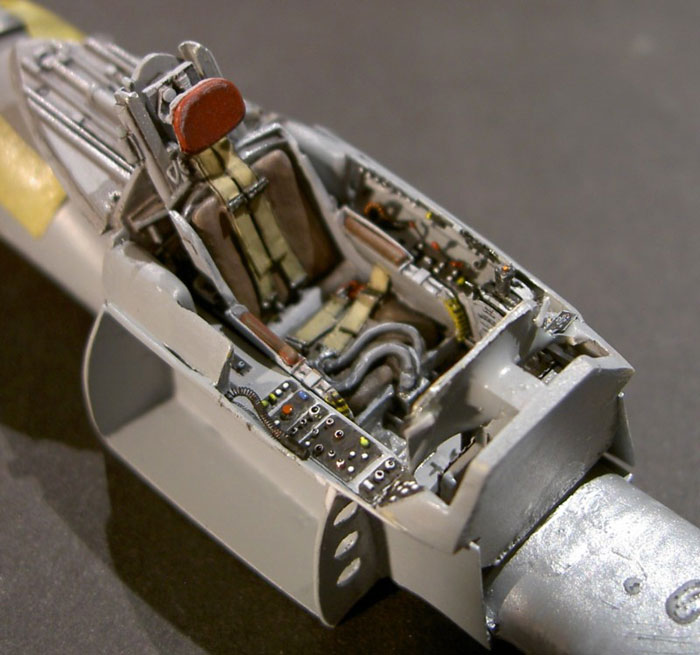
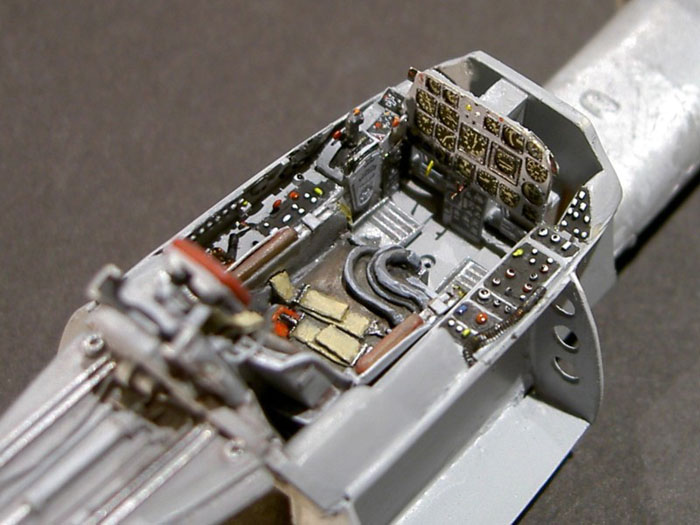
Before I went to the color of the cockpit, I was devoted to the pulpit and the rails where this will be pushed forward and back. I stucked parallel slides to the inside of the pulpit to fit itself to U-profiles on both sides of the manhole, on which I glued the pulpit ventilation in form of wire.
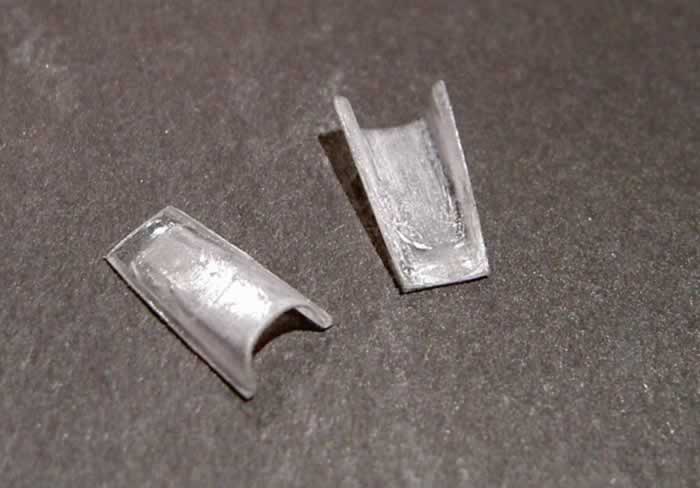
At this stage of the assembly you are doing well to pay attention for the type-specific differences, in particular various inlets and air scoops. Mainly, the distinctive Sugar Scoop Intakes on the flanks behind the Wings are worthy for a little more advertence. The shape was made by deep-towing, using a bit of a visual packaging on a engraving tool. Out of the so-shaped contour, I whittled the inlet glued them on a curved plastic plate to get the base to attach to the fuselage wall. The pictures will hopefully be more meaningful!
For conceal the holes it makes sense to extend all openings to the inside and paint them black so that they simulate sufficient depth.
The reinforcement plate on the rudder must be completely milled, in the area of the fuselage there also have to be changed a few maintenance panels or displaced some hatches or will be engraved new tank openings. For this I recommend the publication of "F-40 Flugzeuge der Bundeswehr" and the Sabre "Walk Around" from Squadron.
If you are already there you have left the worst behind and you have to take care about the color of the cockpit and the pulpit framework. Based on silky Grey (Revell) the details were washed, dry painted the subtleties were accentuated. The etched, color printed instrument panel and various other minutiae of the Eduard etched plate are the highlights. The ejection seat with the already initial casted belts and oxygen hoses could be painted separately and will be concluded only by slipping in the catapult rails on the back. Only the lever for adjusting the head restraint and the cockpit lights with tiny spiral cables are from scratch. At the front of the pulpit, I have draped the seal and put on a handle. The rear-view mirror will be glazed with Chrome foil and glued in casein.
From the control surfaces, I just sawed out the rudder which I only wanted to depict angled.
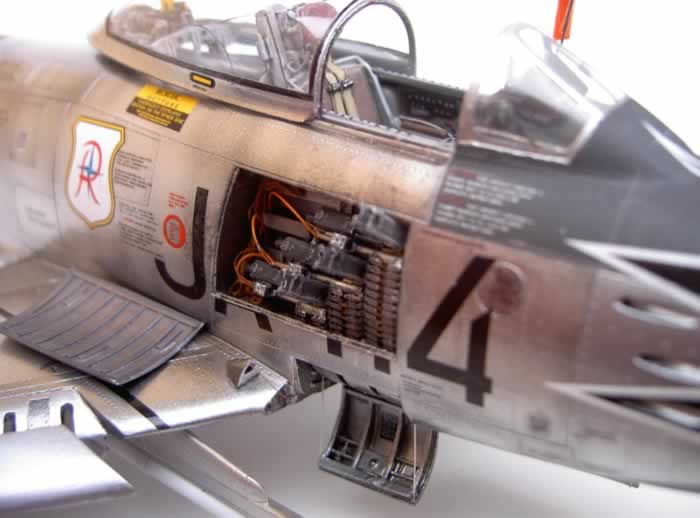
According to the blackening of the inner engine frame I glued the fuselage shells together. For such connections I use Faller Expert plastic glue for welding the seam. The guns obviously had to sat in previously, because the boxes are bigger than the openings. The covers I cut from hobby metal foil and formed the structure on the inside with thin plastic profiles. On the outside I perforated the rivets and scratched the outlines of the closures.
Incidentally, I detailed all the other components that will be painted separately.
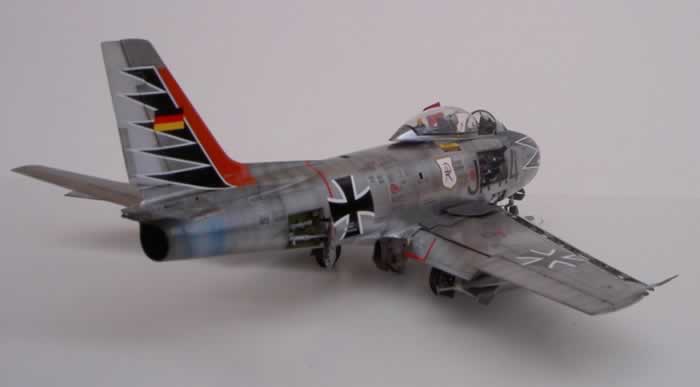
The undercarriage was detailed with an etched torque arms and wire bail. The casted mounts for the gear hatches were carved away and replaced by subtle plastic profiles, the whole gear were so completed, that I later could insert it as a unit. As tiny cable guides were glued from drawn Q-tips, I already needed to run in only a piece of black nylon cable as a brake line.
I cut the nose wheel at the right place to re-assembled it turned, reinforced with wire.
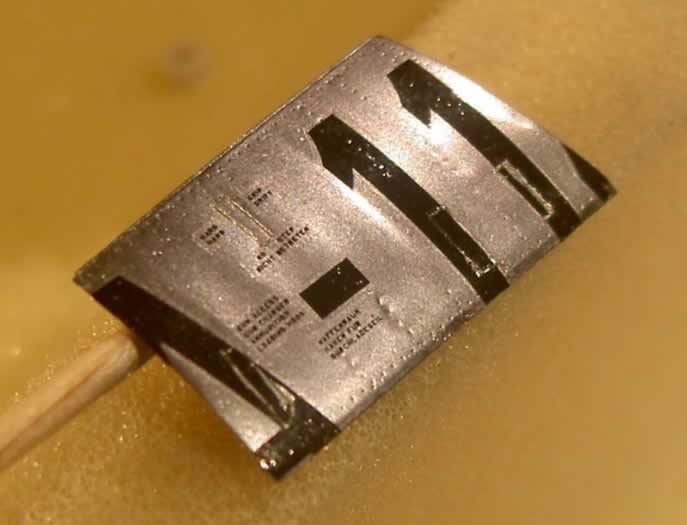
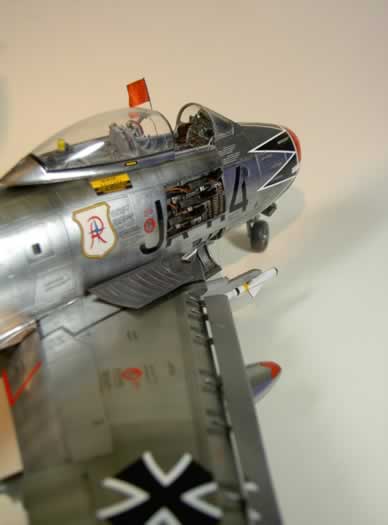
The additional tanks received etched tail fins and the Sidewinder pylons had to be engraved, since these were raised. The missiles, I swapped against nicer ones from the Hasegawa Weapon Set.
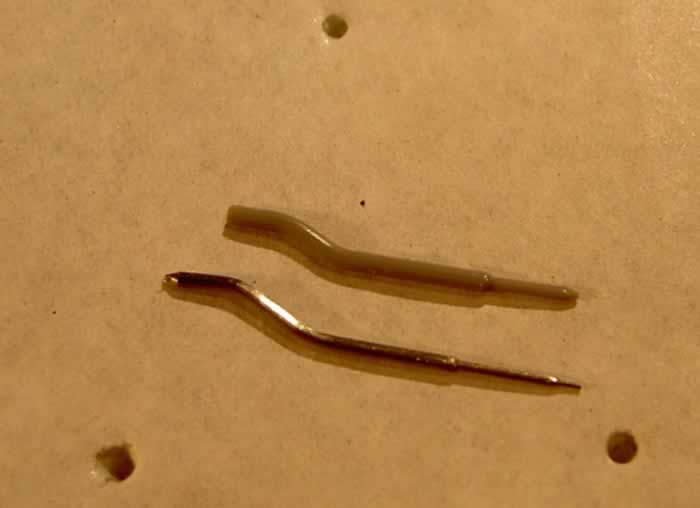
I reproduced the pitot tube from different thick needles because the original determined to break sooner or later. The angled cover for the nose wheel refined with a tiny etched part which becomes later the connection to the gear leg. For the windshield also a ventilation system in the form of two wires was installed on the inside. These and so many other details can be found, if you comb through all image sources repeatedly from start to the end until the folios solve from the bonding - like me!
Except for a P-38 Lightning, in brindled silver painting, which didn´t merit the name: natural metal, I had no experience in this regards. But by the time I accrued more and more different Alclad bottles, waiting for application. To do a NMF is quite difficult as you know, so I wished the courage to do so.
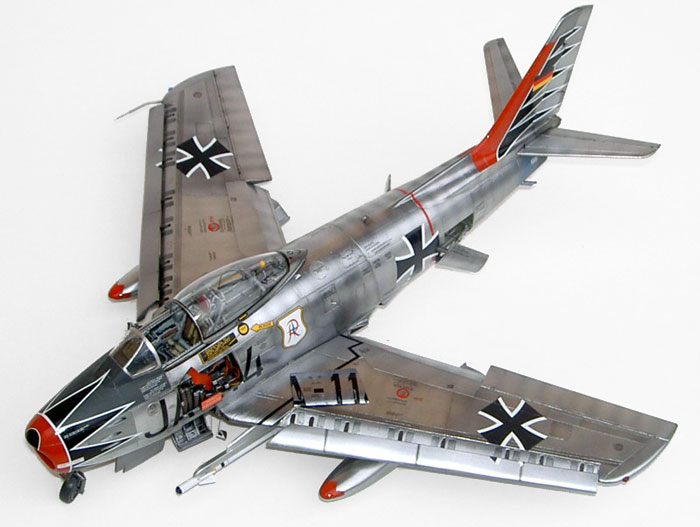
However I got granular on the models of other crafters and found many questions to ask until I finally decided to start. A buzzword in this context is the term "Stressed Skin," which also means that by riveting sheet metal panels on a bearing trunk construction a strained skin is the outcome and the rivets on the exterior are lower than the rest of the non-load-bearing surface. Some model builder has been worked with a bur, but I didn´t have the heart to do that. I looked for other ways. Finally, everyone knows that for this type of coating the surface should be completely smooth. However, after intense source study I concluded that no unpainted aircraft have such a uniform appearance. Therefore my intent was to achieve a regular irregularity so it doesn´t look too proper. I came up with the idea, if not going deeper, then to make the rest higher. As later found out, I was not the first with this inspiration.
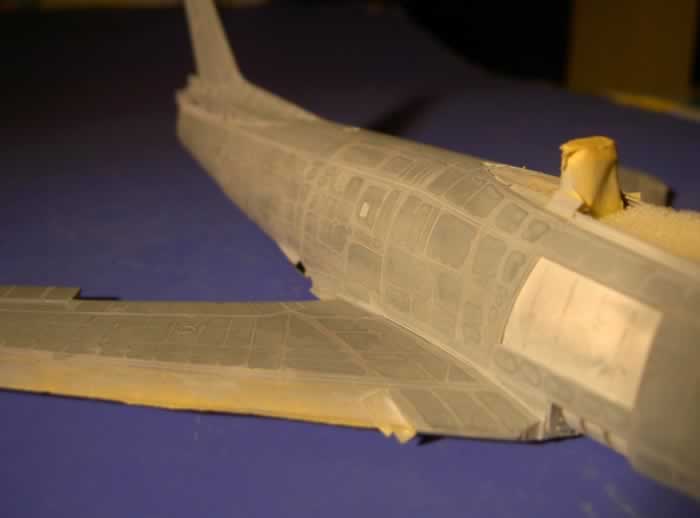
O.K.! At this stage of assembly the model is sanded on ground with fine paper and ready for the first colour, which only serves to detect blemish in form of adhesive remains, columns or scratches on the surface. Likewise, all other components, which are mounted on toothpicks. Cockpit, in- and outlet will be sealed with foam. My habit before large spray – actions is, to wash the components under warm water with standard detergent to clean them of dust and grease, and then put it under a carton to dry. After this thin layer of light grey, everything checked out and maybe some engravings must scribed again or any brink had to sand even sharper. Using photos, I signed the contours of the rivets with a pencil on the surface and gently pushed the pattern of the rivets into the plastic. A very time-consuming work in which nothing should be rushed.

Afterwards I amplified all the areas between the rivet rows with dark grey Enamel, which was time-consuming too! Then, after sufficient drying time, the coating was polished with 8000 grain, but very carefully for nor grinding the paint again. Then again in the sink and the under the box.
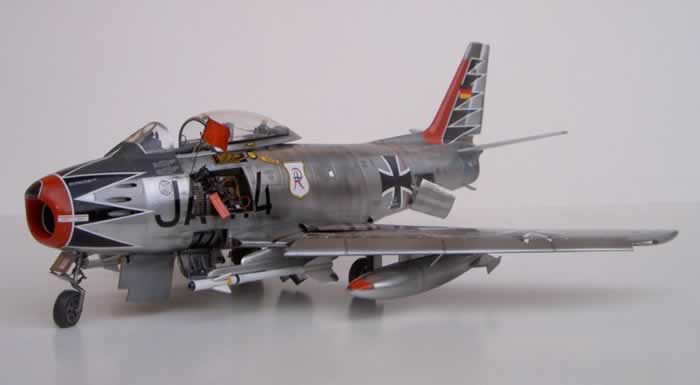
The red area around the nose, the tanks and on the rudder are next, which were masked then for the subsequent work. Although the red fin is on the decal sheet, I painted it because otherwise it had to be mended anyway and therefor you will receive a identic red.
What follows is a layer of glossy black as a primer for the "polished steel" and "polished aluminum" advised from Alclad II Lacquers, which should serve as basis for my finish.
At the same time, I have painted the old "P-38" black, as guinea pigs to experiment with the metal colors.
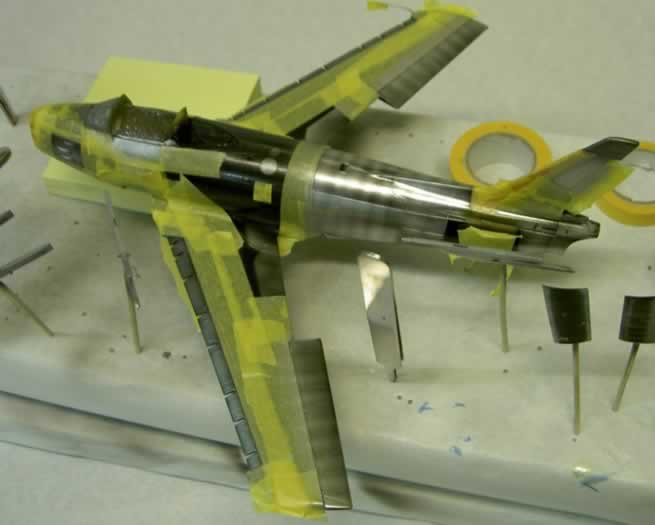
For the NMF I differ from the usual way of starting on the model with the bright areas, to mask them and then spraying the darker segments.
I began with the panels that should be darkest and masked the panels which should remain bright. In the course painting the covered areas were gradually unmasked, and so the first digits got more ink.
Each panel was sprayed individually and I looked out the fact that this is not top-dressed, and therefore the edges turn out darker. I did well to do so, because at some patches I still had to made corrections and so still enough colour came on the model. As I said, the high-gloss sorts form the base for my painting but I finally took advantage of the full range of metallic colors. Over the time, new masks covered elsewhere to get many different shades. The already weak sticky Tamiya tape will still set to a sweatshirt to reduce the liability once again to avoided tearing the lower layers. Alternatively also "post-it" tickets are ideal appropriate for this purpose. I have added no other colors in the course of painting, only to the nozzle at the rear area slightly transparent blue and yellow were sprayed to imitate anneal zones.
Decals & Markings (JG 71 “Richthofen”)
Although the three variants of the Strike Eagle sheet were camouflaged aircraft, it did not detain me doing a NMF. I was looking for a machine which I could realize with the actual letters and numbers what was not particularly difficult and therefore I always cut out decals individually and to the edging.
Anyone, like me, who also would like to set up the numerous maintenance stencils, which were printed on transparent film, need a high-gloss interim finish as basis. The metal effect is minimal reduced, but now decal solutions can be used. Thanks to Set and Sol from Micro Products for now nestling the decals to any unevenness, which is insignificant among the many riveting, because they are visible now. As a varnish about everything I sprayed Revell 01 with one/two drops clear flat. As soot I still sprayed diluted anthracite to the nozzle.
Even before I presented the model on the flattened wheels I detailed the weapon bays with etched ammunition guides into I threaded the color rounds up to the lock of the MK. After cabling with a variety of colored nylon strings and thin bundled wires I still fixed the machine gun cover bar. The hydraulic cylinders for the brake and landing gear doors are adjusted and there still will be some cables relocated. After inserting the pulpit, which brought to a high polish with car burnish, the warning sign “Vorsicht Waffen geladen” is designed with Window Words and the red flag was build from a towed plastic stick and piece of paper handkerchief soaked in casein. For the conclusion only the position lights were still glued.
Everybody probably has their own different view of a natural metal finish. This is my interpretation!
Model,
Text Copyright © 2009 by Hubert Ortinger
Page Created 2 March, 2009
Last Updated
2 March, 2009
Back to HyperScale
Main Page |
 Home
| What's New |
Features |
Gallery |
Reviews |
Reference |
Forum |
Search
Home
| What's New |
Features |
Gallery |
Reviews |
Reference |
Forum |
Search