|
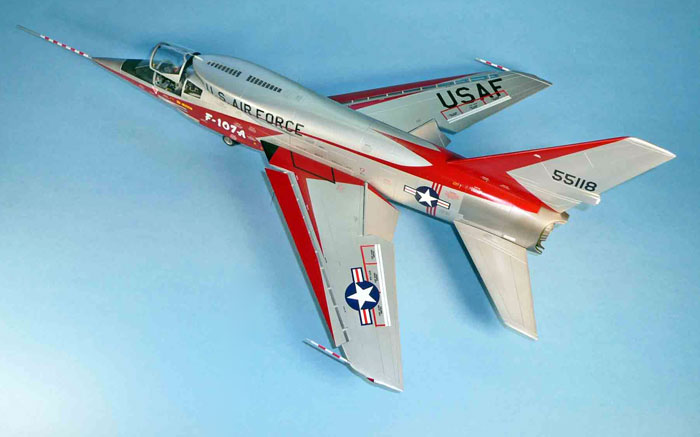
Scratch built 1/32 scale
F-107A
by
Frank Mitchell
|
F-107A |

HyperScale is proudly supported by Squadron.com
They say everything in life is evolutionary, and I guess that goes for modeling as well.
Today’s example is my third attempt at building an F-107A, each using different techniques.
The first, built around 1972, was 1/72 scale and the construction was a styrene vertical keel with formers placed along its surface. These were “planked” with styrene strips and covered with Squadron green putty. I used Hasegawa F-100 wings and tail and stabilizers and a Vigilante vertical tail. It looked ok, but I had used so much putty that it continued to shrink for years. I finally threw it away because of the constant cracks and openings that kept appearing.
The second was built a couple of years later and was a 1/32nd scale totally scratchbuilt project. Again, it looked ok and even won a couple of contests, but in fact, the proportions, particularly in the fuselage, were wrong and it looked (and was) too “fat”. That one used a keel again, but the spaces were filled with expanded Styrofoam and covered with filled epoxy. Wings and tail surfaces were built using pretty much the same methods I use today (vacuum-formed over a balsa core). That model met its fate when a shelf collapsed taking it, and several other models, with it.
In my defense, both of those models were built using only whatever information I could scrounge from the airplane magazines of the day and letters from friends. However, in 1978, a few years after the second model was built, an issue of the much-mourned magazine Aerophile presented an extensive article with photos and drawings that far surpassed anything I had had before. I think I have been harboring a desire to do another one ever since, and the feeling was solidified when Ginter Publications brought out its recent very extensive book on the F-107 which had, by the way, been written by the same author as the Aerophile piece, but contained a magnitude more information. When the 1/32 Trumpeter F-100D came out, the decision was made for me.
For those that aren’t familiar with it, the North American F-107A was built as a competitor of the F-105. It was a very competent airplane, but the Air Force wanted an internal bomb bay, and that, among other reasons, meant the end of the 107 program.
This model is built in my usual way and, also as usual, the photos will show the main points. For this model, I took a few more photos than usual so that more detailed look at the construction can be shown. Besides, I strongly feel that the are no secrets in this game, so the added photos might, hopefully, help someone else finish their project.
This is also probably a good spot to note that the specific aircraft to be modeled had be selected fairly early in the process, because all three prototypes (55118, 119, and 120) had differences and those need to be included or eliminated as necessary.
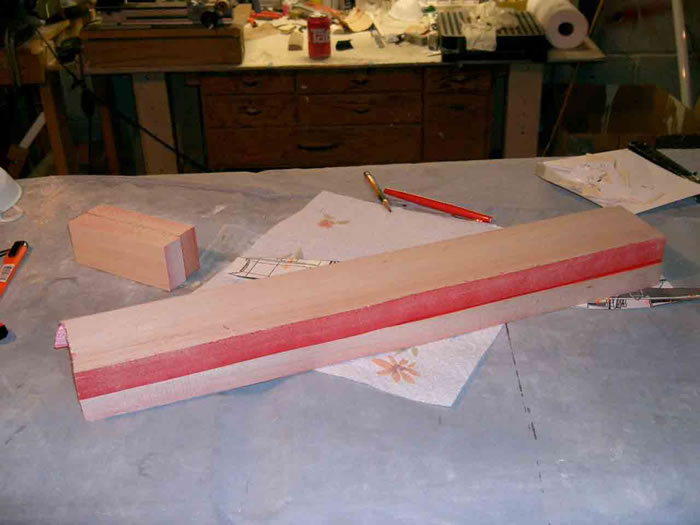
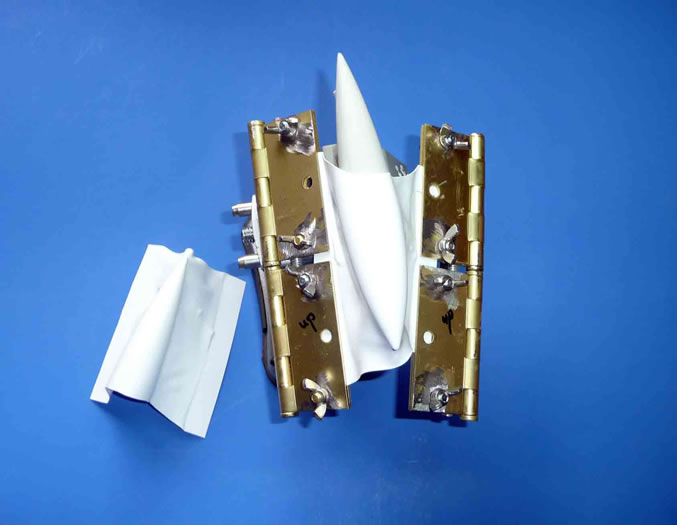
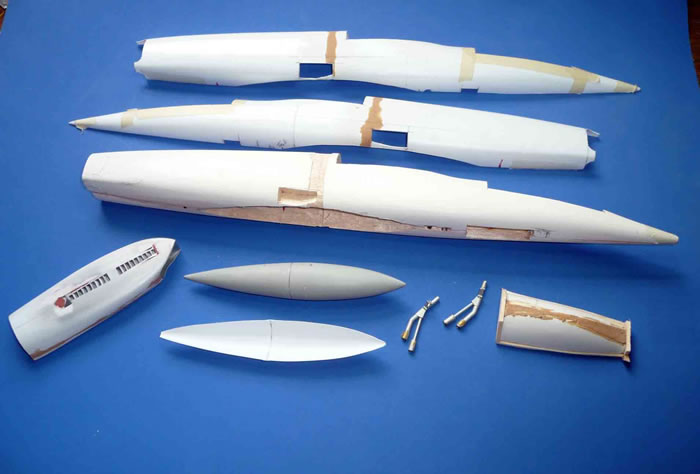
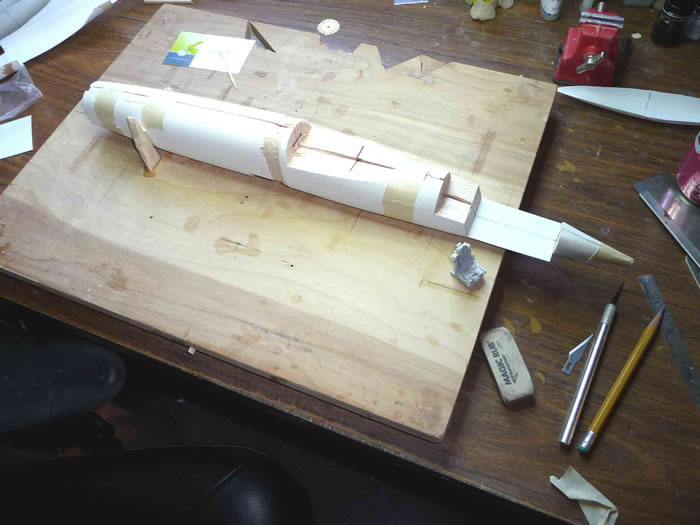
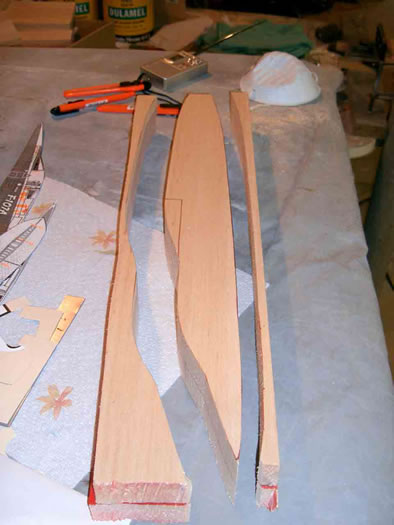
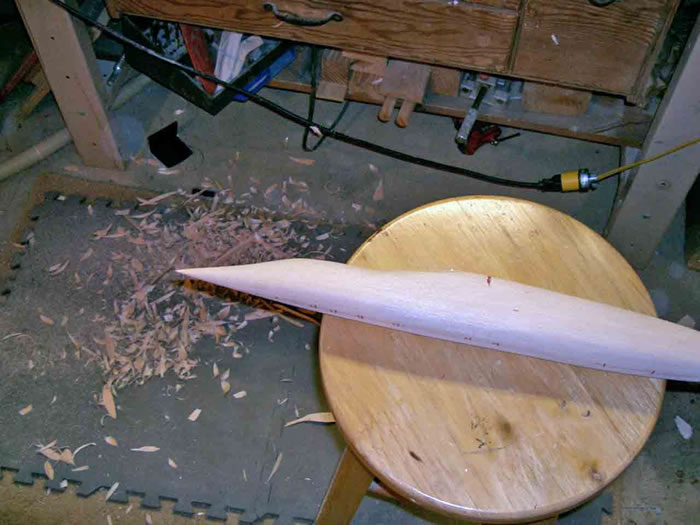
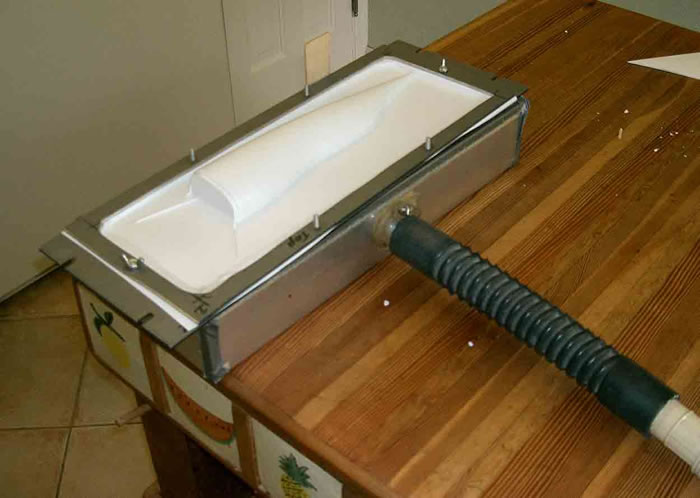
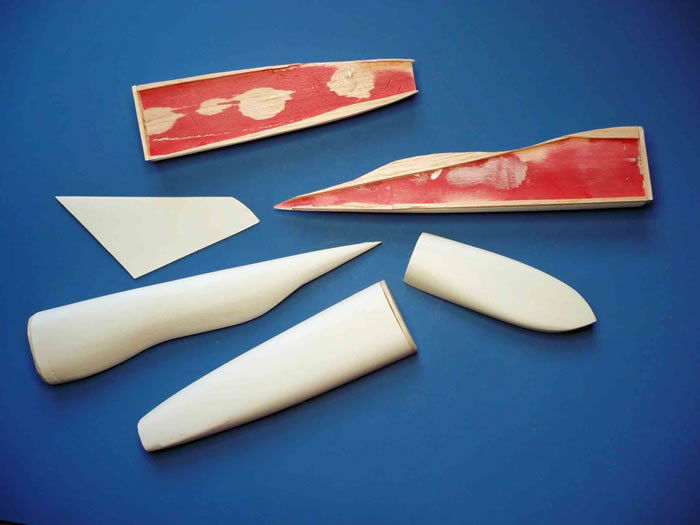
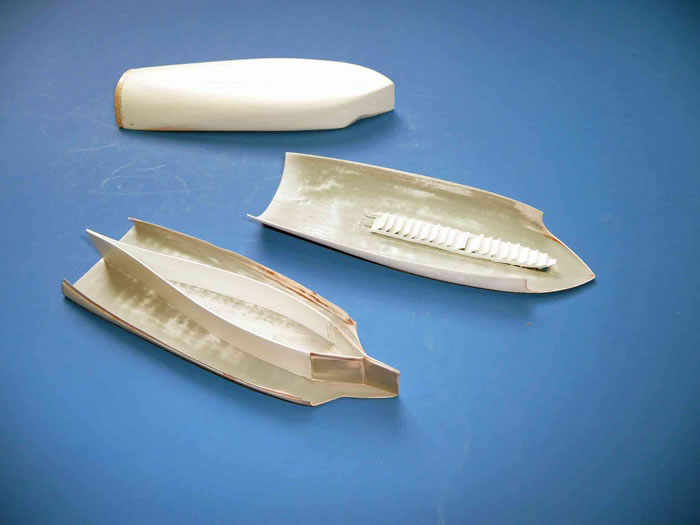
To begin, separate balsa molds were carved for the fuselage, vertical tail, and intake. These were vacuum-formed using .030 styrene.
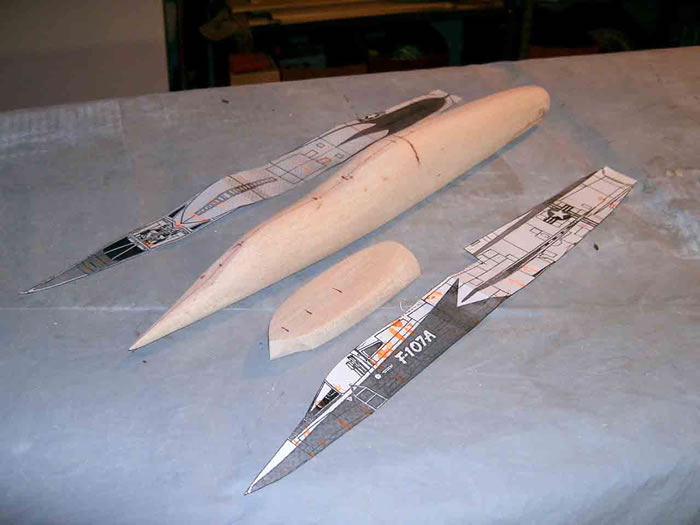
The intake was molded with a horizontal seam, since that made it easier to build the variable ramps. The intake also has a series of slots along its upper surface that are used to vent excess air flow. These can be a real pain to get correctly spaced and sized. However, for this model, I had the great good fortune to have a good friend who is also a genius with CAD and even has access to a very impressive laser-cutting machine. From presentation of the idea to a completed styrene strip containing perfectly-spaced vents required a total elapsed time of maybe 6 minutes. Thanks, James. The photos show how that (black) strip was integrated into the top surface. The intake internal structure was then built up, painted, and assembled.
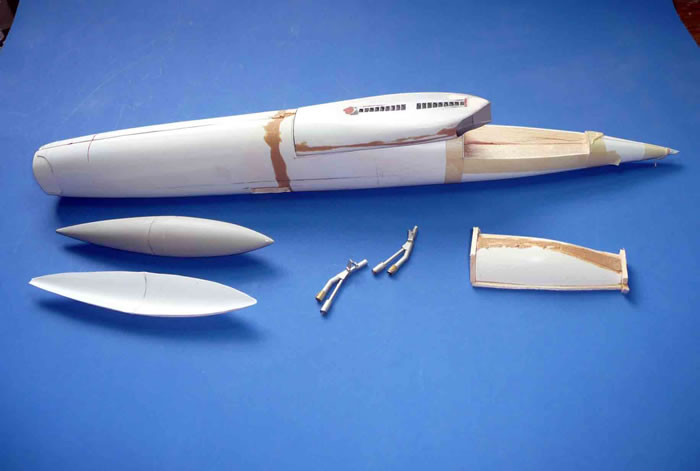
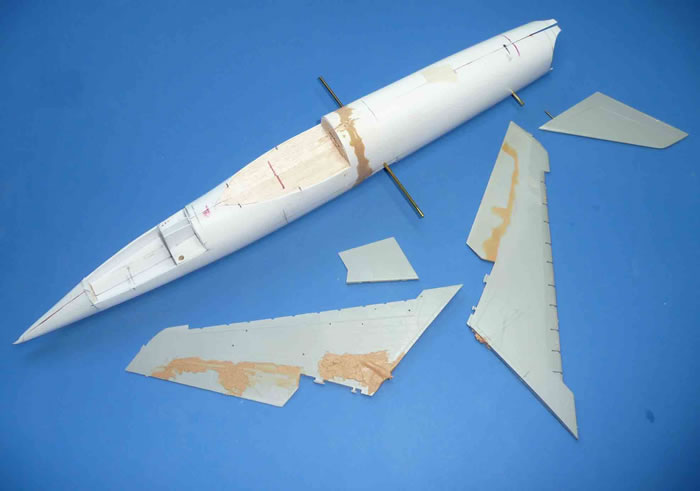
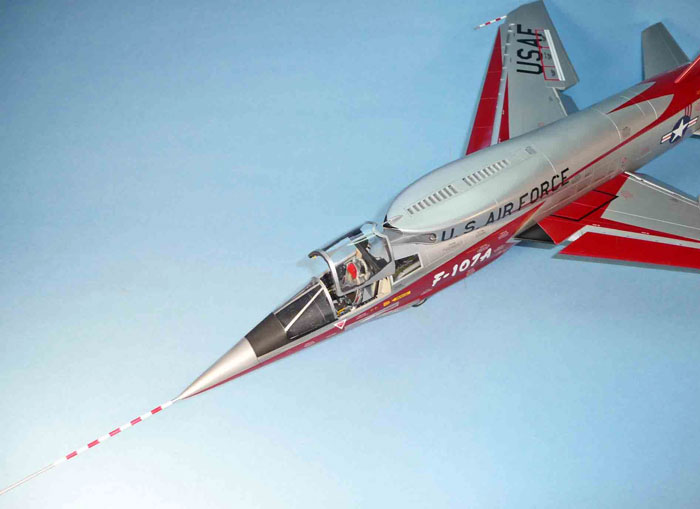
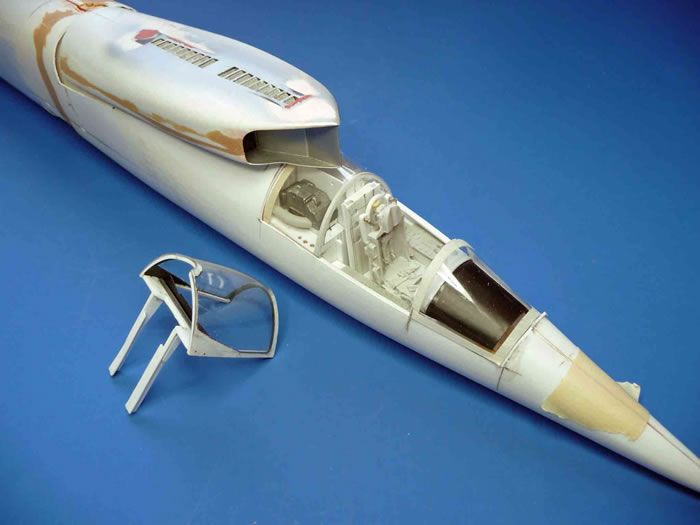
Areas of the fuselage balsa core that would contain the wheel wells, cockpit, tail bumper, engine, etc. were removed and lined with styrene. These openings were then cut into the skins and the areas detailed. The cockpit canopy area was removed and made into a mold for the clear parts.
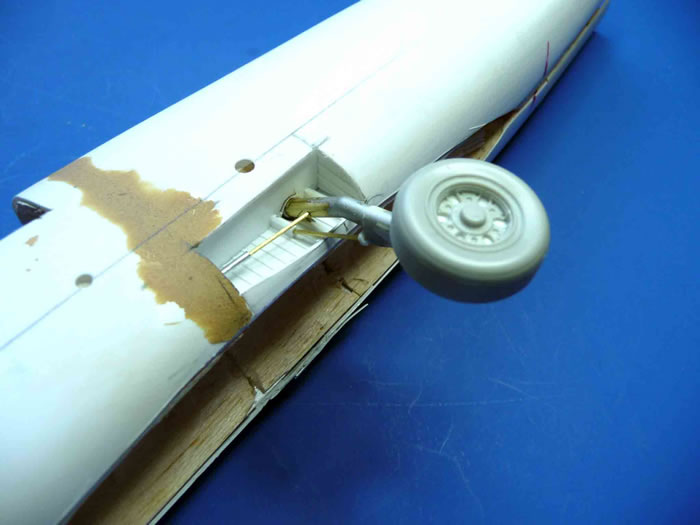
The nose landing gear is similar to the one on the F-100, but was turned 180 degrees on the 107 so that would retract forward. I used the plastic one from the Trumpeter F-100D. which was easier to modify than the metal one. The main gear had to be totally scratchbuilt, although the main legs were from the 1975 model. Never throw anything away. Even the main wheels and tires were a much different size and shape than those on the 100D.
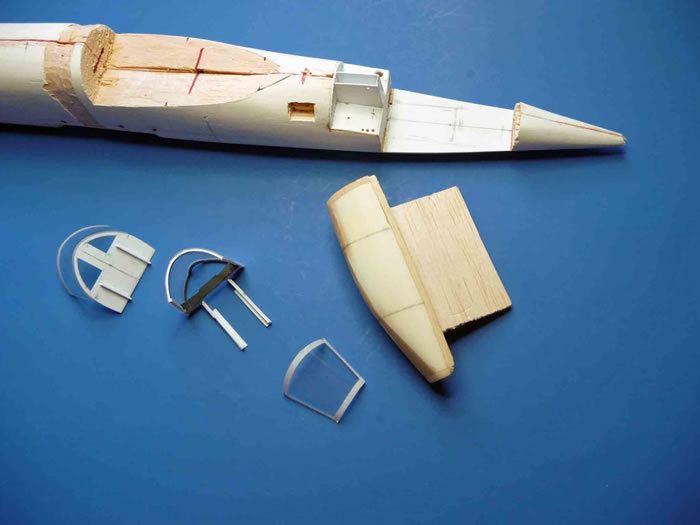
The 107A used a canopy that opened vertically and was actuated using some motorcycle-type chains. With that big intake inches from the pilot’s head, the canopy could not be opened more than 5 inches before engine start, and would, in any case, only open a total of 26 inches. There were all kinds of tests to show that the pilot could eject even with the engine running full blast, but I have always had a suspicion that this feature played a role in the USAF’s decision to buy the 105. I do have to say that, while the canopy is very clever, it is also a pain to build. Basically, it is a clear vinyl canopy lined with a second styrene heat-and-smash mold that was trimmed and fitted inside the clear piece. A large cross-brace is the support for the two struts. Since the structure was a bit flimsy, all the joints are pinned with brass rod.
The rest of the cockpit was built using standard techniques while doing a lot of staring at photos. An AMS F-100 ejection seat was used as a basis, but had to be modified for the 107.
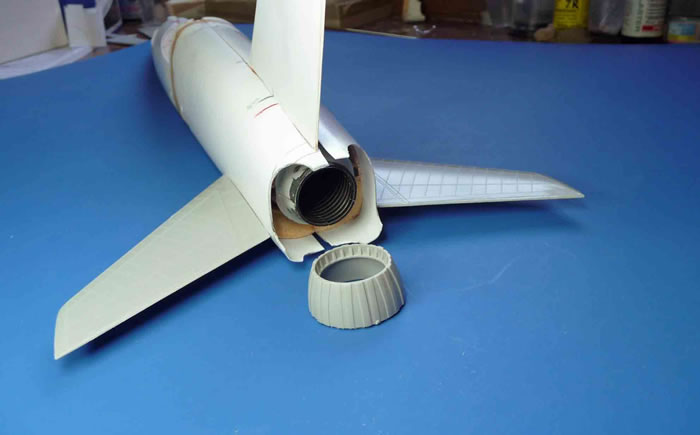
The engine was donated by the Trump 100D. The nozzle of the engine sits inside the fuselage and a fair amount of structure is (unfortunately) visible. This area was another rather tricky one because there isn’t much meat left to mount the tail surfaces, but with some trial and error, things finally were installed and were even (reasonably) sturdy. The thin shroud surrounding the engine was molded from .010 styrene, and took forever to get right.
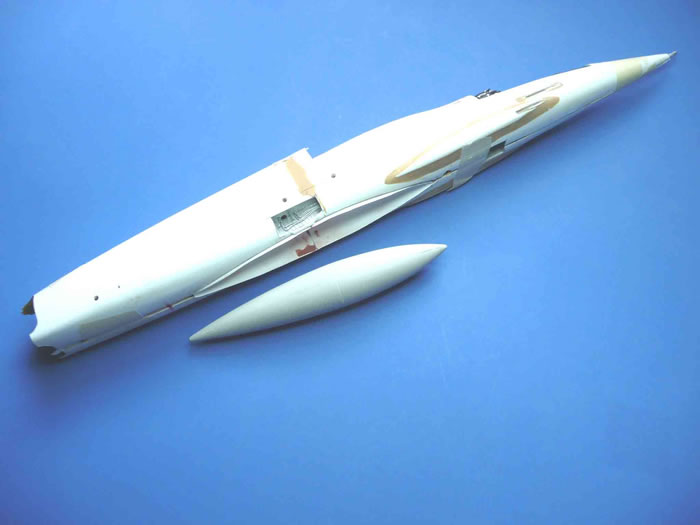
Although it had two hard points on each wing, the 107 carried its main loads in a partially-recessed well in the bottom of the fuselage. Since I wanted to use the large 500 gallon fuel tank in place of bombs, etc., a spare Revell F-4 centerline tank was shortened to the correct size, and .020 styrene was then heat-and-smashed over the tank and epoxied into a well cut in the fuselage. The tank is mounted into the now plastic-lined well.
The side bulges for the cannon were heat-and-smashed from a shaped piece of balsa. These were glued in position and aluminum tubing inserted to represent the gun troughs.
After all the detailing was done (or at least, done to the point of nausea), the fuselage skins were epoxied in place and the seams filled. The intake, clear parts, and some external details were added and the whole thing was scribed.
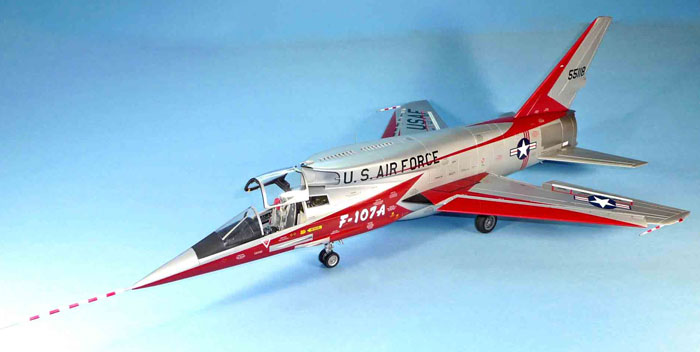
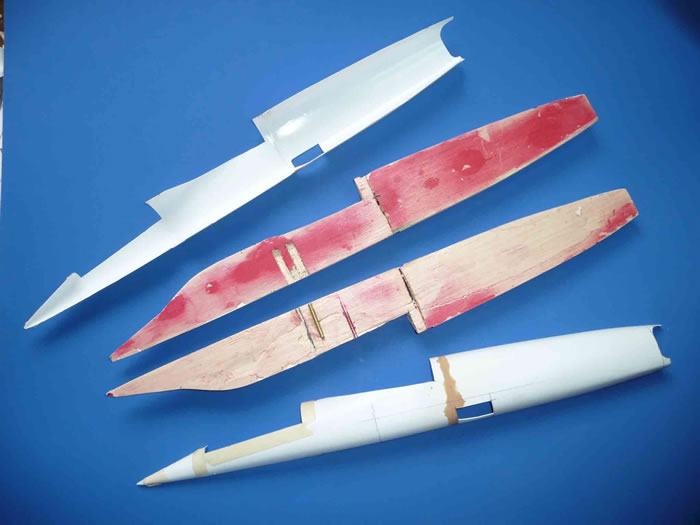
The wings and horizontal stabilizers are taken almost intact from the 100D kit. In fact, I believe that both were a bit thinner on the 107, but that can remain our little secret. Obviously, the kit wheel wells had to be filled in as were the various holes for attachment of armament, etc. In addition, since the 107 used a very different type of bank controls, the ailerons were permanently attached, the seams filled, and the new control surfaces scribed.
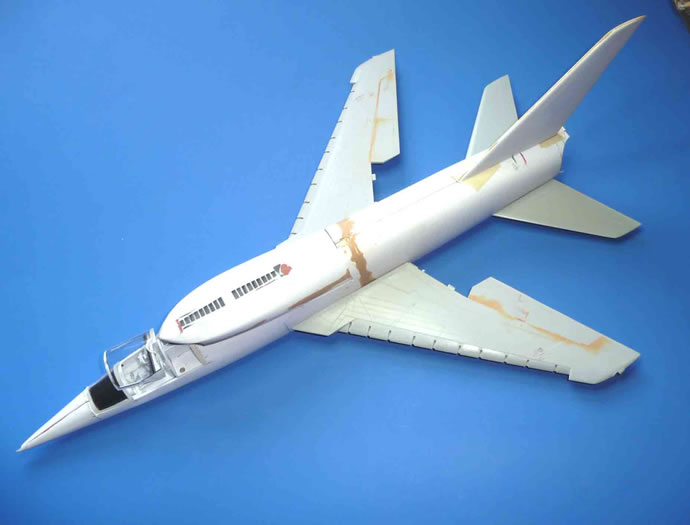
The vertical fin was, as mentioned, formed from a balsa mold covered with vacuum-formed styrene. The fairing for the rear formation light, rear radar warning antenna, and fuel dump was added separately. Both the wings and tail surfaces were attached to the fuselage using brass tubing.
 Finishing consisted of my own brew for aluminum paint, which is a mix of Testor’s Flat Aluminum, a large dollop of Floquil Flat finish, and a glug or two of lacquer thinner. This mix allows the aluminum to be masked without lift or marking. Gunze Flat Red was used for the (wait for it) red, and one of the Alclads for the natural metal areas on the rear of the fuselage. Finishing consisted of my own brew for aluminum paint, which is a mix of Testor’s Flat Aluminum, a large dollop of Floquil Flat finish, and a glug or two of lacquer thinner. This mix allows the aluminum to be masked without lift or marking. Gunze Flat Red was used for the (wait for it) red, and one of the Alclads for the natural metal areas on the rear of the fuselage.
Actually, the painting went well, except for me screwing things up and having to re-paint major portions. Twice.
The decals came from a stash of 40 years worth of odds and ends plus some special ones for the wing spoilers that were made on the computer.
In summary, I am finally have an F-107A with which I am (reasonably) happy.
By the way, anyone want to buy a Trumpeter F-100D that has a few missing parts?
Model and
Text and Images Copyright © 2009 by Frank Mitchell
Page Created 9 January, 2009
Last Updated
9 January, 2009
Back to HyperScale
Main Page |
 Home
| What's New |
Features |
Gallery |
Reviews |
Reference |
Forum |
Search
Home
| What's New |
Features |
Gallery |
Reviews |
Reference |
Forum |
Search