|
1/48 scale Monogawa
Frankenfighter
F-104G
by
John Doerr
|
 |
|
Lockheed F-104 Starfighter |

Hasegawa's 1/48 scale F-104G Starfighter is
available online from
Squadron
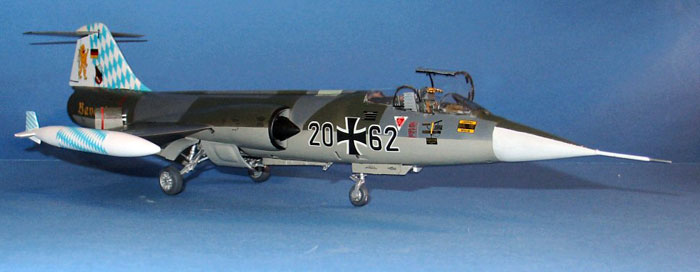
This model represents a
late model German F-104G in the 1983 commemorative “Bavaria” scheme of
JBG 32.
I picked up the Hasegawa F-104G. It was an immediate love/hate affair. I
loved the level of detail and for the most part the fidelity of this
release. However, I detested the effects of the “mad riveter” who seems
lately, to be moving from one company to the next. Having seen German
F-104s up close and personal, when I was stationed at Hahn AB Germany in
the late 60s I was impressed by the smooth finish and workmanship
displayed on these every day working aircraft. It was difficult to spot
a panel line or flush rivet on these aircraft. I decided that the old
Monogram kit had a more realistic appearance than the newer Hasegawa
release.
The Monogram kit is
typical of the 70s and 80s releases with raised panel lines and recessed
outlines of the control surfaces. Given the very smooth and slippery
finish of the real item, I felt that this was a more appropriate
representation.
The Hasegawa kit would
require a tedious application of Mr. Surfacer and sanding. The fit of
the leading and trailing edge blown slats and flaps was not the best I
have seen either. Because these had BLC, they were never in the down
position when the aircraft was unattended. The Monogram kit has the wing
with the slats, flaps and ailerons molded integrally with the upper
fuselage half.
I intended to use as many
of the parts from the Hasegawa kit as possible, as well as the Cutting
Edge resin cockpit set and the Eduard PE set.
 I
started out with the Monogram fuselage. Dry fitting the fuselage halves
revealed that the locating pins actually moved the halves out of
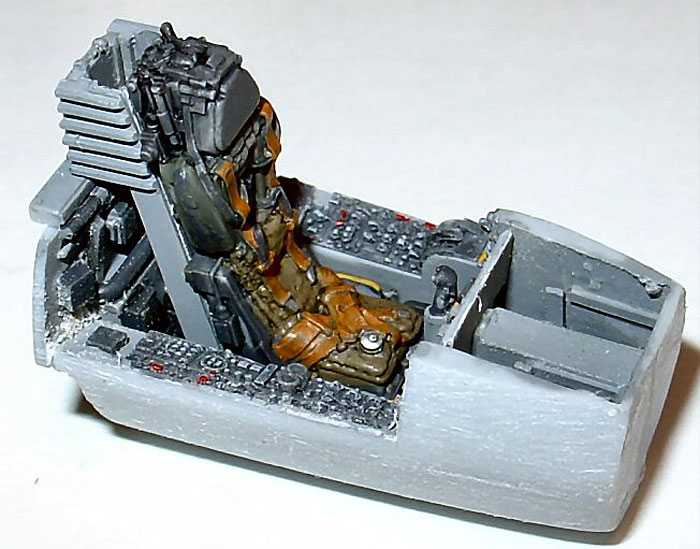
alignment. The Cutting Edge (CE) cockpit set was a better fit than on
the Hasegawa kit. With just a minor amount of sanding, especially around
the front, it just dropped into the lower fuselage half. The CE set
comes with the proper M-B GQ-7 seat as used in the German F-104s. The CE
cockpit and seat presented no problems in painting or construction and
would probably be easily tackled by most of the readers that frequent
this site. I
started out with the Monogram fuselage. Dry fitting the fuselage halves
revealed that the locating pins actually moved the halves out of
alignment. The Cutting Edge (CE) cockpit set was a better fit than on
the Hasegawa kit. With just a minor amount of sanding, especially around
the front, it just dropped into the lower fuselage half. The CE set
comes with the proper M-B GQ-7 seat as used in the German F-104s. The CE
cockpit and seat presented no problems in painting or construction and
would probably be easily tackled by most of the readers that frequent
this site.
The cockpit was painted with ModelMaster (MM) 36235, Dark Gull Gray
enamel. The floor, or rather the aircraft bottom, as the F-104 cockpits
had no such thing as a floor, the legacy of the initial use of a
downward firing ejection seat, was painted with Tamiya acrylic yellow
zinc chromate. The details were picked out with a combination of MM
Panzer Schwartzgrau, and black and black wash added to accentuate the
details. The appropriate switches were painted with red and yellow and
the instruments dry brushed with MM 36495 Light Gray.
Click
the thumbnails below to view larger images:
[../../photogallery/photo00002961/real.htm]
While working on the
cockpit I simultaneously was fitting the gun bay door to the lower left
fuselage. Dry fitting had revealed that the lip was too deep and the gun
bay door would be recessed from the line of the fuselage. 0.010
evergreen strips were inserted onto the lip surrounding the inside of
the gun bay opening. The door was then glued in place and required just
some sanding to finish it off
After detailing and assembling the cockpit section it was secured in the
lower fuselage with CA adhesive. The upper half was glued to the lower,
and the pre-assembled tail section was attached. Note, I decided to use
the Hasegawa afterburner can so the tapered end of the engine exhaust
that is molded as part of the forward fuselage sections was cut off.
Care was taken to assure a close line up of the fuselage halves, tail
section and intakes. This facilitated a much easier clean up of the
seams involved.
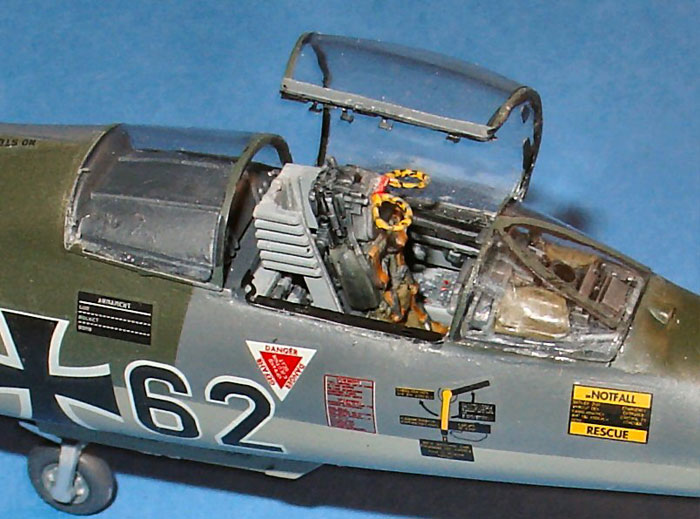
The Monogram canopy and wing tanks were also used, because of the rivets
on the Hasegawa tanks. While I thought that the Hasegawa canopy was the
better of the two, the problems of fitting it persuaded me to use the
Monogram canopy. The canopy was added, as well as, the Hasegawa ventral
fin, tail hook and shell ejection chute after the seams were sanded and
polished.
At this point the model
was masked and painted. I had decided to use the Hasegawa kit decals for
JBG 32. The kit was painted in the standard NATO colors and Luftwaffe
pattern. Tamiya NATO acrylics were used for the camouflage. The model
was a given a coat of clear gloss and the Hasegawa decals applied. I
have run into problems in the past with the Hasegawa decals reaction to
decal solvent. They tend to shrivel and curl up after the application.
Over the years I have developed a technique to prevent this problem. The
decals are applied using only water as lubricant and once in position
the decals are allowed to dry overnight. After they dried in position
Micrsol brand solvent is liberally applied. They decals do not curl or
shrivel but rather stay in position and soften in place and conform to
the underlying plastic. The F-104s I had seen in the past did not show a
lot of weathering and were well maintained, so I decided not weather the
model at all. A tempera sludge was applied to the recessed outlines of
the control surfaces then wiped off after it had dried. The model was
given a coat of clear flat.
The landing gear wells were masked off and the wells and inside of the
doors were painted with MM Metalizer aluminum. The kit landing gear was
used with the Hasegawa larger tires, and bulged main gear doors, which
were fitted to the later F-104Gs. The Monogram kit uses the earlier
smaller tires. The gear legs and wheel hubs were painted with MM
Metalizer steel. The Hasegawa center web structural member was trimmed,
and fitted, being a more petite molding than the Monogram part and also
painted in steel. The landing gear legs and wheel hubs were given a
black wash to bring out the details.
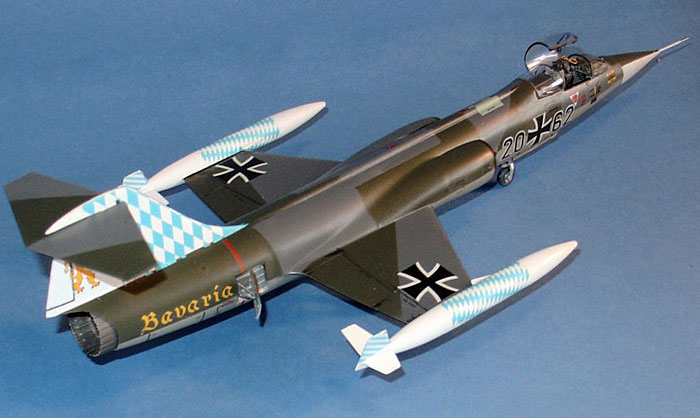
The gears and doors were installed, followed by the Hasegawa burner can,
and the CE seat. The canopy and sill were enhanced with the appropriate
details from the Eduard PE set. I am pleased with the effort and will be
refining the techniques used to do two more Monogram F-104Cs, one in NMF
based in DaNang in 1965 and the other as part of the 8TFW in SEA
camouflage based at Udorn RTAFB in 1966.
-
The Century Series,
In Color, Squadron Signal Publications Lou Drendel, 1980
-
Lockheed F-104
Starfighter - WarbirdTech Volume 38, Specialty Press, Jim Upton,
2004
-
Warbirds
Illustrated No. 44 Peter R Foster, 1987
-
F-104 Starfighter
Detail & Scale 38, Bert Kinzey, 1991
-
F-104 In Action,
Squadron Signal Publications: # 1027, Lou Drendel , 1976
-
F-104 In Action,
Squadron Signal Publications: # 1135, Phillip Friddell, 1993
Click
the thumbnails below to view larger images:
[../../photogallery/photo00013984/real.htm]
Model, Images and Text
Copyright © 2007 by John Doerr
Page Created 16 July, 2007
Last Updated
24 December, 2007
Back to
HyperScale Main Page |
 Home
| What's New |
Features |
Gallery |
Reviews |
Reference |
Forum |
Home
| What's New |
Features |
Gallery |
Reviews |
Reference |
Forum |