|
Collect-Aire's
1/48 scale
YF-23 “Black Widow II”
by
"Bondo" Phil Brandt
|
|
|
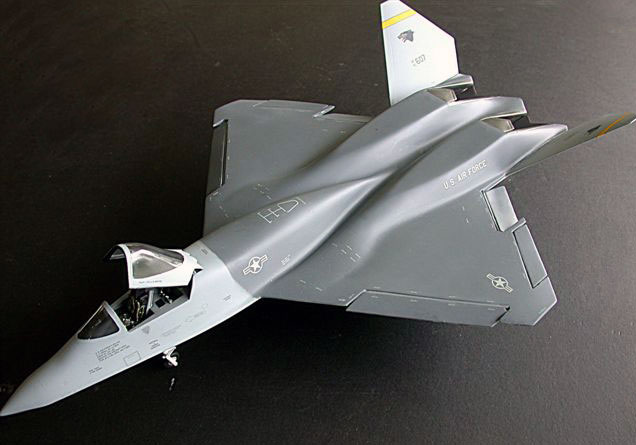
Northrop-McDonnell YF-23
“Black Widow II” |

HyperScale is proudly supported by
Squadron.com
We Interrupt Regular Programming...
Bondo Industries now interrupts HyperScale Broadcasting Network’s
mostly WWII, most-of-the-time programming to showcase an example of
what’s been happening in the ensuing six decades.
Our firmly WWII-ensconced brethren may be shocked to learn that, in the
21st Century, there are actually aircraft that don’t have props or
reciprocating engines, aircraft that regularly fly above Mach 2,
airplanes that fire their air-ro-air missiles while the enemy is beyond
visual range, and, what I’m sure will be most unsettling to Luftwaffe
enthusiasts, that the German Air Force flies many American-designed
airframes!
As representative of the legion of aerospace advances, we will examine
the construction of a 1/48 Northrop YF-23 “Black Widow II.”
Background
From all reports, the 1991 Next Generation Air Superiority Fighter
flyoff between the Lockheed-Martin YF-22 “Raptor” and the
Northrop-McDonnell YF-23 “Black Widow II” was an extremely close affair.
Although the YF-23 excelled in various flight aspects and was thought by
some to be aesthetically more pleasing, the reason that the nod went to
Lockheed’s innovative design might have been because of that company’s
lengthy record of successfully getting advanced products out the door,
whereas Northrop had in the past experienced design and production
difficulties.
The Build Begins
At first look, the Collect-Aire kit seemed to be (for a Collect-Aire
release, at least) a relative no-brainer.
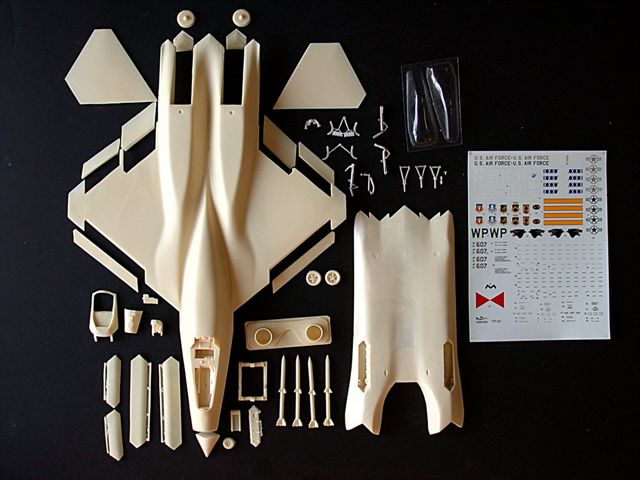
The massive main airframe, including wings, was formed out of just
two large resin castings, the upper half integral with the wings and a
lower half including intake trunks. All the modeler had to do was add
the slabs and glue in the metal gear. Yeah, right...
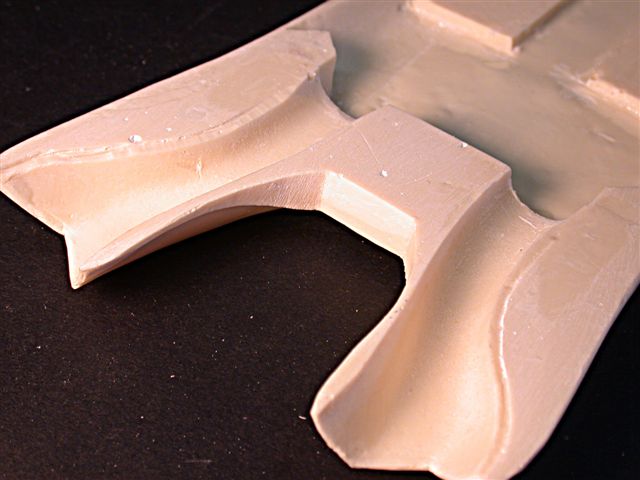
Molding
Although overall molding was very smooth, with minimal warping
(exception: slats and ailerons which maintained an annoying “memory” to
regain warping) and very petite engraving, some of these qualities were
for naught because your correspondent’s kit had serious casting flaws in
the lower, aft fuselage portion, where some areas were literally paper
thin, and it was obvious that additional resin had been poured on top of
already cured resin in an attempt to effect a fix.

Then there were the odd surface discontinuities on the top surface of
both the large trapezoidal wings. That is, there was a large portion of
outer wing surface that was visibly thinner (by just a few thousandths)
than the rest of the wing. The discontinuity was very noticeable and ran
across each wing chord in a wavy line, requiring aggressive block
sanding and applications of 3M Blue Acryl lacquer putty. Some might say
it was just another day at the Difficult Kit Division of Bondo
Industries!
Fit
One might think that full length, cast-in intake trunks are a very
nice innovation in a resin jet kit. Mebbe so...if the inner trunk walls
align properly, with a minimal seam between top and bottom castings. If
you’re betting that this didn’t happen, you’d be a winner. Aligning the
monolithic top and bottom halves required hot water and large C-clamps
to coax the assembly together with epoxy glue. Getting the outer
surfaces to align–especially the zigzag fuselage trailing
surfaces–caused a significant, and I do mean significant, misalignment
of the intake trunk joints. Since said trunks are approximately four
inches long, it’s virtually impossible to sand any further back than,
say, two inches. Luckily, the intakes are under the wings and the trunks
have a lot of curvature, so one literally has to peer into the depths of
each trunk with a mini-light to see the gaps that exist. I even
fashioned a putty application tool in an ultimately vain attempt to fair
in the misaligned seams all the way back to the compressor faces.
The severely angled slabs were butt-joined one at a time to the
empennage with five-minute epoxy. I would hold the fuselage at such an
angle that the slab would be vertical, and I made small adjustments
until the epoxy cure was enough to hold things in alignment.
Landing Gear
Luckily the gear struts are cast metal, because this is a large,
heavy model.
I’ve even worried that the trailing axle, knee-action design of the
mains might not be able to stand up to the weight, but so far, so
good...
Cockpit
The cockpit is fairly plain, with a cast metal instrument panel and
an apparently cloned resin seat .
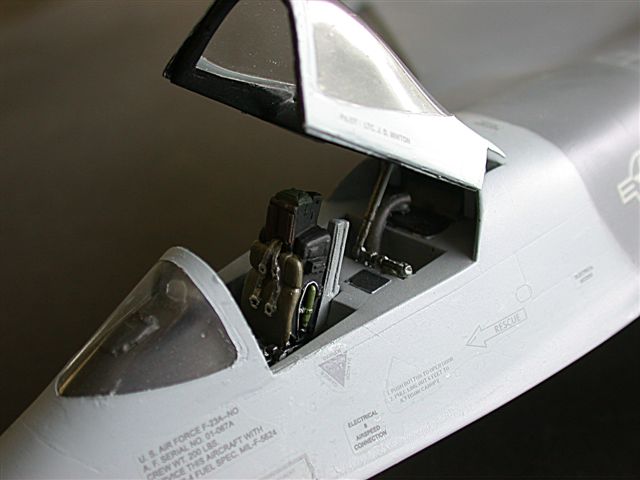
I chose a more detailed aftermarket seat.
Clear Parts
The vacuformed windscreen/canopies (two copies are provided) are
fairly clear and thin, but must be cut apart if you want an open cockpit
configuration. The “saw-blade” aft edge lines of the canopy are very
hard to discern in the vac molding, and much care had to be used in the
trimming.
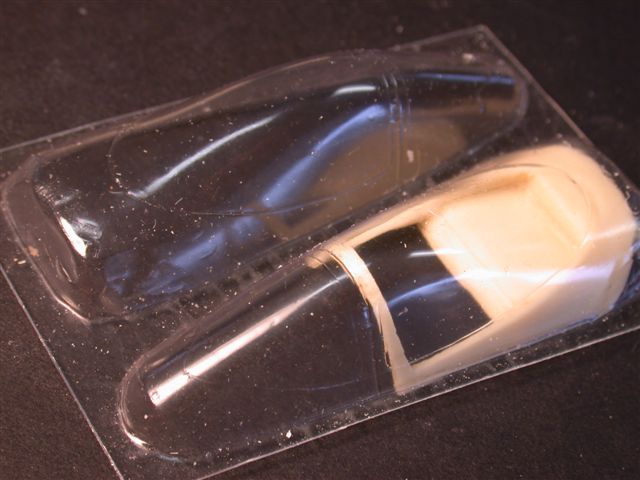
To Collect-Aire’s credit, they provide a one-piece resin canopy interior
structure which saves a lot of scratchbuilding, again, if an open
configuration is desired. What isn’t included is a windscreen structural
arch, and this had to be fabricated from .080 sheet and the trusty
Dremel-with-sanding-drum.
Weapons
Collect-Aire provides four resin missiles (AMRAMS?) and a launch rack
which is embellished with cast metal bay door mechanisms and details. I
elected to pass on an opened weapons bay and extended launcher/missiles
because IMO the whole assembly adds a clunkiness to the overall sleek
appearance of the airframe.
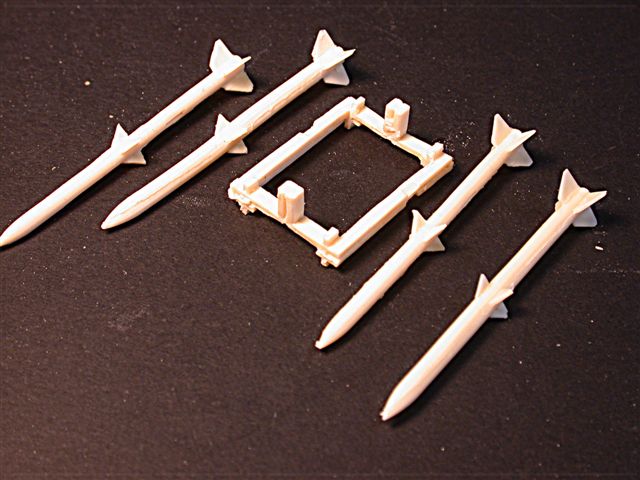
Of course, by skipping the opened bay doors I was inviting the task
of gluing and puttying the ill-fitting doors.
Finishing
Multiple iterations of the old lacquer primer/Blue Acryl/wetsand/rescribe
routine eventually provided a decent surface for the three shades of
Testors Acrylic (gunship gray, dark ghost gray and light ghost gray)
which mimic the scheme used by many of today’s F-16s. There were some
small areas in which the resin seemed to “bleed through” the paint
layers (even though the resin had been scrubbed with soapy water and
rubbed down with lacquer thinner), creating small, weird shiny areas.
Fortunately the final dusting with Testors clear flat minimized this.
Markings
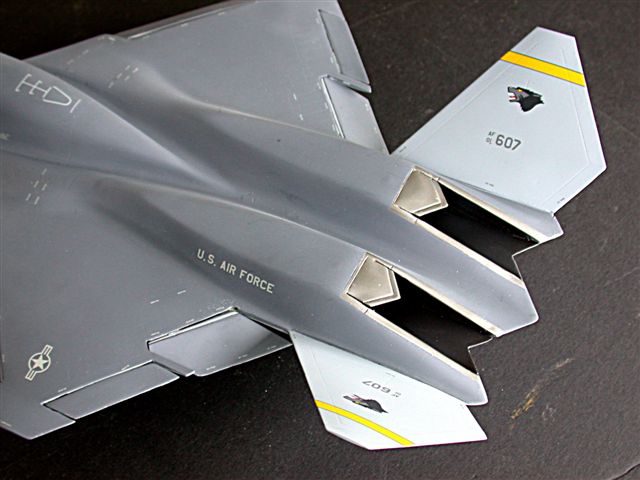
This modeler isn’t nuts about prototype schemes , preferring real
world operational ones. Thus, I took advantage of the kit’s 8th Fighter
Wing “Wolfpack” hypothetical markings that might’ve been used had the
YF-23 deployed to Kunsan, South Korea as an F-16 replacement. Hey, it
coulda happened! The excellent decals were custom-designed by Gerry
Asher of Fox Three Studios in Fort Worth. Unfortunately, locations for
some of the stenciling were not depicted in the instructions. Even the
prominent “Wolfpack” logo locations were not shown, so I copied the
location of the logo from Kunsan F-16 pix. Some additional stencils were
added from an Aeromaster F-16 sheet.
One more resin “beating”! But, as with most of Collect-Aire’s offerings,
this bird’s is (so far) the only 1/48th game in town.
We now return you to our regularly scheduled WWII programming.
Click on the thumbnails
below to view larger images:
[../../photogallery/photo00019609/real.htm]
Model, Images and
Text Copyright © 2007 by "Bondo" Phil Brandt
Page Created 31 July, 2007
Last Updated 24 December, 2007
Back to HyperScale
Main Page
|
 Home
| What's New |
Features |
Gallery |
Reviews |
Reference |
Forum |
Home
| What's New |
Features |
Gallery |
Reviews |
Reference |
Forum |