|
Hasegawa's 1/48 scale
Supermarine Spitfire
Vb
by Roger Fabrocini
|
 |
|
Supermarine Spitfire
Mk.Vb |

Hasegawa's 1/48 scale Spitfire Mk.Vb
is available online from Squadron.com
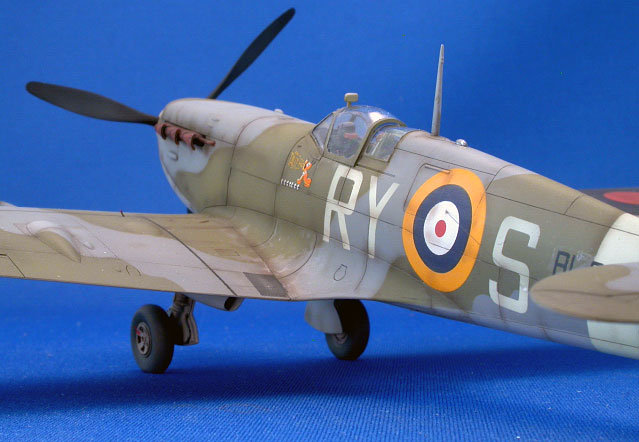
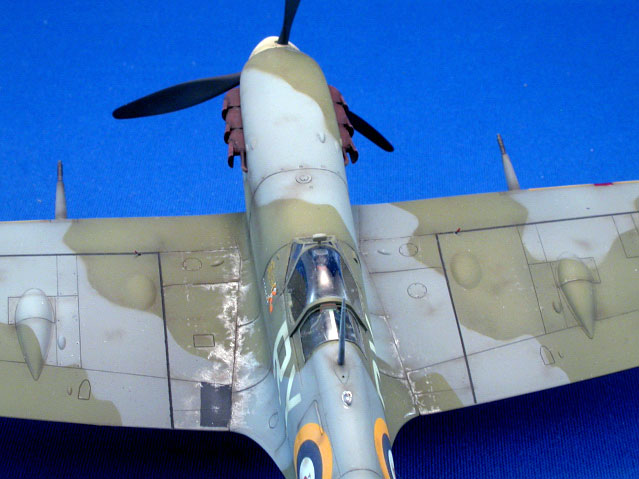
This is the Hasegawa 1/48 scale Spitfire Mk. VIb (kit #Jt-7) modeled
as a Spitfire Mk.Vb. The Mk.VI is basically the Mk.Vb kit with an
additional spruce containing the extented wing tips, 4-blade prop. and
assorted bumps and intakes.
I had recently viewed the Czech film "DARK BLUE WORLD" and being that my
mother (God Bless her) was born and raised in Czechoslovakia, I was duly
inspired to model a Spitfire in the markings of one of the RAF squadrons
manned by Czech pilots. The Spitfire Mk.V was produced in a dizzying
array of configurations and I had a certain one in mind to model, mainly
so I could use as many Ultracast parts as possible.
Sometimes I think I start a kit just so I can use Kevin McLaughlin's
beautiful resin parts.
Compared to the much praised Tamiya Mk.Vb Hasegawa's offering seems
more, as Tony Bell so aptly put it, lithesome. The detail is definitely
more petit. I found no areas that needed correcting. The only omission
is the lack of a windshield with a external armored glass (someday I
plan on addressing that). I did add the following parts to "enhance" the
detail.
-
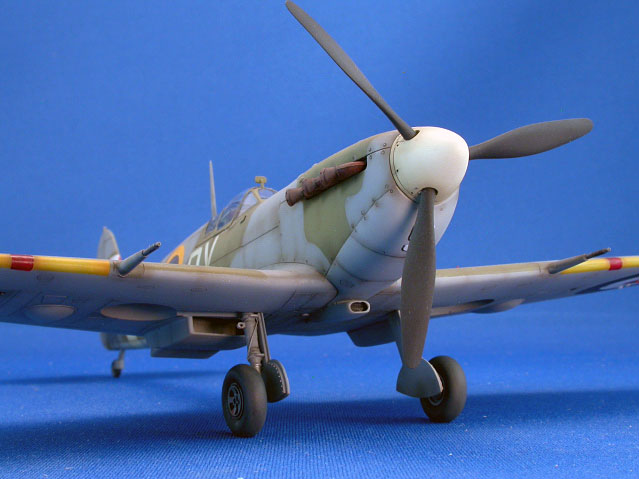
Ultracast de Havilland 3-blade prop
and spinner (48112)
-
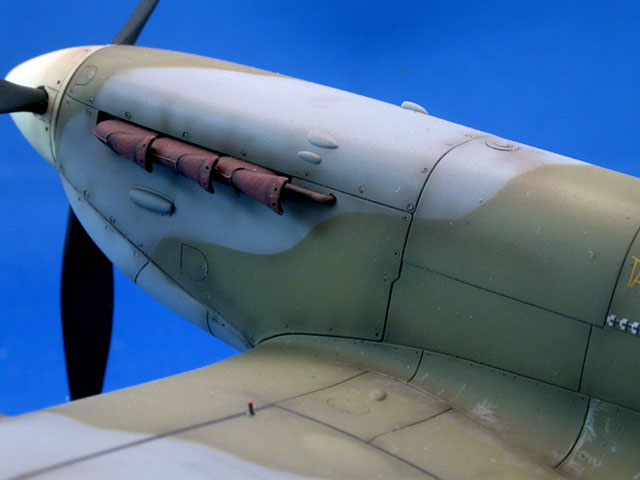
Ultracast flared exhaust stubs
(48044)
-
Ultracast B wing cannon (48145)
-
Ultracast Seat with Sutton Harness
(48020) (see what I mean)
-
True Detail resin Spitfire Mk.V
cockpit set
I almost always search the various model websites for build articles
on my current project to give me a 'heads-up' on any problem areas to
look out for. Suprisingly there are not many on the Hasegawa Mk.Vb. I
did find useful information concerning the fit of the wing to fuselage
joint in a 2001 article by Brad Main. (thanks Brad...again) I solved it
by first gluing the upper wings halves to the assembled fuselage, then
fitting the lower wing. I found it much easier to finesse the fit of the
lower wing, where seams are more easily dealt with, then deal with the
notoriously difficult wing to fuselage joint.
I cut off the molded on wing cannon and drilled out holes to fit the
Ultracast replacements. the fit was excellent and I use a small smear of
white glue to fill a few tiny gaps. The only other problem were the wing
tips. They are a tad thinner then the wing. I glued them flush with the
upper wing surface and sanded the joint on the bottom.
Some Mk.Vs were fitted with exhausts with intensifier tubes for gun
heating. Hasegawa poorly represents these as small tabs molded to the
fuselage, aft of the exhaust opening. I cut these off, drilled holes in
the fuselage and exhaust and fashioned new tubes out of brass wire.
As I stated Hasegawa's scribing is petit, in my opinion a little too
fine in regards to the cowling fasteners. Spitfires seem to have a
reinforced flange around the fasteners. This I replicated by punching a
larger circle around the existing fastener with a beading tool.
Paint
I primed the surface first with Mr. Surfacer 1200. My subject was
finished in the day fighter scheme of Medium Sea Grey lower surfaces,
Dark Green and Ocean Grey upper surfaces. I used the excellent Mr. Color
range of lacquer paints to do the camouflage.
I used Tamiya masking tape to mask the demarcation lines between colors.
I printed out a 1:48 scale line drawing of a Spitfire Mk.Vb and drew the
camouflage lines on to the drawing using a dark marker. I layed a piece
of clear acetate over the drawing and layed a piece of Tape over the
area I wanted to duplicate. I could see the demarcation lines through
the Tamiya tape and simply traced them on to the tape, marked off
reference points for placement, then cut them out and applied them to
the model's surface.
I like to create depth to my finish by painting highlights and
shadows on to the surface. After I apply the base color I go back over
it with a lightened and thinned mix of it. For the greys, I lightened
with white. For the Dark Green I added Zinc Chromate yellow. I'll start
toward the middle of panels and slowly build up the effect in random
patterns. The trick is to apply the paint very thinly so that you
preceive no variations in the color. It is a tedious process. I also go
back and spray small areas with the original base color to acheive a
little more contrast.
I found it easier to mask and spray the yellow wing ID edges after I
painted the airframe. I painted the spinner, fuselage ID band and codes
with Gunze Sky. I "killed two birds with one stone" by painting the
codes. One was I could match the codes to the color of the spinner and
fuselage band and the other was that I would not have to use the
'horrible' Tally-Ho decals. (more on that in a moment)
I use Mr. Hobby Super Clear lacquer as a gloss coat for decals and
Humbrol Matt-cote as a final matt finish.
The latest vinyl acrylic hobby paints manufactured by Andrea, Vallejo
and Reaper are a Godsend for brush painting. If you have not tried them
I suggest you give them a try. I use them for various bits in the
cockpit, tires, touch-up and to create that heated, rusted metal effect
on the exhaust. When asked I always direct people to the Vallejo site
for an excellent tutorial on how to use these paints. http://www.acrylicosvallejo.com/
They are able to explain things far better then I can, though briefly
they are applied in thin 'veneers' to create quite stunning effects.
Markings and Weathering
Tally-Ho is a Czech Republic decal and paint mask manufacturer. Not
suprising that I found a suitable subject on their decal sheey 48-017,
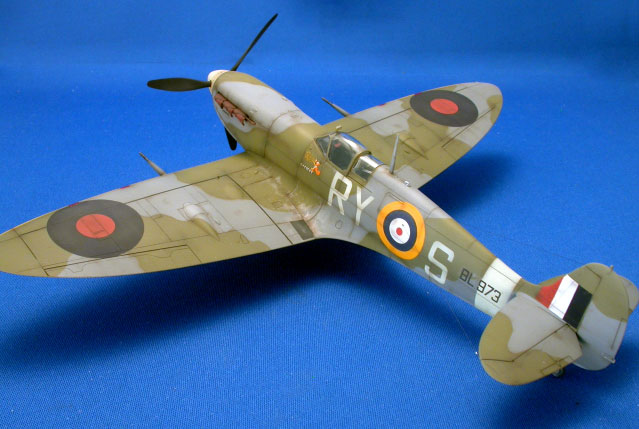
"Spitfire Mk V Aces Part I". I chose The Spitfire BL 973, RY S, of
Hornchurch wing, No. 313 (Czech) RAF squadron, Fairlop AFB, Flown by
Flt./Lt. Stanislav Fejfar.
My past experiences with Tally-Ho's decals have been exercises in
frustration. Their performance leaves much to me desired, silvering with
no encouragement on my part and resisting all attempts to make them
conform to panel lines, etc. I also find their research suspect. They
are beautifuylly printed though. In the end I only used the personal
"Tally-Ho" dog markings, serial number and letter "S" under the nose,
again solving the code problem with the masks. I figured that I would be
safe for the fact that they were being applied to basically flat areas
with just one panel line to deal with. A recent post on the forum
suggested using lacquer thinner to fix silvered decals and I used this
technique to good effect on problem areas. Though finished in the Day
Fighter scheme, Tally-Ho states that it carries the early style national
markings. 56" dia. red/blue roundels on the upper wings, 50" dia.
red/white/blue lower wing, 35" diameter Red/white/blue/yellow roundels
for the fuselage and 24" wide Red/white/blue fin flash. The only picture
I could find of BL 973 was a small one of Flt./Lt. Fejfar standing by
the cockpit showing the personal Pluto "Tally-Ho" marking in the RED
KITE title "Czechs in the RAF" by Zdenek Hurt. I went with Tally-Ho's
recommendation with a bit of reluctance. "Spitfire the history" lists BL
973 doing to 312 squadron, though it also states it lost on the same day
Flt./Lt. Fejfar was shot down and killed over France. I eventually
sourced the national markings from an Aeromaster sheet.
More weathering was acheived with a post shade of very thin
red-brown/black mix. I took Brett's advice and used it to tone down the
demarcation lines between the colors a well as weather the markings. To
finally tie everything together I added a drop or two of white to my
brown/black mix, thinned it even more, then lightly sprayed that over
the uppersurfaces.
The final bit of weathering is creating the paint chipping along the
wing roots with a PrismaColor pencil. Time spent examining wartime
photos of Spitfires helps get it right.
My mother would say it's about time I modeled a Czech subject. It
just took a little cinematic inspiration to motivate me. If online
builds are any indication the Hasegawa Spitfire Mk. Vb is not very
popular, especially when compared to the Tamiya offering. With a little
help I think it builds up to a very nice looking Spitfire.
As always, thanks for the indulgence.
Click on the thumbnails
below to view larger images:
[../../photogallery/photo00016684/real.htm]
Model, Images and Text Copyright ©
2007 by Roger Fabrocini
Page Created 13 June, 2007
Last Updated 24 December, 2007
Back to HyperScale
Main Page
|
 Home
| What's New |
Features |
Gallery |
Reviews |
Reference |
Forum |
Home
| What's New |
Features |
Gallery |
Reviews |
Reference |
Forum |