|
Czech Master Resin's
1/72 scale
Spitfire LF Mk
IXE
by Mark Davies
|
 |
|
Spitfire LF Mk IXE |

HyperScale is proudly supported by Squadron.com
Czech
Master Resin (CMR) probably produces more Spitfire variants than any kit
other manufacturer, and I suspect even exceeds those offered by New
Zealand’s Ventura kits. Their Spitfire LF Mk IXE also serves to set a
new benchmark in terms of accuracy and completeness. Several detailed
in-box reviews are available by following these links:
Hyperscale,
Modelling Madness and
Internet Modeller.
The
kit is boxed with attractive artwork, and all parts are sealed in
compartmentalised plastic bags. It consists of a mixture of CMR resin
and Eduard pre-painted and plain Photo-Etch (PE). Suffice to say that
CMR’s excellent resin mouldings are 99.9% pin-hole free with very thin
attachments to the casting blocks. Here is a run-down of some of the
kit’s options and features.
Firstly options:
-
Clipped or full-span wings.
-
Resin wheels with hubs, or resin wheels designed to use one of
several styles of PE wheel hubs.
-
Flattened and round section exhausts.
-
Two types of rear vision mirrors in both resin and PE.
-
Spinner and separate blades, or spinner with mounted blades.
-
Wing and centre-line bomb racks with resin or PE sway braces.
-
Resin tail-wheel and leg, or separate resin tail-wheel and PE fork.
-
Resin or PE pilot’s entry flap, plus a choice of gun-sight types.
-
For the wing armament there are four or two cannons, two 50 cal
barrels and sleeves, plus blanking caps for unarmed versions.
-
In addition to Bf 109 drop-tanks (used by some aircraft on their
ferry flight from Czechoslovakia to Israel) there are three bombs.
And
secondly some features:
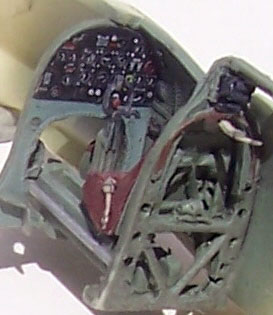
- A
combined resin and pre-painted PE cockpit interior.
-
Two canopies are provided along with an excellent Eduard masking set
made from the same type of paper as Tamiya masking tape.
-
Thorough instructions, colour-scheme guides and a photo-walkaround.
- A
plethora of decal choices for Czechoslovak and Israeli machines,
plus a separate full stencil set applicable to most Spitfires. These
last two items are very high quality and printed by Tall Ho decals.
Upon
opening this superb kit I was confronted with the choice of which
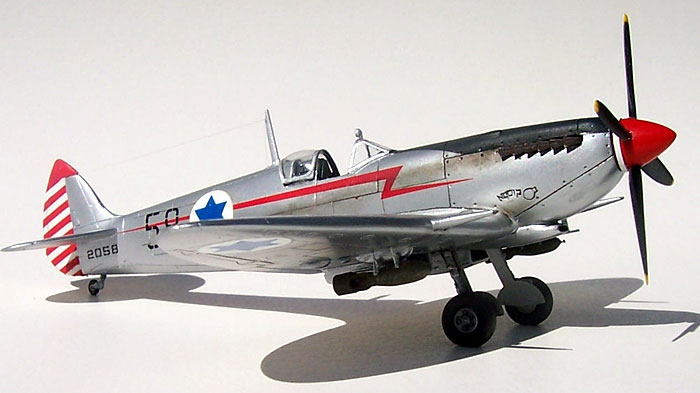
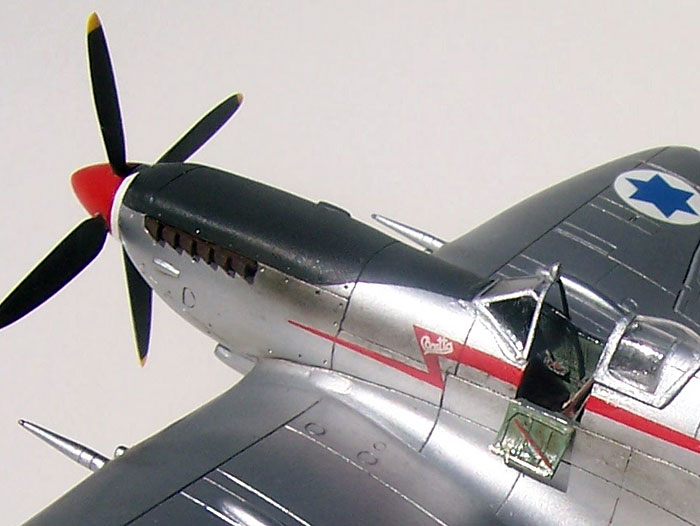
version to model. In the end I settled on an operational Israeli machine
for no other reason that it featured full-span wings with a very
attractive natural metal scheme. I build models of aircraft from fall
manner of air forces, and the opportunity to do a Spitfire Mk IX in
colours other than grey and green was well worth taking.
Removing the parts from their casting blocks needed barely more effort
than removing an injected kit’s plastic parts from sprues, so fine were
the attachments. I was also pleasantly surprised with the excellent fit
of the main airframe parts, which was on par with good injected kits.
This good fit was to continue throughout the build with one small
exception (see later).
Click the thumbnails below to view larger
images:
[../../photogallery/photo00021904/real.htm]
I
liked the combination of resin and PE, which tended to optimise the
properties of each to the parts being modelled, with a nice choice of
medium in some cases to suit individual skills and preferences (such as
bomb sway braces). The pre-painted Eduard components work well and save
on time. It is a pity in some ways that a 1:72 Spitfire’s cockpit is so
small, as several good details are hard to see.
I
learned some interesting information about E-type wings during this
build from a friend who restores Spitfires for a living. Having noticed
the outboard ammo hatches in the wings I checked to see if the model
should have barrel holes in the wing leading edges. I was advised that
the E wings on Merlin engine Spitfires retained the ammo hatches for the
out-board guns, although no guns were fitted and no barrel openings in
the wings were present. Instead the ammo bays were used to contain
additional oxygen bottles. E-wings on griffon engined Spitfires did away
with the out-board ammo hatches as the extra oxygen bottles were located
in the rear fuselage for centre-of-gravity reasons associated with the
larger engine.
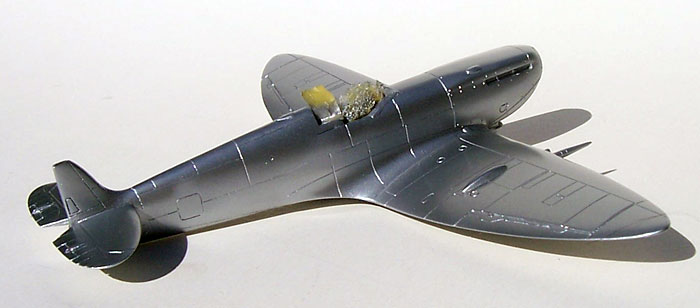
I
mentioned one exception to good fit. This involved the very nice PE
radiator and intercooler matrix faces. They were slightly too tall to
fit without modification in the underwing radiator housings. The simple
fix was to trim with sharp scissors a small strip off the top of each
face where it would not be seen. What I did like about these PE matrix
faces was I could mask their steel colour with tape, install them and
paint the airframe in Alclad II White Aluminium. All I needed to do was
then reach in with a sharp bald and tweezers to lift and remove the
masking tape. A quick oil wash on the PE and the matrix pattern was
nicely revealed.
I
chose to use the spinner and separate prop blades as I feel they look a
bit better than spinner and blades all moulded as one. However, I always
struggle with mounting separate blades, and feel I could maybe have done
better if I had more patience. Given that this was my sixth finished
model in about the first 10 weeks of 2007 I don’t always have the time
to get too fussy.
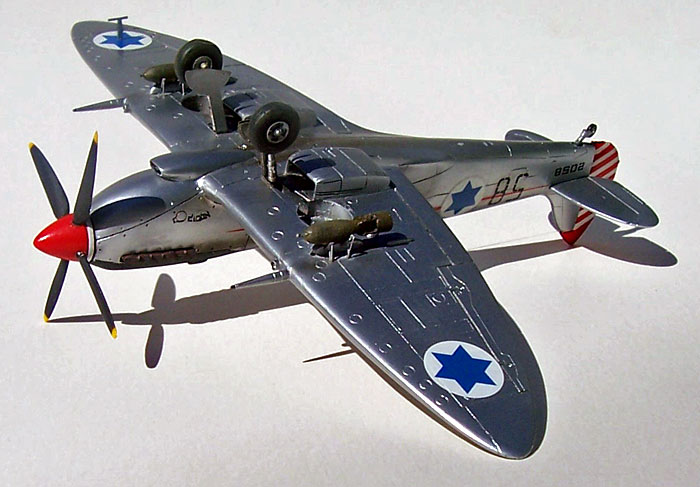
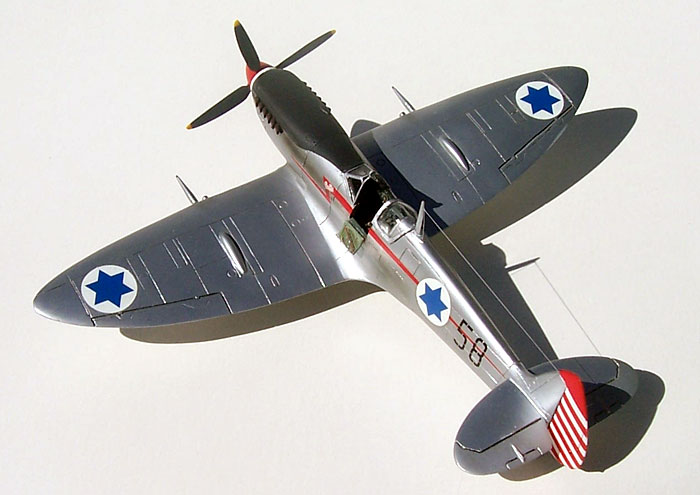
I
decided to mount bombs on my machine as photos I have seen of Israeli
Spitfires show them with bomb racks, and a friend of mine who is an
Israeli AF fan advised they were used as fighter-bombers. I mounted the
bombs with PE sway braces (prematurely) and them knocked them off, then
with resin braces and knocked these off. Finally I delayed fitting the
bombs and made my own sway braces from stretched sprue.
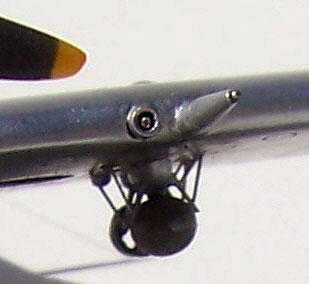
During
the build I managed to drop and lose both of the kit’s resin .50 cal
tubes and barrel front. As a result a scratch-built mine by hollowing
out some rod and inserting a small piece of hypodermic needle to
represent the gun barrel.
Masking the anti-glare panel was simple as, having used Alclad II, I had
no paint-lifting worries. The other thing I like about this paint is it
totally resistant to oil washes which allowed me to dull & dirty the
finish a little, and break the uniformity that was apparent when first
painted.
I used
the Eduard canopy masks, my first time with this product, and found them
to be very good. Unfortunately I was over-enthusiastic to see how well
they had worked, and I removed them a little too soon whilst the Alclad
had softened the underlying framing’s enamel colour. In the end I
resorted to using painted decal strip on the canopies as I had damaged
the masks. This was my fault, and I feel I can highly recommend this
masking product.
The
Tally Ho decals were excellent, although for some reason the tail
stripes seemed more fragile. This was probably because I moved them
around more.
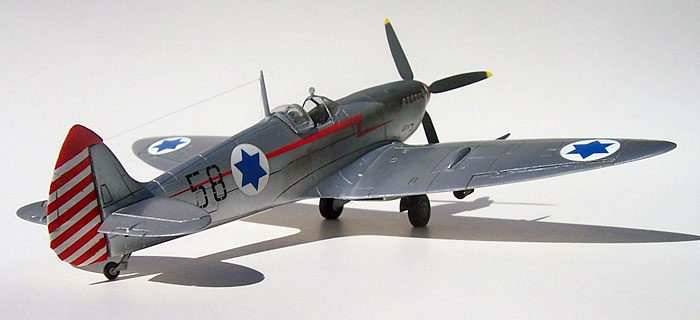
Given
that at first glance this appeared to be quite a complex kit, I was
pleasantly surprised at how straight forward it was to build. Although
far from perfect due to my skill level, I am still pleased with the
result, and have what I feel is an accurate and pleasing to the eye
Spitfire in my display cabinet.
Click the thumbnails below to view larger
images:
[../../photogallery/photo00007631/real.htm]
Model, Images and Text
Copyright © 2007 by
Mark Davies
Page Created 10 April, 2007
Last Updated
24 December, 2007
Back to
HyperScale Main Page |
 Home
| What's New |
Features |
Gallery |
Reviews |
Reference |
Forum |
Home
| What's New |
Features |
Gallery |
Reviews |
Reference |
Forum |