|
Airfix's 1/48 scale
Supermarine Spitfire
IXc
by Brett Green
|
 |
|
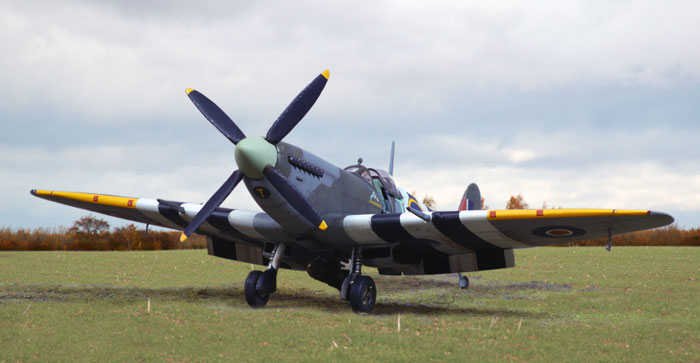
Supermarine Spitfire Mk.IXc |

Airfix's 1/48 scale Spitfire IXc / XVIe is available online
from
Squadron
Background
The search for an ideal 1/48 scale Spitfire Mk.VIII / IX / XVI has
been something akin to the quest for the Holy Grail. Every time modellers get a
whiff, that potentially perfect Spitfire rapidly recedes into the
mist.
Hopes were high for the Ocidental offering, but that kit had some
serious dimensional and cross-section problems. The ICM 1/48 scale
Spitfire IX was more accurate, but early pressings were plagued with
moulding flaws and the fuselage was a bit skinny. Over-engineering also
made this kit a challenge to build. Hasegawa's 1/48 scale Spitfires are
beautifully detailed, but the whole family is blighted with a noticeably
short fuselage and related detail issues.
It is as if this great aviation icon is cursed.
Airfix is the latest company to roll the dice for this most-produced of
all Spitfire variants.
Airfix's 1/48 scale Spitfire IXc / XVIe in the Box
 Airfix
released their almost new Spitfire IXc / XVIe early in 2006. It
comprises more than 70 parts in injection moulded plastic, some of which
were originally included in their Mk.Vc kit from a few years ago Airfix
released their almost new Spitfire IXc / XVIe early in 2006. It
comprises more than 70 parts in injection moulded plastic, some of which
were originally included in their Mk.Vc kit from a few years ago
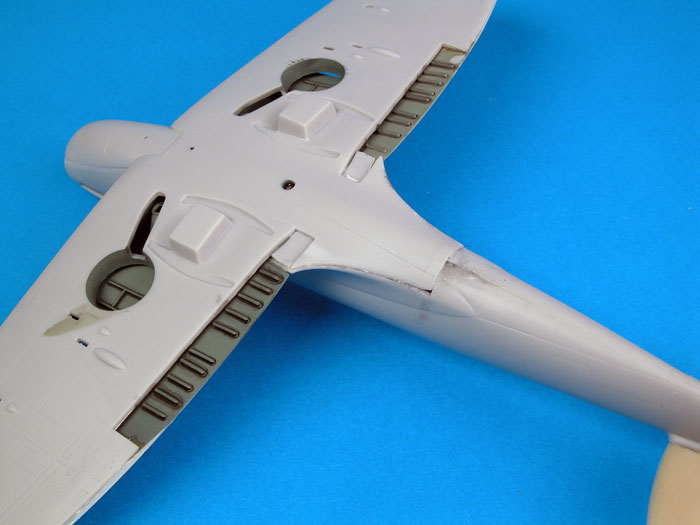
The new parts are well done. Panel lines are crisply recessed,
supplemented with subtle rivet and fastener detail in places. The
texture of the new parts is satin, and benefits from a light overall
sanding. There were only a couple of minor
sink marks on my sample. These are on the starboard side of the fuselage
under the canopy, and were quickly dispatched with putty and a
sanding stick. The only other moulding eccentricity is the massive sprue
connectors on the wing parts.
The wings are noticeably thick, as are the trailing edges of all the
control surfaces.
It is a great relief to find that the general outline of the airframe,
and the overall dimensions, correspond with respected plans. The shape
of this Spitfire is basically accurate.
So, what can we build from the parts in the box?
Airfix supplies us with a standard "razorback" fuselage, plus a late
elliptical wing. In addition to this basic canvas, Airfix offers two
styles of upper cowl (early "flat" style and the later bulged version,
usually seen covering Packard Merlins), three varieties of separate wing
tips (standard, clipped LF and the pointed HF versions), and three
versions of wing gun covers (standard two-gun C, four gun C, and E).
Only the flared style of exhausts are in the box. Two wheel patterns are
included though - four spoke and covered, both with smooth treaded tyres.
Elevators are the late "kinked" style only, and the intake under the
nose is also the late style. Early (rounded) and late (pointy) rudders
are also included.
Taking all these options into account, we can build any razorback
Spitfire IX or XVI straight from the box except the earliest production
Mk.IX. And even if you do want to build an early Mk.IXc from, say, 1943,
you will only have to rescribe the elevator hinge line and replace the
intake.
Airfix has also provided separate flaps. Keep in mind, though, that the
flaps were either full up or full down, and it was rare to see flaps
down when the Spitfire was parked.
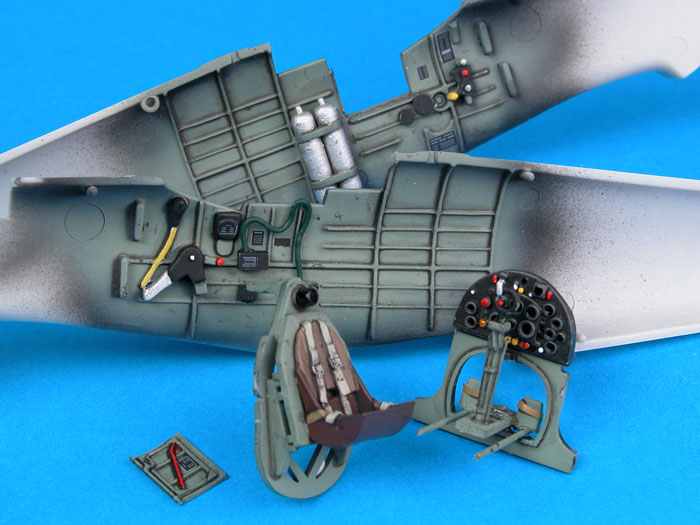
In the cockpit, a few prominent features such as the oxygen regulator,
oxygen hose and some wheels and boxes are missing, but they are very
easy to add from scrap plastic and wire if you feel so inclined. The
seat looks somewhat oversize.
The exhausts, propeller blades and wing bulges are poorly shaped, and
there is no face detail (neither front nor rear) inside the big
radiators.
The six clear parts are very clean, but thick.
Although the cockpit can trace its roots directly back
to the 1970s-vintage Airfix Spitfire Vb kit, I actually like the deep,
albeit sparse, features. It is a good basis for further detailing, and
takes painting and weathering very well.
I replaced the pilot's seat with an Ultracast item due
to its nice detail and also because it was the only Q harness that I
had. I accidentally broke one of the plastic floor rails, so I replaced
them both with brass wire. Apart from that, I only added some boxes and
punched wheels from scrap styrene, rudder toe straps from lead foil and
an oxygen hose from UpNorth flexible wire. Reheat cockpit placard decals
were also used for effect.
The beautifully detailed pilot's door is from Ultracast
too. It is designed for the ICM kit, but fits the Airfix Spitfire quite
well. By the way, the red crowbar is a feature of postwar restorations,
but I could not resist the splash of colour.
After posting the above photo to HyperScale's Plastic
Pics Forum last year, one of our eagle-eyed visitors pointed out the the
Mk.IX would not have been fitted with the cushioned headrest. I
therefore sliced this part off and repainted the armour plate. This was
a little tricky as I had already glued the fuselage halves together!
I disregarded the suggested construction sequence and
completed the main fuselage components before offering it to the wing.
Using this sequence, it is easy to get a perfect fit between the
fuselage halves and the separate top and bottom cowl pieces. It also
ensures the correct spacing on the bottom of the fuselage at the front
of the wing root.
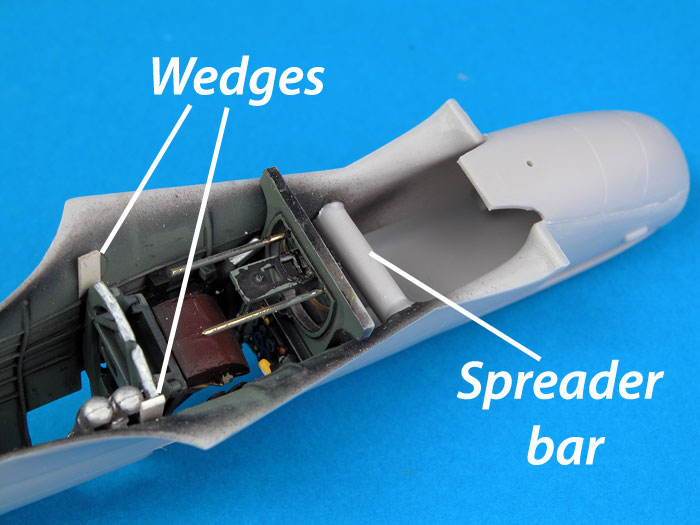
Test fitting showed that there would be a gap between the wing and the
fuselage at the wing root. The solution was to spread the fuselage.
Fortunately, I had not glued the bottom half of the rear cockpit
bulkhead to the fuselage halves. This was just as well, as it offered
the flexibility to insert two wedges of plastic on either side of the
bulkhead. This spread the fuselage at the mid section.
Further test fitting indicated that there was still a gap toward the
front of the wing root. A length of sprue was tested, then glued into
place to spread the fuselage in this area too.
The bottom of the rear bulkhead seemed to foul with the mid flap roof
section, so I cut a few millimetres off the bottom of the bulkhead.
Click the thumbnails below to view larger
images:
[../../photogallery/photo00029969/real.htm]
I could not find any credible reference photos that showed the wheel bulges on the wing of an early Mk.IXc during wartime,
so I used the top Mk.Vc wing supplied in the kit instead. There was a
slight overhang at the front and the rear, and some additional trimming
and sanding was necessary at the wing root to obtain a perfect fit, but
a perfect fit was eventually had.
The wing was secured with Tamiya Extra Thin Liquid Cement and copiously
taped while the glue dried. The dihedral was set with tape stretched
from wing tip to wing tip.
The result was a near perfect fit in all the most important places - the
wing root, top cowl, bottom cowl. Underneath is a little less tidy, but
still easily manageable. I used Milliput to fill the small gaps at the
front, rear and on the wing fillets.
Note the upper wing overlapping the lower wing halves in the photo
below. I sanded a smaller but similar overlap at the leading edge. The
trailing edge overlap was filled with Milliput and sanded razor thin.
The wing tips did not fit well, with a step at the top
and bottom and not conforming to the profile of the ailerons' trailing
edges. Putty, sanding, re-contouring and re-scribing was the solution.
The trailing edges of the control surfaces are
unacceptably thick. I knew that I would have to virtually rebuild them
if I took the thinning option, so I replaced them instead. I used the
small rudder from the ICM Spitfire VIII kit (I did not need that version
of the rudder anyway). This was much sharper at the trailing edge, and
slimmer overall. Before the fuselage halves were joined, the fin halves
at the rudder hinge line required significant thinning in order to avoid
a noticeable step between the thick kit fin and the nice skinny rudder.
A small shim of styrene strip was also added to the top of the fin to
fill a small gap. The leading edge of the fin was slightly lumpy after
the rudder was glued in place, but a couple of minutes re-profiling
smoothed over that problem.
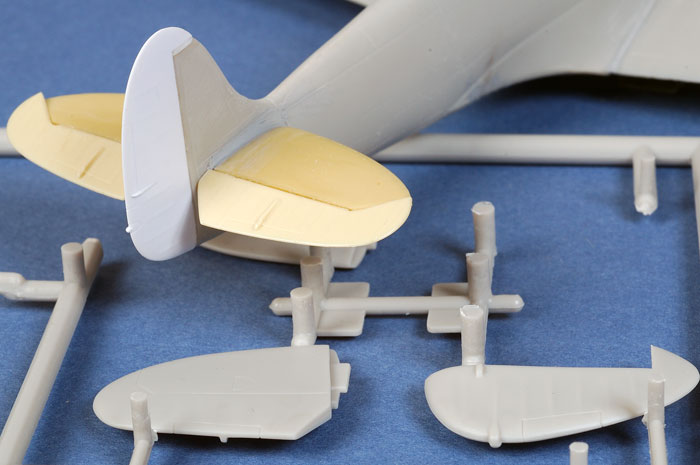
I was planning to finish my Spifire as an early Mk.IXc,
but the Airfix kit only supplies the "cranked" late version
elevators. I fitted Ultracast's early uncranked elevators instead. They did not need much
work to adapt them to the Airfix kit, and they are appropriately thin at
the trailing edge. The Ultracast control surfaces also offer the benefit
of some of the best fabric rendition in the business.
The result was a much more convincing tail end for my
Spitfire.
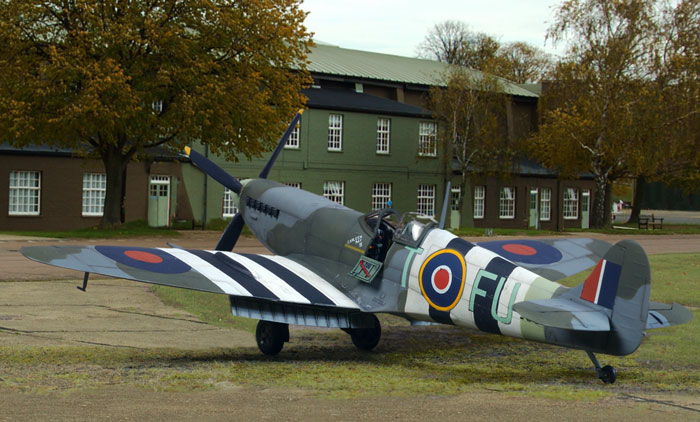
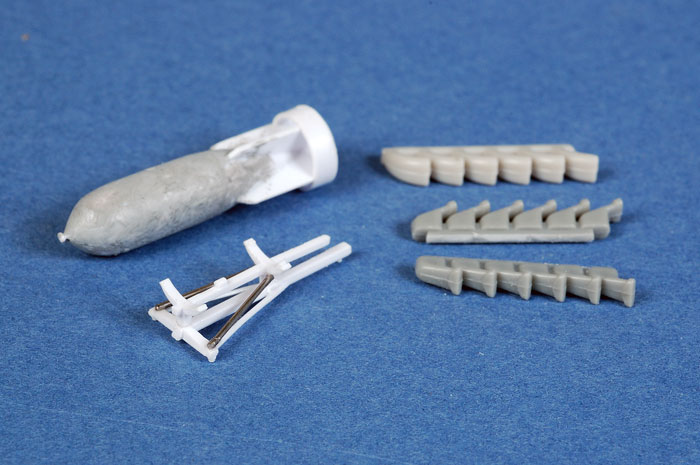
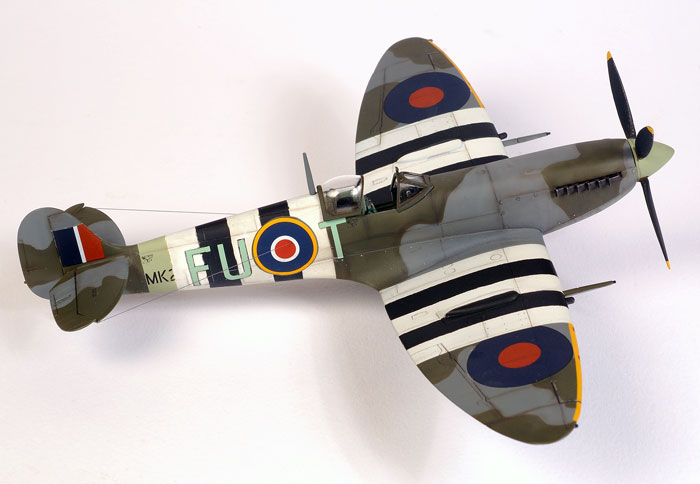
This 453 Squadron (RAAF) Spitfire was responsible for both
escort and fighter-bomber missions, so I decided to add a bomb to the centreline. The rack and bomb were sourced from the ICM kit - not only a
nice model but also a fabulous source of spare parts. The support struts
were supplied in very fine styrene. I replaced them with more rigid
steel rod. ICM's bomb was coated with Tamiya Surfacer and stippled with
a short brush to obtain a slightly rough cast effect.
The exhaust stacks as supplied by Airfix are blobby, to
put it kindly. I replaced these with exhaust stacks from the Hasegawa
kit (the Hasegawa kit will be fitted with Ultracast exhausts - around
and around we go...), which are not perfect but much better than the
alternative. The mounting strips behind the Hasegawa exhausts were
sanded back around 1 millimetre to achieve the correct protrusions of
the stacks.
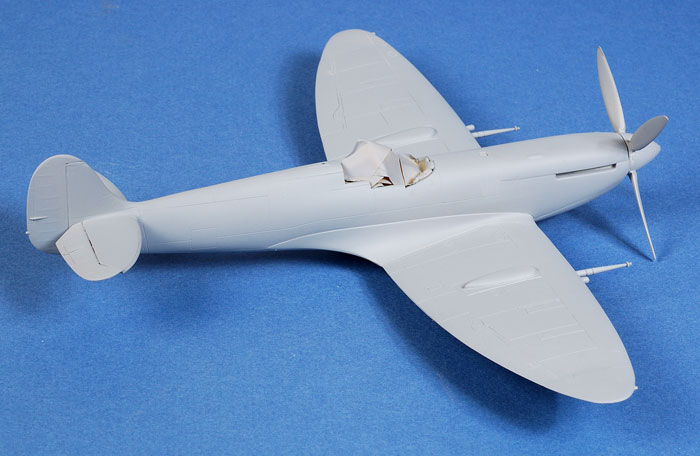
The propeller assembly was also replaced. Aeroclub' plastic
replacement spinner and propeller assembly fitted almost perfectly and
represented a major improvement over the shape of the kit parts.
This early Mk.IX retained the small carburettor intake
of the Mk.V. These parts were taken from the ICM kit.
Airfix's clear parts are reasonably accurate, but they
are very thick. The centre canopy section would not have a hope of
sitting down convincingly on the spine when posed open, so I once again
delved into the Alladin's Cave-like ICM kit for a thinner replacement.
This fitted reasonably well after a few tiny plastic tabs were glued to
the inside front corners.
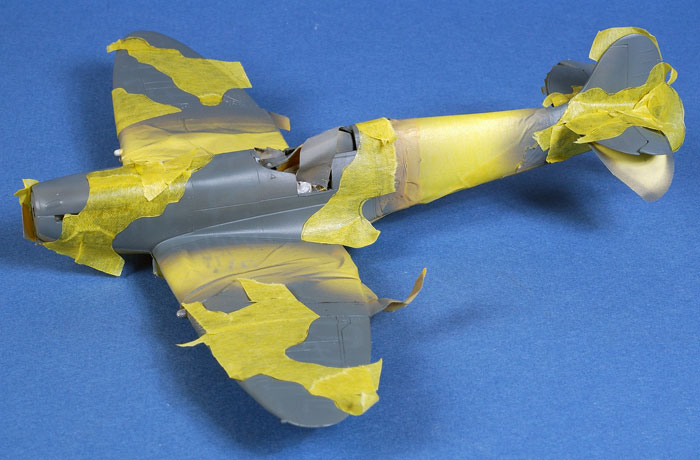
Prior to painting, the main joins were brushed with
lines of Tamiya Liquid Surface Primer as insurance against any fine
gaps, and the entire model was sanded first with my Blue Mastercasters
sanding stick, then with 3600 grit Micro Mesh cloth.
The canopy parts were dipped in Future then masked with Tamiya tape
and sprayed black prior to the application of camouflage colours.
I primed the entire airframe with Tamiya
Grey Primer straight from the can. I like the Tamiya primer, being fast
drying and a good way to quickly check for any persistent gaps or other
surface imperfections before the final colours are applied.
Click the thumbnails below to view larger
images:
[../../photogallery/photo00029391/real.htm]

The Testor Aztek A470 airbrush fitted with the "Fine"
tan tip was used for all remaining painting.
I acquired a pack of three "Mr Color" lacquer paints for
RAF fighters some time ago. This seemed to be as good a time as any to
use them.
First, the white area of the invasion stripes were
sprayed and masking tape applied to protect this coat during subsequent
painting. Next, Mr Color Medium Sea Grey was sprayed on the bottom of
the model. I found that I could spray these colours very thinly, around
70-80% lacquer thinner, for fast drying and good coverage. The only
problem is the cloud of toxic vapour. You will need very good
ventilation when using these paints.
When the upper surfaces were coated with Ocean Grey, the
hard-edged camouflage pattern was masked using a combination of Tamiya's
wide masking tape and sections of Post-It Notes. Several fine coats of
RAF Dark Green was misted over the surface to ensure that there was no
build up of paint along the demarcation lines.
Click the thumbnails below to view larger
images:
[../../photogallery/photo00025910/real.htm]
Following removal of the masking tape, the black
portions of the invasion stripes were masked and sprayed.
The airframe was shaded with a thin mix of Flat Black
and Red Brown. This was sprayed along control surface hinge lines,
selected panels, in a few random spots and streaks and along the
demarcation line between the Ocean Grey and Dark Green. This slightly
reduces the harshness of the sharply masked demarcation.
The carefully masked invasion stripes looked very attractive and tidy,
but reference photos showed 453 Squadron's stripes to be a bit messy. I
brush-painted Flat Black acrylic paint along the demarcation of the
stripes on the fuselage to obtain a less regular line. For the wings, I
carefully tore strips of masking tape and sprayed over these.
The model received a coat of Polly Scale Gloss acrylic in preparation for
decals.
National markings and stencils were sourced from the
Airfix decal sheet. These performed well, with good colour saturation
and minimal silvering.
The unique aircraft markings came from Ventura Decals
V4821. These arrived after I had painted the entire model, including the
Sky fuselage band and spinner. I should have waited for the decals
before I started painting though, as the
Ventura version of Sky was quite different to my Tamiya paint. Next time
I will match the paint with the codes.

Click the thumbnails below to view larger
images:
[../../photogallery/photo00025290/real.htm]
Contemporary photos show that 453 Squadron's invasion
stripes were painted around the code letters and fuselage roundel using
a paint brush. There are narrow but irregular gaps between the markings
and the invasion stripes, especially obvious on the white sections. I
had partially prepared the fuselage while painting the invasion stripes
by masking a section just larger than the diameter of the roundel inside
the stripes.
The code letters were a bit more complicated. While the
decal code letters were still on their backing sheet, I carefully drew
an outline around them with a fine medium grey Letraset ProMarker. I cut
the decals out of the backing paper using a sharp hobby knife, going as
close to the letter as I dared and leaving only a tiny grey outline. I
touched up the edges with white paint when the decals were safely in
place on the fuselage.
All the decals performed flawlessly with the help of
Mr Mark Setter and Mr Mark Softer.
A finishing coat of Polly Scale Flat sealed the decals
and the paint job.
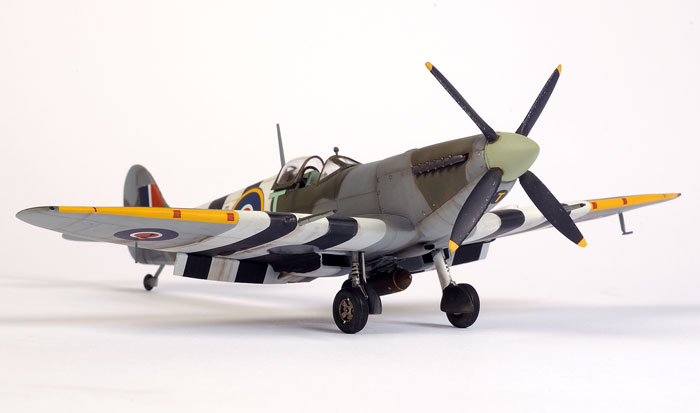
The undercarriage, bombs, flaps and other detail parts were painted and installed without incident.
Finishing touches included a rod aerial underneath the wing, and antenna
wires from the tips of the horizontal tailplanes to the fuselage sides
made from E.Z Line elastic thread.
Airfix has delivered the classic
"Curate's Egg" with their 1/48 scale Spitfire IXc / XVIe - it is good in
places.
At the end of this project I find
myself disappointed at the missed opportunity for Airfix to create
the definitive late-Merlin Spitfire.
I think that the fuselage shape is
really very good; probably the best of any of the Spitfire kits. The
subtle bulges of the cowl look right, and the smooth transition from the
nose to the spinner is especially good. The Hasegawa kit looks lumpy and
inelegant in this area, being a bit pinched at the front of the
fuselage. Surface detail is fine, crisp and consistent. Decals are
produced to a high standard and work well on the model. The supplied
options are impressive, with parts for high altitude, clipped wing and
Seafire versions. Even the cockpit, wheel wells and undercarriage are
acceptable. Fit is generally pretty good too.
Unfortunately, there is a
correspondingly long list of shortcomings. The rudder and horizontal
tailplanes are very thick and need replacing. The wing is also
noticeably thick, and the dropped flaps are an unnecessary gimmick. The
shape of the propeller blades is poor, as are the blobby exhausts and
the slab-like cannon bulges on top of the wings. Canopy parts are far
too thick for this day and age as well.
Except for the thick wing, all these
deficiencies can be addressed by the after market and spare parts from
other kits. However, it really should not be necessary to scavenge a
dozen parts from alternative sources simply to achieve an acceptable
replica, particularly considering the amount of research available on
the Spitfire and the current state of injection moulding technology.
In conclusion, I believe that this is
a kit with some merit and a worthwhile modelling project, but the Airfix
1/48 scale Spitfire must be content to take its place on the "close but
no cigar" pile along with Ocidental and Hasegawa.
Aeroclub has now released a
replacement fuselage for Hasegawa's 1/48 scale Spitfire. Perhaps this
will be the most direct route to an accurate Spitfire.
Thanks to
Hannants for the sample
kit.
Model,
Images & Text Copyright © 2007 by
Brett Green
Page Created 21 February, 2007
Last Updated
24 December, 2007
Back to
HyperScale Main Page |
 Home
| What's New |
Features |
Gallery |
Reviews |
Reference |
Forum |
Home
| What's New |
Features |
Gallery |
Reviews |
Reference |
Forum |