|
Tamiya's
1/48 scale
Supermarine Spitfire
Mk.Ia
by Werner Scheibling
|
 |
|
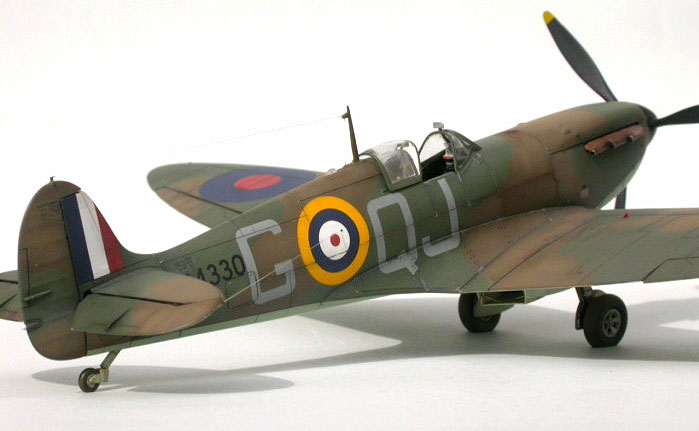
Supermarine Spitfire Mk.Ia
No. 616(F) Squadron RAF
Kirton in Lindsey / Lincolnshire, early October 1940 |

Tamiya's
1/48 scale Spitfire I is available online from
Squadron
It was August 2006 and I was
pondering over the ever difficult question which kit to choose for my
next project. (Having a growing stash of equally tempting kits in the
treasure chest doesn’t seem to help at all).
As this year marked the 70th
birthday of Supermarine’s timeless Spitfire, my decision was quickly
made: I dragged out a Tamiya Spitfire Mk.I kit, bought in the
mid-nineties, and discovered to my joy that I had added a set of
Aeromaster decals and some Eduard photo-etch to the contents of the box
sometime long ago.
The Kit
A lot has been written about
Tamiya’s representation of this beautiful aeroplane – and not all
comments are favourable. Personally, I would sum up the pros and cons
like this:
-
High quality plastic, perfect moulding, very good fit of all parts
-
The outlines of nearly all parts reflect the scale plans in
‘Modellers Datafiles’ very closely (though I’m generally sceptical
about most kinds of scale plans).
-
The shape of the wing’s trailing edge has been much maligned because
it is slightly too curved and tugs in at the fuselage joint - which
it shouldn’t do. Nothing to get wound up about – just carefully sand
it back into shape and the wing looks fine
-
The upper wing bulges (which create space for the main wheels when
retracted) are slightly too big and wrong in shape. As there are not
a lot of photos showing these bulges in close up, I hope to get away
with not fixing this detail
-
The clear parts are way too thick which hardly seems acceptable
these days
-
The propeller blades do not really look ‘De Havilland’, which of
course they should
-
There might be the odd access panel out of place, or too many, or
missing, depending on how much you trust scale plans
-
Definitely missing are the aerodynamically shaped hot air vents (gun
heating exhausts; one on each side on the underside of the wing,
near wing tip). I got mine from an old Mk.V kit, sitting in my scrap
box
-
And finally, as I learned from the German importers of the Tamiya
brand, this kit is most likely out of production by now. Sad news
indeed

Resin Accessories
Some areas of the kit can
definitely do with improvement and ‘Ultracast’ from Canada provide the
necessary resin parts. These are:
-
a very realistic seat with Sutton harness
-
a beautiful set of exhaust collectors
-
a prop and spinner assembly that perfectly
represents De Havilland’s early two-speed, three-blade metal
propeller
-
the separate flying surfaces which are not
necessarily a must, but give the model just that tiny bit of
enhanced realism that most of us look for
-
the five-spoke Spitfire wheels - which
are a slight let-down. The rims are not exactly round – a fault that
would stand out like a sore thumb once the parts are painted. I
chose not to use them
As the brand name implies, all
parts are immaculately cast with a very durable, break-resistant resin.
No worries about any hidden air bubbles here.
Cockpit Assembly
As the only aftermarket resin
cockpit set I’d contemplate using (‘Cooper Details’ of lucky modellers’
days gone by) doesn’t seem to be available any more, I had to fend for
myself.
Roughly the same amount of work
and time as I used for the rest of the construction went into the
cockpit assembly.
With some useful parts from the
Eduard PE sheet both cockpit sidewalls received additional detail that
is not provided by Tamiya. Switches, electrical wiring and little extras
were scratch built using copper wire (0,1 – 0,3 mm diameter) from the
local electronic shop, punched out discs from styrene sheet and
leftovers from old PE frames. The photos in ‘Modellers Datafiles’
provided the necessary inspiration.
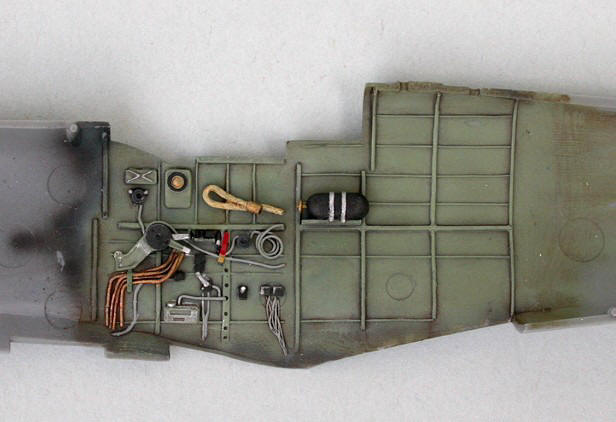
I decided to use the kit’s
plastic instrument panel because it is more three-dimensional than the
Eduard PE part. All instrument dials were punched out from various old
decal sheets and carefully glued into the (otherwise rather empty) dial
frames. Tamiya unfortunately didn’t provide any decals in the 90s for
this important area.
The gunsight was entirely
scratch built, as the provided plastic part is somewhat frugal.
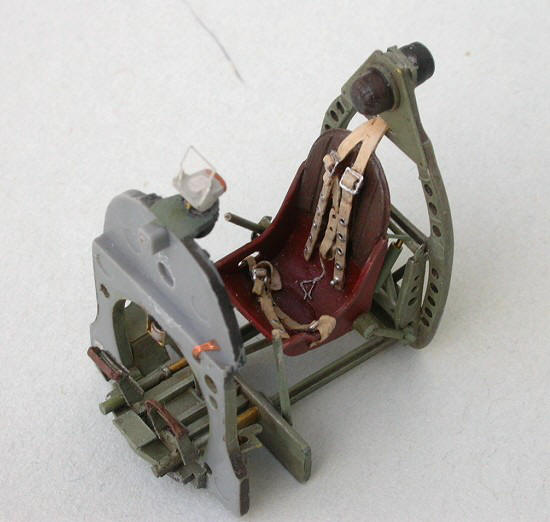
And now came the tricky bit: How
to integrate the resin seat into the cockpit assembly? As a former
catholic I still seem to prefer the arduous and stony path as a general
approach (no offence meant, guys).
First I removed all superfluous
plastic from the cockpit floor and only left the two rudder actuating
rods. This left just enough plastic to connect the front bulkhead to the
rear bulkhead, but the assembly is fragile.
After some deliberation I
decided to create the complete system of articulated tubing that
attaches the seat to the rear bulkhead.
As the real Spitfire didn’t have
a cockpit floor, this system allowed a sturdy attachment of the Bakelite
(the first industrially used synthetic resin) seat to the rear bulkhead.
At the same time the pilot could move the seat easily up and down with
the help of a lever at the right side of the seat.
I used hypodermic needles of
various diameters and brass wire to recreate this framework. Superglue
holds it all together.
When the seat finally sat
straight and level in the middle of the fuselage, I knew I had got my
measurements right. What a relief!
Click on the thumbnails
below to view larger images:
[../../photogallery/photo00029208/real.htm]
The Balance of Construction
There is not a lot to report, as
this is a relatively simple kit with only few parts which all fit very
well:
·
Resin flying surfaces: I dropped only
the elevators – a common sight with parked Spitfires. The replacement
ailerons are very tricky to install, as the top wing / lower wing
cut-outs are asymmetric. Some very exact cutting and lots of dry fitting
is required. The top and lower wing cut outs had to be slightly spread
apart with a custom made styrene spacer. Without this spacer the top
wing would sag and come into conflict with the straight aileron leading
edge. I attached all these resin parts with the help of brass pins and
two-part epoxy
·
The radiator housing got a new flap
made from styrene sheet and tiny stiffeners from Eduard’s PE sheet. The
flap was positioned ‘3/4 open’. Unfortunately the radiator body, an
integral part of the lower wing moulding, had to be removed and rebuilt,
as it is too long. I used fine wire mesh from a generic Eduard PE sheet
and fine plastic strips to detail the radiator front and end
·
As I didn’t use the Ultracast wheels, I
drilled out the kit’s rims to give the voids between the ‘spokes’ the
necessary depth. The finishing work on these cut-outs was done with the
tip of a (or rather several) scalpel blade(s). I ought to warn you
though that modifying two rims that way equals the timeframe of one long
modelling evening… Before flattening the tyres with sandpaper, remember
to keep in mind the fact that the Spitfire undercarriage has a positive
wheel camber, otherwise our model would sit very peculiarly on level
ground
·
The clear canopy parts have the
thickness of scale armoured glass and are not completely distortion
free. This time I didn’t crash-mould replacement parts but tried a new
approach: First I dremeled and sanded the parts from the inside until
the frames were down to proper scale thickness. Then I polished the
parts with Tamiya compound and dipped them in Future (or Klear for the
Brits amongst us). They are perfectly acceptable now and nobody would
notice that the centre sections are still as thick as before.
As I have come to like ‘Vallejo
Model Air’ acrylics a lot, I wanted to use these paints on my Spitfire
model, too. I selected the suggested hues (017 dark green, 029 dark
earth and 009 duck egg green) and went to work.
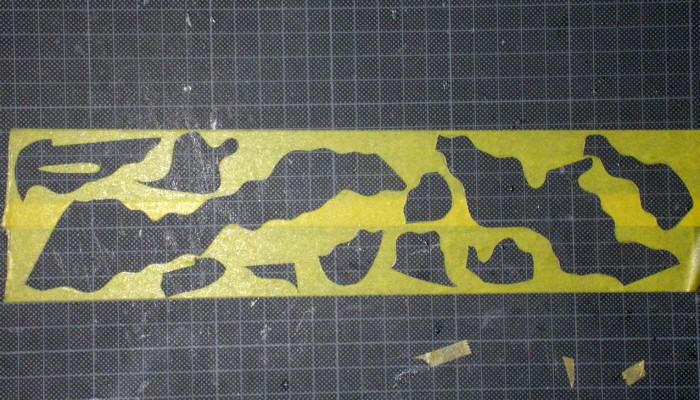
The demarcation lines between
the green and brown segments should be sharp, which calls for the use of
proper templates. First I copied the shape of the templates on drawing
paper, using Tamiya’s scale plan that comes with the Mk.V kit. It
provides the so-called ‘A’-scheme. Then I made myself an 8 cm wide strip
of Tamiya masking tape and transferred the shapes onto this surface. A
special template cutter for curvy outlines helped a lot to cut the masks
in smooth, flowing lines.
When it was time to remove the
masks I found the duck egg green far too intensive (I think it would go
well as ‘Sky’ used by the RAF in the fifties), the dark green too light
and the dark earth too dark. What now? The undersurfaces were remedied
by lightly overspraying the offending shade with strongly diluted RLM 76
‘Lichtblau’. The green was darkened by rubbing on various thin layers of
dark olive green artist oil paint with a soft cloth. The dark earth was
treated with an overspray of strongly diluted Gunze earth brown – a hue
suggested for weathering armoured vehicles. Judging from wartime colour
photography I managed to come pretty close to the original, even though
it was a lot more work than originally planned.
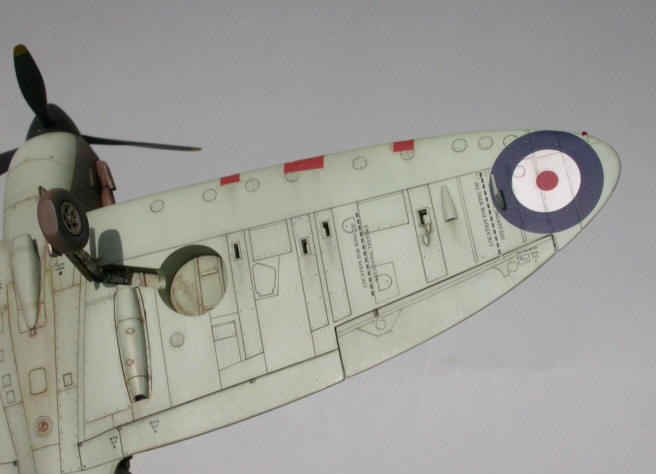
All panel lines were accentuated
with pastel dust (greys for the under surfaces and blackbrowns for the
upper surfaces). Certain panel lines, where fluids would seep through,
were treated with strongly diluted artist oils.
To replicate paint-chipping, I
like to use a ‘Karismacolor silver’ pencil (a US product). It has the
right softness to stick well to smooth, painted surfaces but still
doesn’t crumble; it is better than anything similar I’ve tried before.
The Aeromaster decals went on
without any hint of silvering, even though they were more than ten years
old. Unfortunately they reacted only to the strongest of decal softeners
and I had to use up my last few drops of ‘Aerosol’ (once marketed by
Aeromaster). If any fellow modellers know whether this aggressive
mixture is still sold under a different brand name, I would be happy if
you could drop me a line.
As a final touch I oversprayed
all decal areas with very lightly tinted clear varnish (one drop of dark
grey per airbrush cup) to tone down the unnatural brilliance of brand
new decals.
Perhaps I should finish this
section with some remarks on how I painted the exhaust stacks.
I do like to visit aeroplane
museums (Duxford near Cambridge is my favourite place because of its
hands-on appeal) and spend the day studying and photographing details of
restored and – even better – unrestored warbirds. I think I feel
confident enough now to claim that the general depiction of ‘brass’ or
‘rust’ as the predominant colour of British aeroplane engine exhausts is
wrong. One of the Duxford engineers described the material as some kind
of high-carbon steel that looks like matt stainless steel when new. It
hardly rusts, but darkens in orangey and red-brown hues when heated
repeatedly. An underlying metallic shine is generally visible, which
sometimes gives the parts a brass-like appearance. And, the older the
exhaust, the darker its colour.
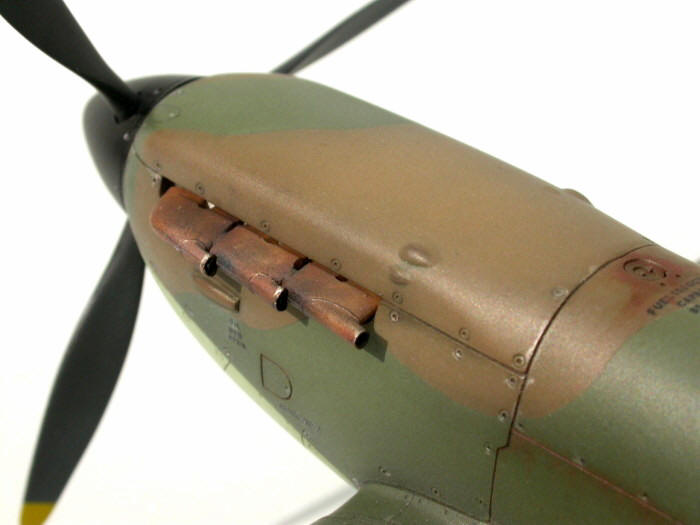
I tried to replicate this by
first spraying the Ultracast parts with Alclad II matt aluminium. Then I
added nearly translucent shades of orange and red-brown by airbrush. The
final touches were done with pastel dust, also in reddish-brown hues.
Everything was sealed with matt acrylic clear varnish. I’d also like to
note that these early Spitfires hardly showed any exhaust staining,
because the exhaust collectors stick out a fair bit from the fuselage.
Some historical notes about
‘my’ Spitfire Mk.Ia, serial X4330, QJ-G
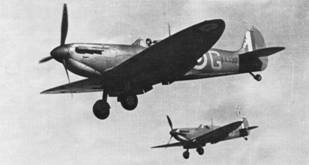
According to Shacklady and
Morgan, X4330 was first flown on 31 August 1940. A bit more than a month
later (14 October 1940) it was destroyed in a crash landing at base.
Certain distinctive features in its camouflage and markings - uniformly
Sky’ coloured undersurfaces with ‘A’-type roundels, black spinner and no
fuselage band - are secure proof of the relevant time frame.
‘Aeromaster’ claims on its
decaling instructions that this Spitfire was flown by the British Ace of
Aces, James Edgar ‘Johnnie’ Johnson.
As ‘Johnnie’ Johnson spent
nearly the whole of September to December 1940 in hospital recovering
from shoulder surgery, his flying hours in this Spitfire must have been
rather limited. His real career as a most outstanding fighter pilot and
officer started in January 1941, when he was back on duty and X4330
probably long dismantled for any re-usable spare parts.
Finally: ‘Camouflage and
Markings’ claims that X4330, QJ-G, belonged to No. 92(F) Squadron, which
is wrong. There has always been confusion about Spitfires marked QJ, as
this code was at least temporarily used by both 616 and 92
Squadrons. Conclusions are virtually impossible from the photo alone,
unless the serial number is visible.
Building a kit from the early
90s can still be a lot of fun and the result doesn’t have to be inferior
to a state-of-the-art kit. But maybe this is only true, if the brand
name is Tamiya. Something else this kit taught me is that it is not
necessary to buy expensive resin cockpit sets all the time. You can do a
lot with copper and brass wire, maybe some PE details, preferably a
punch-and-die set – and a fair amount of time and patience. And to be
fair, ‘Ultracast’s’ lovely resin parts have to be mentioned again, most
favourably.
Some selected books for the
Spitfire fan:
·
Spitfire – The History,
by Eric B. Morgan and Edward Shacklady
Key
Publishing Ltd., Stamford / England 1987
ISBN: 0-946219-10-9
·
The Supermarine Spitfire – A
Comprehensive Guide For The Modeller,
Part 1: Merlin Powered, by Robert
Humphries
Modellers Datafile No. 3, SAM Publications, Bedford / England 2000
ISBN: 0-9533465-2-8
·
Spitfire in Action,
by Jerry Scutts
Squadron/Signal Publications, Aircraft No. 39, Carrollton / Texas
ISBN: 0-89747-092-3
·
Camouflage and Markings RAF Northern
Europe 1936-45, Number One – Supermarine Spitfire,
by James Goulding
Ducimus Books Ltd.,
London
·
The Royal Air Force of World War Two
in Colour, by Roger A. Freeman
Arms & Armour Press, London, 1993
ISBN: 1-85409-185-9
Resources:
·
Supermarine Spitfire Mk.I,
Tamiya 1/48 Scale Aircraft Series, Kit # 61032-1800
·
Spitfire Mk.I,
1/48 scale photo-etch detail set, Eduard # 48-106
·
4 Ultracast 1/48 scale resin detail
sets:
o
Supermarine Spitfire seats (with
Sutton harness) # 48020
o
Supermarine Spitfire Mk.I control
surfaces # 48038
o
Supermarine Spitfire Mk.I exhausts
# 48040
o
Supermarine Spitfire Mk.I/II/V De
Havilland 3-blade prop and spinner
#
48112
·
Battle of Britain Spitfires,
AeroMaster Decals # 48-078
·
Spitfire Stencils,
Crazy Modeler Decals # DC-0092
Click on the thumbnails
below to view larger images:
[../../photogallery/photo00014179/real.htm]
Model, Images & Text
Copyright © 2007 by Werner Scheibling
Page Created 03 September, 2007
Last Updated
24 December, 2007
Back to
HyperScale Main Page |
 Home
| What's New |
Features |
Gallery |
Reviews |
Reference |
Forum |
Home
| What's New |
Features |
Gallery |
Reviews |
Reference |
Forum |