|
Airfix +
Flightpath
1/48 scale
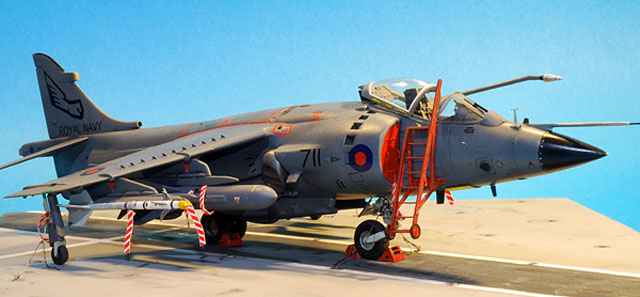
BAE Sea Harrier FRS.1
by Ingo Degenhardt
 |
|
BAE Sea Harrier FRS.1 |
images
by Lutz Degenhardt

HyperScale is proudly supported by
Squadron
I had no particular interest in the Harrier family until reading “Sea
Harrier over the Falklands” by Com. “Sharkey” Ward last year.
This excellent book first inspired me to build this
FRS.1 and in it’s wake it caused the planning for a lot more Harriers.
Stuff for years…
I still had the Tamiya model built approximately 15
years ago and after looking for it in my personal AMARC and removing the
dust I realized that Tamiya standards way back then were a little
different to what they are now…
So I bought the Airfix kit and it was even worse –
not much, but worse. I decided to go for it anyway as there was no
state-of-the-art kit available in 2006, at least not in 1/48. Not that
much of a surprise because it is just as old as the Tamiya kit.
Several aftermarket manufacturers came to the
rescue.
The large Flightpath set, although made to be used
with the Tamiya kit works very well with Airfix too. Only minor
modifications are needed for some of the etched parts.
Flightpath provides the following:
-
blade antennas,
wind sensor, starboard fuselage fuel dump
-
gear leg detail
(front wheel)
-
Radar altimeter
-
vortex generators
on wings
-
blast shields for
the rear (hot) nozzles
-
air brake detail
-
tail cone detail
-
covers between
stabilizers and fuselage
-
tie-down rings for
gear legs
-
windscreen wiper
and it’s cover
-
FOD-covers
-
Sidewinders & twin
launchers (cast metal)
-
boarding ladder
-
wheel chocks
-
RBF-tags
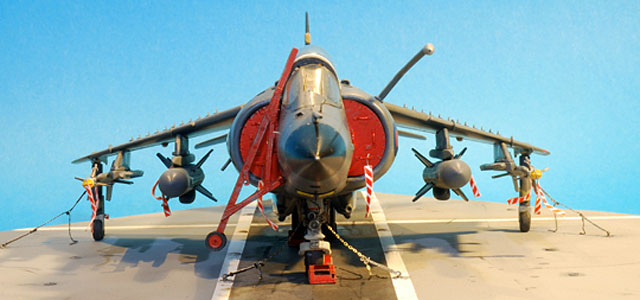
-
chain connectors
for tie-down (the chains come from Hauler)
-
Flightdeck
attachment points
-
Sea Eagle ASM
(these were then included in the set for the FA.2 that I also have
here)
Some of the above details replaced Airfix parts
while others are helpful because there are no kit parts at all – for
example the fuselage fuel dump or the covers that move with the
horizontal stabilizers.
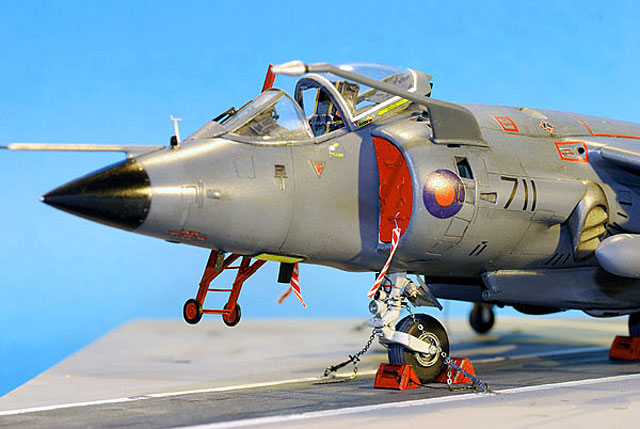
The set also contains PE parts for the cockpit and for the auxiliary air
intakes (blow-in doors) but I did not use these because I replaced the
whole cockpit with the very good Neomega resin cockpit and seat while
the air intakes come from Heritage Aviation and are Resin parts with the
upper blow-in doors open (down) due to gravity.
The Flightpath parts are now in my spares box and
wait for GR1 and GR3.
The set by Heritage Aviation contains four new
resin jet nozzles that replaced the Airfix parts.
Further contents are new horizontal stabilizers
with the mentioned cover moulded on and two external fuel tanks. Both
found their way into the spares box.
All this adds up to a rather high budget for this
Harrier but there is still enough work and room for personal initiative.
In this case I engraved the panel lines completely
– of course this 23 years old kit has raised panel lines, while the
general fit is surprisingly good.
On the kit, the rear nozzle-blast shields are
moulded-on thick plastic parts and are beyond any kind of modification.
I cut them much shorter and used them as a base for the Flightpath PE’s
to be glued on. Removing their rear portion left me with holes in each
fuselage side. I stuffed them from the inside with Milliput that was
sanded to shape when dry.
The Airfix gun pods have a completely wrong shape
at their front end that I corrected by cutting and sanding according to
photographs and the much better Monogram pods.
I also lengthened the tail cone by 2mm using sheet
plastic because it is positively too short on the model.
Further detailing was done on the fuselage top
where I cut out the APU exhaust and remodelled it completely. Airfix
forgot about altogether three small air inlets – these I made from lead
foil.
The anti-collision beacons (fuselage top & airbrake
bottom) come from Aires (Position lights & Anti-collision beacons).
There are two fuel dumps on the wings upper
surfaces located between flaps and ailerons, these were made from
syringe needles.
The retraction wells for the outrigger wheels are
massive plastic and have to be hollowed out. The red safety locks on the
outrigger gear legs were made from lead foil.
The refuelling boom was taken from the Monogram
GR.1.
I did not like the Airfix decals at first sight –
off register by far. So I enlarged the budget for Sky models sheet 48028
that contains markings for a lot of Harriers of all kinds.
Initially I had the intension to build a Harrier of
“Operation Corporate” (Falkland war) but eventually could not resist the
‘winged fist’ of 899 Squadron contained on the Sky models sheet.
So this is ‘711’, delivered in 1987 and converted
into FA.2 in the early nineties. There is a minor mistake on the Sky
models sheet – 711 is not BuNo. ZE 890 but ZE 690. This is easily
corrected with digits from the sheet (there are a lot)
Unfortunately there is not a lot of stencils on the
sheet so I had to use the Airfix decals anyway. I cut away the
protruding White on as many decals as possible and some markings are
even sprayed on such as the red surroundings of the fire accesses (have
to be drilled out) in the wing roots.
Painting was done with Xtracolor (as usual) Extra Dark Sea Grey that was
lightened up a little with White.
I applied a black wash with thinned oil paint and due to the already
glossy Xtracolor enamels the model then was ready for the decals.
Afterwards the whole model was sealed with Humbrol
Satin Cote to resemble the gloss paint scheme of the real thing in
scale.
A lot of work for this Sea Harrier all in all and prospects for the
Airfix FA2 are similar, although the new fuselage has engraved panel
lines and the flaps and ailerons have the right length (Airfix confused
the length of these on the FRS.1 – I filled them with superglue and
rescribed)
The base plate is my attempt to show a deck section of the through-deck
cruisers or aircraft carriers like ‘Hermes’, ‘Invincible’ or the like.
It is 600 wet & dry glued to a massive piece of wood.
I am still looking for two or three figures and a
little bit of deck equipment to add to the scene.
-
Harrier inside and
out by Mark Attril
-
Harrier in action
No. 58 (Squadron/signal publ.)
-
Flugzeugprofile No.
7 – Bae Harrier
-
various
internetsources
-
and thanks to DJ
Parkins for answering my questions regarding his Flightpath detail
set
Model and Text Copyright © 2007 by
Ingo Degenhardt
Images Copyright © 2007 by Lutz Degenhardt
Page Created 12 March, 2007
Last Updated
24 December, 2007
Back to
HyperScale Main Page
|
 Home
| What's New |
Features |
Gallery |
Reviews |
Reference |
Forum |
Home
| What's New |
Features |
Gallery |
Reviews |
Reference |
Forum |