|
Hobbycraft +
Cutting Edge 1/48 scale
Hawker Sea Fury FB.11
by
James Davies
|
 |
|
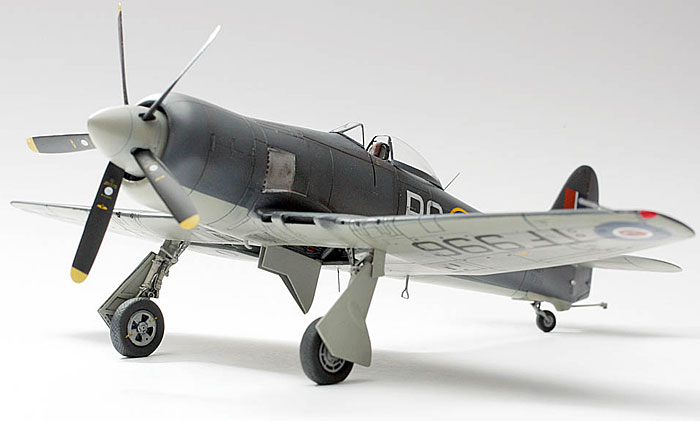
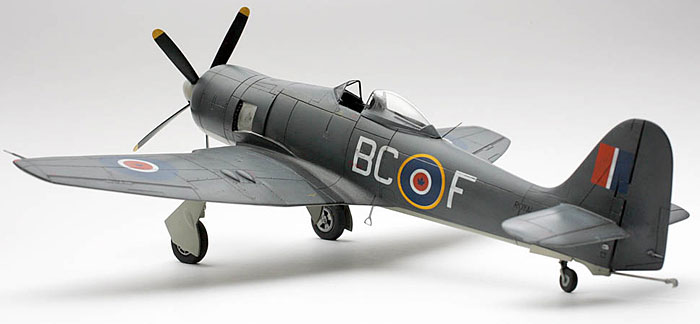
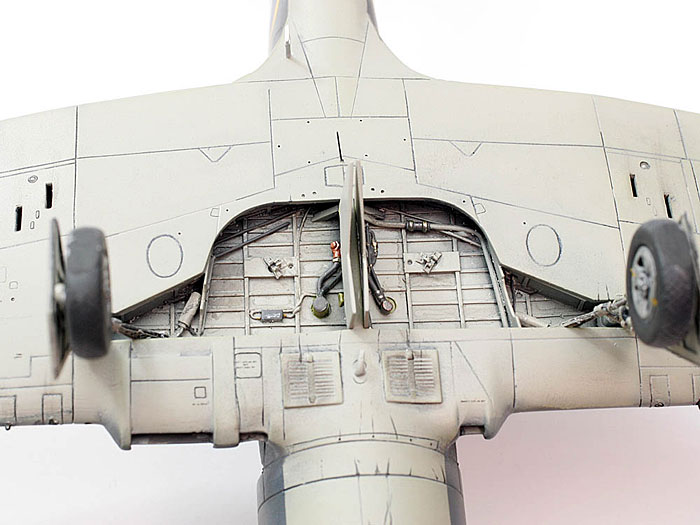
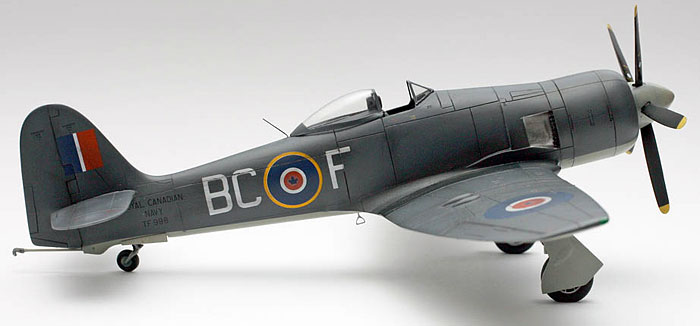
Hawker Sea Fury FB.11 |

HyperScale is proudly supported by
Squadron
Sometimes you just need a bit of a push, that extra spark to bring a
project back to life.
Jennings Heilig’s fabulous 5 part series on Hyperscale last month on the
colour and Markings of the Hawker Sea Fury in Royal Canadian Navy
service between 1948-1956 was just that for me.
Just what I needed to dig out a long stalled Sea Fury project from the
bottom of the cupboard.
I started this project 2 years ago after buying the Cutting Edge Cockpit
(CEC48360) and the Exterior (CEC48346) sets a year or so before that.
This project has been maturing like fine wine, laid away in a dark
cupboard until the modelling gods eventually came together.
Now after reading Jennings’ articles and having the colours explained I
was ready to hit the workbench.
The cockpit had been painted and placed in the fuselage halves 18
months ago, now it was full steam ahead. The resin wheel well was
quickly fixed in place and the wings married up with the fuselage.
Navigation light were cut out of the wing tips and replaced with
clear sprue, these where later sanded and polished to shape.
My only reference was the Squad Signal book no.117 Hawker Sea Fury in
action, and on looking at the line drawings I could see right away that
there where many panel lines missing from the kit. They must have
thought that making the ones that are on the kit 4 times bigger than
they should be would make up for all the ones they missed!
I set to work with Dymo tape, scribing template, Olfa P cutter and pin
and added all the missing lines. In retrospect I should have been braver
and filled and rescibed the whole kit, but as the fuselage halves were
glued together when I restarted the project, I used that as an excuses
to wimp out on that challenge.
Various size drill bits in a pin vice were used to add all the
fastener detail to the wing panels and a number of small drain holes
were added were appropriate. Then the usual coat of MrSurfacer 1000 was
sprayed and once dry, any mistakes taken care of and it was almost time
for paint.
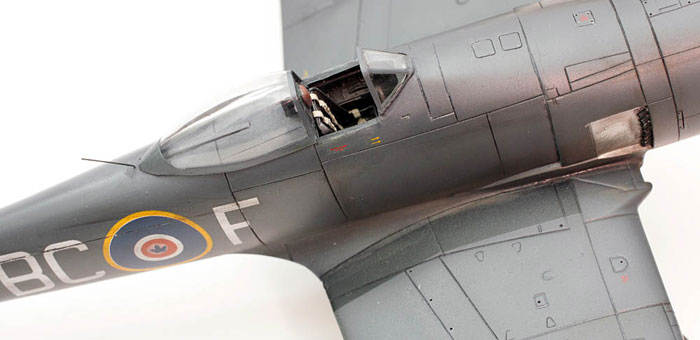
Before the airbrush came out the forward section of a Squadron vac form
canopy was attached with white glue mixed with NATO Black Tamiya paint,
a new technice I used for the first time and one I will have to have a
bit more practice with.
I should have fixed the windscreen in place before the primer was
sprayed as I ended up with a fine, but distinct gap between the vac form
part and the plastic. As usual this was only glaringly obvious under a
coat of paint. Ah next time…
Jennings’s explanation of the mix-up between the colours ordered for
Sea Furys to be delivered to the Royal Canadian Navy is
best explained by reading his great article
I tackled the colour issues by using Tamiya XF-24 for the Extra Dark Sea
Grey and I should have know better but I was tempted and settled for a
Polly Scale Italian blue grey for the base colour for the underside
Canadian version of Sky (which is really light grey. Read Jennings’s
articles for the details).
Now neither of these colours are a perfect match, but one thing I have
learned in the past year of modelling is that by the time you have
tinted and highlighted, post shaded and applied a filter wash to a paint
job, the final colour can be a way off what came out of the bottle to
start with.
Now for the ugly bit, why didn’t I just mix the Canadian sky from Gunze
or Tamiya acrylics?
I have bought about 20 bottles of Polly Scale acrylic paint, always
specific colours for subjects I don’t have much reference on, and every
time I spray them I am disappointed with the paints performance. I have
tried every thing to get them to spray smoothly, retarder, water, Metho,
alcohol, Polly scale thinners, and different airbrushes at different psi.
All with the same effect of the paint clogging the airbrush after a
minute or two of spraying. Same thing this time. Why did I bothe?. Can
anyone suggest a method of spraying these paints that doesn’t involve
stopping to clean the brush every 2 minutes, please, email below… Makes
you realise just how good the Tamiya and Gunze products are.
Wing walk areas were sprayed in with NATO black, and the exhaust panels
masked and filled in with Alcad aluminium
After the paint had cured on went a coat of future followed by the
decals. I had been given the Aeromaster Decal sheet Sea Fury Collection
48-215 by a club member some time back and one of the 803 squadron mates
aircraft TF 996 is included on the sheet. Jennings used aircraft TF 999
in the pattern 1 scheme in instalment 2 of his article so that was close
enough for me. The Aero master decals went on like a dream.
I used a wash of Payne’s grey oil paint and a few touches of Tamiya
weathering pastels soot colour on the panel lines. They don’t need much
to highlight them, they sort of stand out by themselves in all there
gaping glory.
The decals were sealed in with a coat of satin from Microscale. I know
the plane should be shiny but I just cannot bring myself to leave it
that glossy. It just looks like a toy in this scale.
The undercarriage was tackled next. I was a bit concerned about the
white metal undercart legs but after priming with Mr Surfacer they came
up well. The base of the white metal parts needed to be whittled down in
size to fit in the resin wheel bay mounts but once done they fitted
positively into the holes drilled.

The legs were dressed up with brake lines from lead solder held on with
thin strips of Tamiya tape and it was on to the under carriage doors,
these were thinned down by sanding on a flat surface to scale thickness
and the internal detail replaced with strip plastic card. This makes a
big difference to the kit, as the doors out of the box are whoppers.
All that was left now was to add the rear section of the vac canopy [ I
added 2 rear view mirrors to the canopy just to dress it up] and 2
antennas from stretched sprue and the project was done.
This was a very satisfying project.
It is always great to finish a stalled build and as much as I love
building the latest kits from the top mould makers I still get a great
kick out of dressing up a less that up to date kit and making it shine.
Thanks to Jennings Heilig for his articles and inspiration to get this
kit from the bottom of the cupboard on onto the workbench.
Cheers.
Click the thumbnails below to view larger
images:
[../../photogallery/photo00004300/real.htm]
Model, Images and Text Copyright © 2007
by James Davies
Page Created 15 April, 2007
Last Updated
24 December, 2007
Back to
HyperScale Main Page
|
 Home
| What's New |
Features |
Gallery |
Reviews |
Reference |
Forum |
Home
| What's New |
Features |
Gallery |
Reviews |
Reference |
Forum |