|
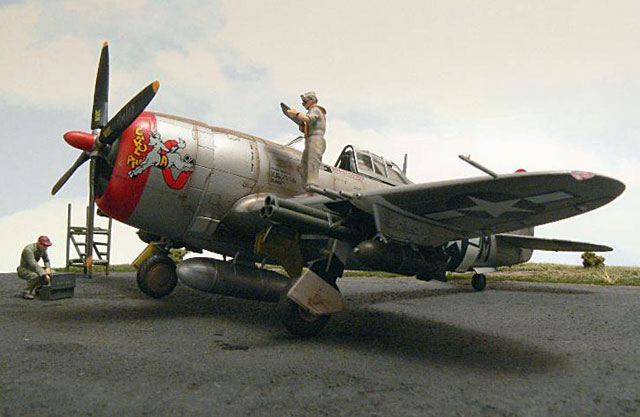
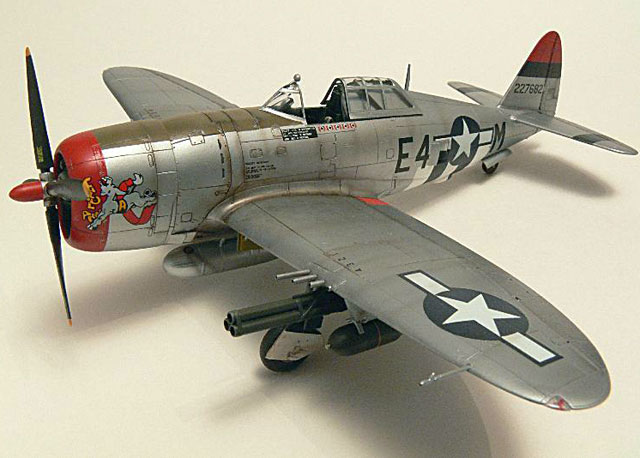
Tamiya 1/72
scale
P-47 Razorback
Redux
by Rafe
Morrissey
|
 |
|
P-47
Razorback |

Tamiya's new
1/72 scale P-47D
Razorback is available online
from Squadron
After
watching Floyd
Werner build
three super
looking P-47s
for our last
DVD, I figured I
should have a go
myself. In the
process, I
learned a
valuable, if
painful, lesson
on the
importance of
testing any
finish before
applying it to a
model.
What you see
here is actually
my second
attempt.
My first go
around was with
the Tamiya 1/48
scale P-47D
Razorback.
Unfortunately,
after having
detailed the
cockpit and
fully assembled
the airframe, I
used a bottle of
Alclad II gray
primer that had
gone bad in the
bottle. This
made the
subsequent
metallic shades
look so horrible
that I elected
to bring the
project to a
halt. I decided
to start over
with the
excellent 1/72
scale rendition
of the P-47 by
Tamiya.
Aside from
altering the
design of the
model so that
the seam through
the landing gear
bay is visible
(unlike the 1/48
scale version),
the kit is truly
a marvel of
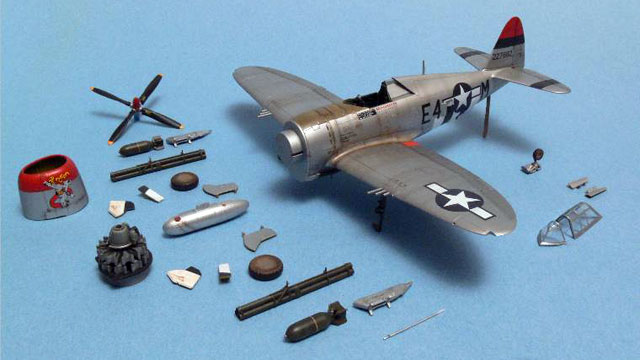
engineering. In
addition it
comes with a
variety of prop
styles and under
wing ordinance
to suit almost
any
configuration.
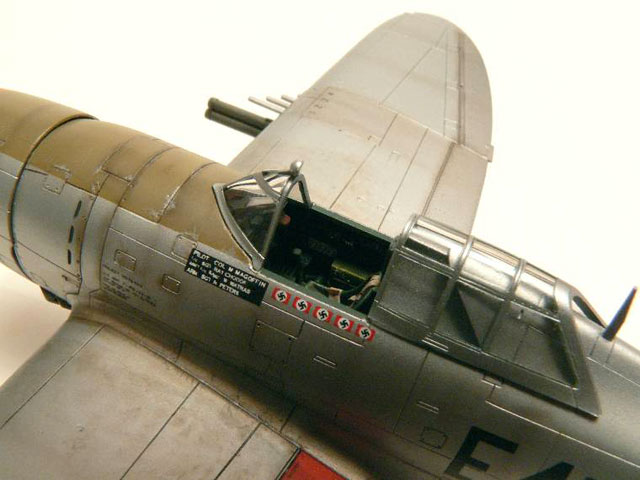
The model was
built out of the
box as I wanted
to expedite the
process of
turning out my
first NMF model.
The only
exception was
the need to make
a scratch built
replacement for
one of the bomb
shackles and the
antenna which
were lost when I
took the model
to work on
during a model
night at a
friend’s house.
As mentioned
earlier, I used
the Alclad II
system to finish
my model. After
my earlier
experience, I
made sure to
test the Gray
primer on a
scrap kit and
the new bottle I
obtained
directly from
Alclad II worked
to perfection.
When it works,
there is really
nothing better
as you can
detect and fix
flaws and re
prime in a
single session
rather than
waiting
overnight for
the various
paint coats to
dry.
Incidentally, we
have posted a
guide to
determine to the
best of our
ability which
primer batches
are good and how
to tell the
difference
between them.
You can access
it off of the
Master Class
Model Building
Videos main
page.
The basic
process in
painting the
model involved
laying down the
primer coat
using a Badger
200 single
action airbrush
at a low
pressure setting
(@5-10psi). I
then applied a
base coat of
Alclad II
Aluminum using
the same single
action airbrush
and pressure
settings.
Control surfaces
were masked and
sprayed with
Alclad II
Duraluminum. I
also used Alclad
II Dark Aluminum
for the panels
behind the
exhaust waste
gates.
I should mention
that my base
coat of Aluminum
had the problem
of remaining
tacky that has
been mentioned
on this site. I
found that the
major problem
was that the
paint is
extremely
sensitive to
heat from finger
tips when being
handled. I had
no problems
handling the
model with
Tamiya modeling
gloves and
suspect regular
cotton gloves
would work as
well.
Fortunately, the
paint was able
to withstand
masking with
Tamiya tape and
3M blue tape
without lifting
so I didn’t find
it to be too
much of a
liability. This
again highlights
the importance
of testing any
finish on a
scrap first,
however, so you
know what you
have to work
with.
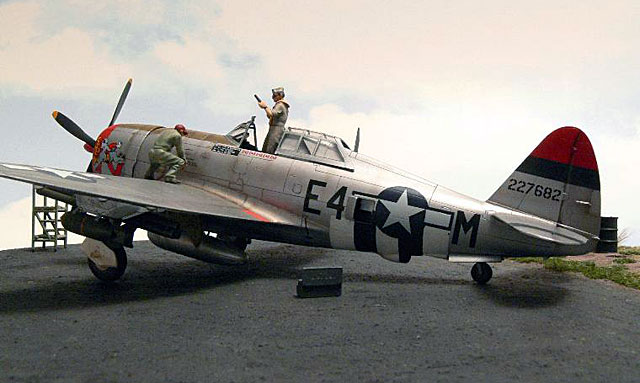
With the base
NMF applied, I
then masked the
model for the
tail surface
bands,
anti-glare
panel, the
cowling ring and
the invasion
stripes and
applied the
necessary colors
using Tamiya
Acrylic paint. I
cut special
masks made by
tracing the
shape of the
side stars and
bars onto Tamiya
tape to protect
this area when
the invasion
stripes were
added so they
would not show
through
underneath the
decal.
Immediately
after applying
the anti-glare
panel, I used a
sharpened
toothpick to
chip around
various access
panels and
fasteners. I
also used this
method to apply
chips to the
leading edge of
the cowling.
Once all the
complicated
masking and
painting was
accomplished, I
applied an
overall
glosscoat of
Future thinned
slightly with
Tamiya Acrylic
Paint Thinner. I
find that the
addition of the
Tamiya thinner
helps the Future
flow on more
smoothly and
level out
better.
After applying
the decals, I
over sprayed the
decaled areas
with another
coat of Future
and let it cure
overnight.
I continue to
experiment with
the post shading
technique made
popular by Chris
Wauchop and our
Hyperscale
editor, Brett
Green. I find
that applying
the post shading
with a very thin
mix of Tamiya
XF-1 Flat Black
and XF-64 Red
Brown is best
done over the
cured gloss coat
since it is
possible to
remove any
errant streaks
with a q-tip
dampened with
Windex. You can
remove streaks
two or three
times before the
Windex starts to
affect the
Future under
coat as long as
you are careful
to keep the
q-tip just
slightly damp. I
also kept a
print out of
Roger
Fabrocini’s
excellent
article on his
beautiful P-51B
close at hand.
This is one of
my all time
favorite NMF
subjects from
Hyperscale and
was very helpful
in planning my
weathering
strategy. I
highlighted
selected panels
with the super
thin mix and
concentrated on
the control
surface hinge
lines, engine
area and areas
of natural
shadow. I also
added a few
random streaks
vertically on
the fuselage and
in the direction
of airflow on
the wings and
tailplanes.
 I
sealed the post
shading with a
coat of Testors
Acryl Clear Flat
which dried to a
nice even matte
finish. I
enhanced some of
the engine panel
lines with a pin
wash of Raw
Umber oil paint
and used a mix
of thicker Raw
Umber and Black
Oil paint to
create random
oil streaks on
the underside of
the fuselage
behind the
engine and other
areas likely to
leak a bit of
oil. Additional
chips and
scratches were
added with a
Prismacolor
silver pencil. I
added a filter
wash around the
wing root areas
to replicate the
grime tracked
about by the
ground crew
during
servicing. I
also added a few
chips along the
wing root with a
regular #2
pencil which, if
not over coated,
adds a little
different
metallic sheen
suggesting wear. I
sealed the post
shading with a
coat of Testors
Acryl Clear Flat
which dried to a
nice even matte
finish. I
enhanced some of
the engine panel
lines with a pin
wash of Raw
Umber oil paint
and used a mix
of thicker Raw
Umber and Black
Oil paint to
create random
oil streaks on
the underside of
the fuselage
behind the
engine and other
areas likely to
leak a bit of
oil. Additional
chips and
scratches were
added with a
Prismacolor
silver pencil. I
added a filter
wash around the
wing root areas
to replicate the
grime tracked
about by the
ground crew
during
servicing. I
also added a few
chips along the
wing root with a
regular #2
pencil which, if
not over coated,
adds a little
different
metallic sheen
suggesting wear.
The propeller
blades were also
chipped with the
#2 pencil. I
left one blade
unchipped to
indicate a
recent
replacement and
added a
manufacturing
date with a
white
Prismacolor
pencil. My
references
suggest these
markings were
often chalked on
by hand at the
end of the
manufacturing
process.
The exhaust
stains behind
the waste gates
were added with
the ubiquitous
red brown/ black
mix. I love how
repeated
applications
produce
different
effects. The
first few passes
look quite brown
but if
concentrated it
takes on a very
black tone
allowing you to
create a variety
of realistic
effects with the
one mixture.
Finally, I used
MiG pigments to
add a bit of
dust to the
wheels and
sealed it in
with a wash of
pure mineral
spirits. When
the wash dries,
it leaves a nice
even dusty
appearance and
helps bond the
pigments to the
wheels.
Markings
I chose E4*M
from Eagle
Strike’s sheet
for Thunderbolts
from the 362nd
Fighter Group
(Sheet Number
72-055). The
decals performed
flawlessly and
conformed to all
the panel line
details. I
should also
mention that the
sheet includes
decals for all
the tail
stripes. I just
masked and
painted mine
because I felt
in the mood.
All in all
this was a very
satisfying
project and I’m
happy to have
finally cracked
the NMF barrier.
If I had tested
my paint first,
I would have had
a rather nice
1/48 P-47 to
show, but it was
an important
lesson to learn
and one I’ll not
soon forget.
Now, I wonder
if the Tamiya
cockpit will fit
in the old
Monogram kit….
Click the
thumbnails below
to view larger
images:
[../../photogallery/photo00014789/real.htm]
Model, Images &
Text Copyright
©
2007 by Rafe
Morrissey
Page Created 24
May, 2007
Last Updated
24 December, 2007
Back to
HyperScale Main Page |
 Home
| What's New |
Features |
Gallery |
Reviews |
Reference |
Forum |
Home
| What's New |
Features |
Gallery |
Reviews |
Reference |
Forum |