|
Pavla's
1/72 scale
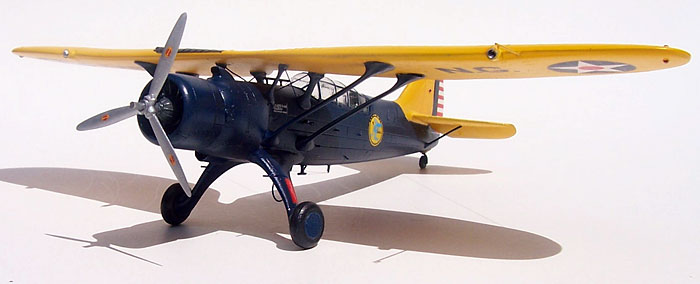
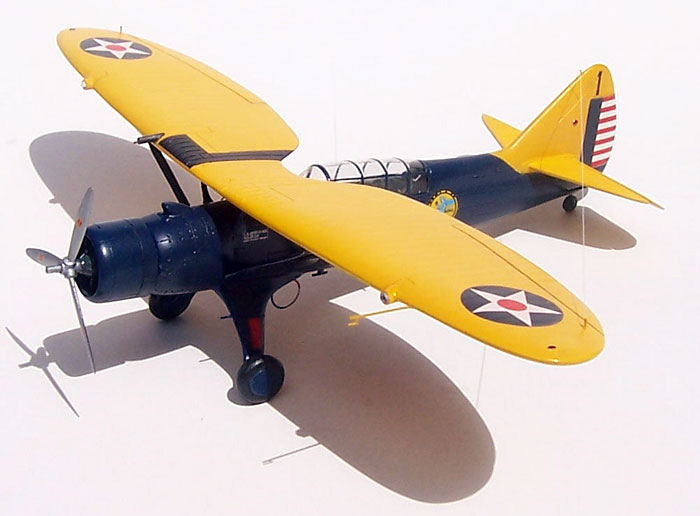
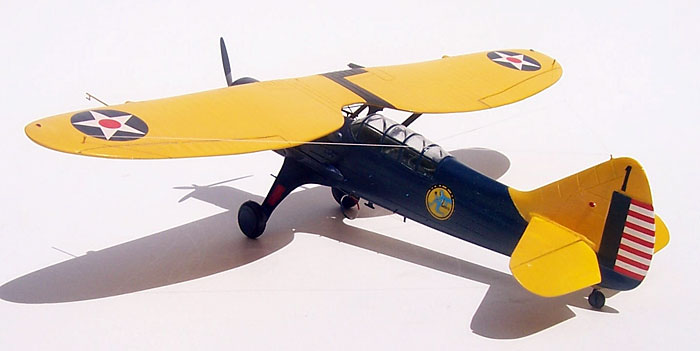
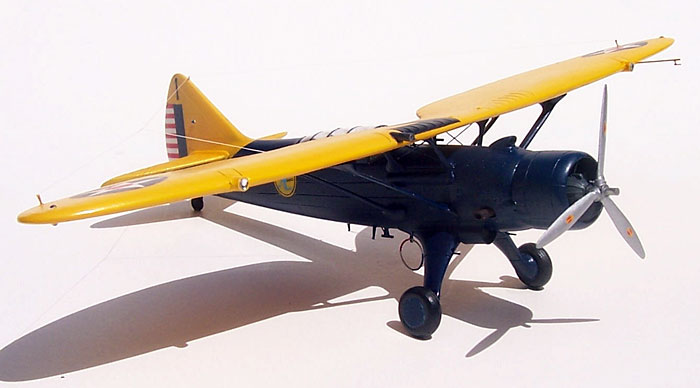
Douglas O-46
by Mark Davies
|
 |
|
Douglas O-46 |

Pavla's
1/72 scale O-46A is available online from
Squadron.com
The O-46 was the last in a line of
successful Douglas observation monoplanes. Prior to the its involvement
in WW2 USAAC had begun to consider the O-46 to be two heavy for soft
field operations, too large for concealment near front lines and too
underpowered and un-manoeuvrable to survive when threatened by fighters.
This assessment was to prove all too true, and about a dozen saw very
limited service in WW2 before being declared obsolete in their intended
role in 1942. It was then relegated to training duties and redesignated
the L-46A.
Over the years I have accrued a few Pavla kits, and a check of my
database shows they account for 32 of my unbuilt 1,100 kits. I have
always appreciated Pavla’s choice of subjects, but have also been struck
by their distinctly limited run nature. I’m not too put off by this,
having built numerous limited run kits by Azur, Special Hobby, MPM,
Condor, CMR, Planet, Avia, Elf, ICM to mention a few, but for some
reason I’ve haven’t got around to a Pavla kit until now.
Their O-46 kit on has quite nicely moulded fuselage, wings and
empennage, but critical items such as the wing struts and finer details
like venturi-style pitots and tail wheel start to show the limitations
of Pavla’s limited run tooling; being either rather rough in places,
slightly misaligned, vaguely defined etc. Also, a few panel lines are a
bit lacking in definition. The resin parts are nicely executed,
accounting for the engine, air intake, and little antenna masts for
under the fuselage, and propeller hub. I’m pleased to report that the
main undercarriage is in resin too, and shows what could have been
achieved if the wing struts were provided in this medium rather than
Pavla’s styrene. Two vac-form acetate canopies enabling the quite
adequate cockpit detail to be seen. The package is rounded out by very
nicely presented instructions, colours & markings plans and decals. For
an informative and thorough in-box review please
follow this link to Internet Modeller (Pavla 1/72nd Douglas O-46A).
I was soon struck by the kit’s plastic
somehow managing to be both typically soft like most limited run kits,
but also rather brittle and “biscuity”. This meant re-scribing and
working with small parts needed particular care. I chose to complete the
fuselage, empennage and wing support struts as one assembly, and the
wing and engine plus cowling as the other two. This simplified painting,
but made attaching the wing cleanly later on a bit of challenge
The vac-from canopy is about par for those found in many Czech
manufactured kits, being some way from the quality of NZ’s Falcon
products (who also make Squadron Crystal Clear), but still quite
useable. The main challenge is clearly identifying where the canopy
begins and surplus acetate ends, so I removed the canopy with some
excess to allow for gradual adjustment. Suffice to say quite a bit of
adjustment was needed to get a good fit. The entire canopy was masked
off for the fuselage to be painted, as all framing was to be applied
using painted decal film later (the method I use for all acetate
canopies).
The fuselage needed a bit of re-scribing and filler here and there, but
nothing excessive. The horizontal stabilisers have to be cut at a slight
angle in order for the elevator hinge line to be 90º to the fuselage
datum. There are also two small windows on the underside that must be
cut out and glazed by the builder. The resin undercarriage legs were a
good fit, being blended in with a swipe of Mr Surfacer.
The real weakness of the kit is the wing struts. They are not 100%
consistent in appearance, both in section and the faired attachment
points. This observation applies more forcefully to the cabane struts,
and I could see I was going to be in for some difficulties later. I
decided not fuss too much as I realised this model was going to have
some rough points (by that I mean things that would affect IPMS-type
judging, rather than things I could live with!), so I ran with kit
struts and added the cabane strut rigging. The tail wheel was a bit out
of round, so I used the Pavla leg and a replacement wheel from the
spares box. I decided to add the tail struts, crew mounting steps,
pitots and under-fuselage antenna supports after the main painting and
decaling had been completed.
The wing halves had their trailing edges thinned, and I replaced the
landing light structures in the wing leading edge with plastic tube and
clear plastic lenses as this was the easiest way to get well rounded
protuberances coming out of the wing’s leading edge.
I was aware that the O-46 had two machine guns, one pivoting in the rear
cockpit and one fixed to fire forward. From what I could tell this was
located in the wing. I found it hard to find good references relating to
this latter gun. Pavla provide a rounded sausage shaped item to go where
I thought the gun should go, with a little pip on the front. I think I
misinterpreted this when I scratch-built the wing gun you see in the
photos. I have since found one photo of a restored plane showing a
“blob” like that which Pavla supplies painted the wing colour, so I
think I got it wrong, and Pavla’s “shape” was accurate! Most photos I
have seen show no protuberance in this area, so maybe it’s a gun camera
housing, but I would appreciate some advice on this aspect of the O-46
from any one who can help so I can correct my model (please
email me if you know).
Painting was straightforward, and the
decals proved to be excellent, needing no setting or solvent solutions
over the gloss Humbrol paints I used. I then sprayed a semi-gloss clear
to tone down the gloss for the sake of scale appearance.
Now for fitting the wing! With hindsight I could have spent more time
optimising the fit of the struts by adjusting their length. This would
need to have been done away from either end of the effected struts as
they incorporate streamlined fairings where they mate with the fuselage
and wings. I didn’t bother because I went through a phase of diminished
optimism as to how the finished model would turn out. This was a mistake
on my part. In the end, and after several failed attempts, I anchored
two cabane and one wing strut with superglue, and then worked away at
the remaining ones.
I found I had the odd small gap where streamlined strut attachment
fairings met the wing, and I ran white glue into these, and painted them
blue when dry. The combination of dark colour and underwing location
meant I basically got away with this patch-up. I feel Pavla should have
produced the wing struts in resin to the same high standard as the main
undercarriage legs. This would result in an easier to build and better
looking model.
By this stage I was feeling more optimistic about my model. The engine
and cowling presented no problems, leaving only the prop blades to be
thinned down. These were fitted easily enough to the resin hub as I left
some stubs on the blades and drilled the resin hub to receive these.
This approach gave a better result than butt-jointing them, and made
pitch adjustment in particular easier to do. The resin engine exhaust
was mounted on the plasticard blanking plate I added before fixing the
fuselage halves, and I added the various crew steps and venturis to the
fuselage. The wing pitot was made from piano wire and sprue rather than
use the kit example.
The underside of the O-46 is a characterised by a large DF loop and a
“cat’s cradle” style antenna strung between four points. The DF loop was
made from thin wire and had its quadrants painted in different colours
as per the instructions. The fuselage and wing-to-tail antenna wire were
added from stretched-sprue to finish. I should explain at this point
that Pavla’s instructions point out that the colour scheme I chose was
unarmed, meaning no rear cockpit gun, no telescope sight and no
aforementioned “sausage-shaped blob:” in the starboard wing. However I
decided that the Connecticut National Guard must have exercised with
guns at some stage, so I added the gun(s) and sight to my model. If I’d
followed the instructions I could have avoided my gun quandry!
So, all in all, a bit of mixed bag from a build point of view, but I’m
quite pleased with the result as a cabinet display model.
I have since looked at my other Pavla
kits, and look forward to building them with a new found optimism about
the results I can expect. I’ve already started a Curtis AT-9 Jeep which
seems to have much nicer plastic and a more polished finished than the
O-46, so just I suggest you accept a Pavla kit at face value and quite
possibly you will be pleasantly surprised with the results as I was with
my O-46.
Click the thumbnails below to view larger
images:
[../../photogallery/photo00009261/real.htm]
Model, Images and Text
Copyright © 2007 by
Mark Davies
Page Created 09 March, 2007
Last Updated
24 December, 2007
Back to
HyperScale Main Page |
 Home
| What's New |
Features |
Gallery |
Reviews |
Reference |
Forum |
Home
| What's New |
Features |
Gallery |
Reviews |
Reference |
Forum |