|
Bilek's 1/72
scale
MiG-19PF
by
Yufei Mao
|
 |
|
MiG-19PF |

HyperScale is
proudly
supported by Squadron
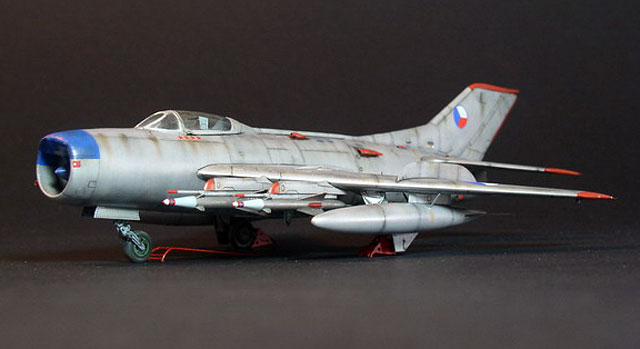
This is my
recent work,1/72
Bilek
MiG-19PM.Also
another new
comer to my 1/72
MiG series
collection.
MiG-19PM,called
as “Farmer E”,is
the intercepetor
type in the
MiG-19
family.Different
from MiG-19P,
two 30mm cannons
are deleted so a
PM usually
carries four
RS-2U(AA-1
“Alkali”)
missiles.
The only 1/72
“Famer E” kit
available in the
market now is
from a Czech
brand “Bilek”.
The kit was
released as one
of the Bilek
“Farmer” kit
series in
2001,with
accurate panel
lines and
detailed parts
such as landing
gears and
wheels.
Otherwise, I
used the
customized PE
part from
Extratech, which
improved the
small parts a
lot.
During my
construction,
I’d like to
aware those who
want to make
this kit several
points as below:
-
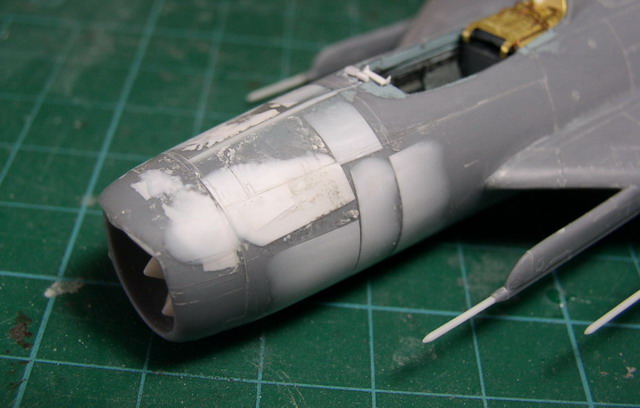
The kit
assembles
very well,
except for
the nose
area. What’s
more,the
section of
nose area
appeared to
be elliptic.
In order to
correct it,I
had to apply
a lot of
plastic card
on the nose
and sand it
after drying
thoroughly.
The nose
landing gear
bay was also
need to be
scratch-build.
-
The 4 RS-2U
missiles are
quite
rough.I
replaced the
fins by PE
parts after
a careful
part-cleaning.
Of
course,exhausts
on the
missiles and
fairings on
the PE
landing gear
covers have
to be
scratch-built.
-
Some wiring
work will
greatly
improve the
look of
landing
gears.I also
scratch-built
some landing
lamps by
clear sprues
-
Rescirbing
work of the
hatches near
the top of
fuselage
will be a
challenge.No
tool is
suitable
because the
raising fin
on the back
became the
drag. I
rescribed
them only by
a sewing
needle
controlled
by my
fingers.There
were no
rivets on
the original
kit,but I
think some
riveting
work will
improve the
look of this
50s-60s
aircraft.
-
I didn’t add
too many
details such
as a resin
ejection
seat in the
cockpit as I
chose the
closed
condition.
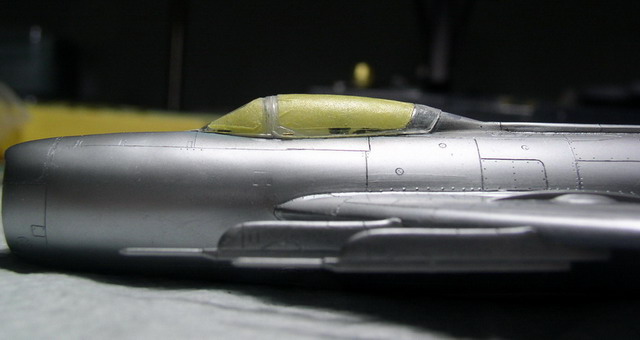
The original
canopy parts
of the kit
are
absolutely
wrong. The
height is
too high
while width
too wide.I
used a Pavla
Models
vacuum
canopy here
which was
also
incorrect
for the same
problem, but
much
improved.
The vacuum
canopy was
firtly cut
into 2 parts
as
windscreen
and
canopy.Then
sanding from
bottom to
decrease the
height,and
from the cut
area to
reduce the
angel of
windscreen.This
procedure
cost a lot
of time as
continuous
sanding/dry-fitting
was
necessary.
But this
procedure is
the most
important
step in the
built,as in
my opinion
canopy is
the “eye” of
an aircraft
model.
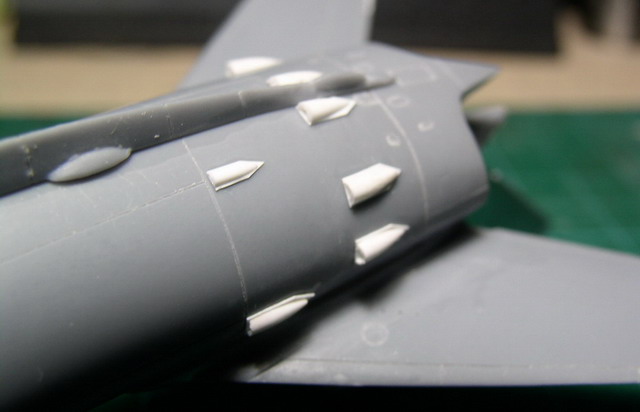
-
There are
many cooling
air intakes
with
different
types and
shapes on
MiG-19.Most
of them are
skipped in
the kit so I
had to make
them by
plastic rods
with drills.
-
The ladder
was made by
0.35mm brass
rods.
Fortunately,
the
structure is
quite simple
while wheel
stops are PE
parts from
UK
Flightpath.
Next up is
painting.
The MiG-19PM
does not have as
many interesting
choice as the
MiG-19S or P, as
most of them
were unpainted
only with a
vanish
surfacing. I
chose the most
colourful one of
them," Black
1113” belonged
to Former
Czechslovak Air
FoRce in 1965.
All paints are
from Gunze
Sangyo Mr.Color.#8
Siliver+#1 White
as the main
colour of
aluminum, with
many shading
colours created
by #8 Siliver+#2
Black and #8
Siliver+#41
Redbrown.
The decal
provided by
Bilek is made by
Czech Tally
Ho!,which is
already quite
famous for its
aftermarket
goods
nowadays.No
complaint can be
found as the
quality is the
top
class.Clear,thin
and quite easy
to use with the
help of Gunze
Mark Softer.
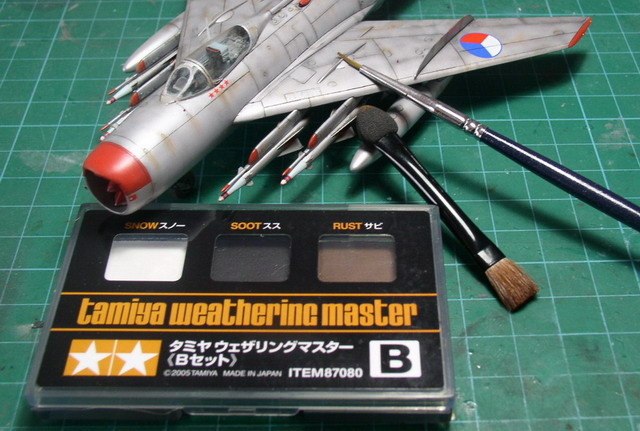
Washing material
is Tamiya enamel
colours while
another Tamiya
goods is used
for weathering,
Taimiya
weathering
material sets.I
highly recommend
the 2 sets as
the powder
particle is very
fine and
stickness is
quite
satisfying.
After finishing
it for a while,
I found some
pictures of the
real bird in a
Slovak air
museum on
Internet, which
proved that the
Tally Ho!
instruction
sheet is totally
wrong. The blue
rador area on
the nose is red
on that sheet...
I began my build
on December 2,
2006 and
finished it on
Janurary 6,
2007, in one
month with 5
weekends and a 3
days new year
vocation used.
As my first work
in 2007,wish you
a best 2007 and
hope you like
it!
References:
Czech 4+
Publication
4+021 MiG-19P
And some photos
from the
Internet
Click the
thumbnails below
to view larger
images:
[../../photogallery/photo00001176/real.htm]
Model, Images &
Text Copyright
©
2007 by
Yufei Mao
|
 Home
| What's New |
Features |
Gallery |
Reviews |
Reference |
Forum |
Home
| What's New |
Features |
Gallery |
Reviews |
Reference |
Forum |