|
Vector's 1/48 scale
LaGG-3 Series 66
by Brett Green
|
 |
|
LaGG-3 Series 66 |

HyperScale is proudly supported by
Squadron
Background
The LaGG-3 was born of the urgent requirement to build a
fighter from non-essential materials such as wood. Within a remarkably
short period, the design team of Lavochkin, Gorbunov, and Goudkov (hence
the LaGG acronym) delivered a prototype which was immediately ordered
into production.
The first LaGG-3s to enter service suffered from being overweight and
underpowered, poor manufacturing standards and slow climb performance.
Its pilots were also endangered by a deadly high stall speed. The first
versions of the LaGG-3 were inferior to the Messerschmitt Bf 109 F in
every aspect of dogfighting except in the horizontal plane, and even
then the Bf 109 could simply break off combat and climb to safety. The
LaGG was so mistrusted that its pilots dubbed it the "lakirovanny
garantirovanny grob ("guaranteed varnished
coffin").
Despite these shortcomings, the LaGG-3 showed promise thanks to its very
heavy armament and robust survivability. Even after being shot to
pieces, a LaGG could often limp home to its base.
Later versions of the LaGG-3 were far superior machines with more more
powerful engines, leading edge slats (eliminating the high stall speed),
lighter weight and overall performance superior to a Messerschmitt Bf
109 G. Later still, the airframe was further streamlined with measures
including retractable tail wheel, and stripped of additional weight.
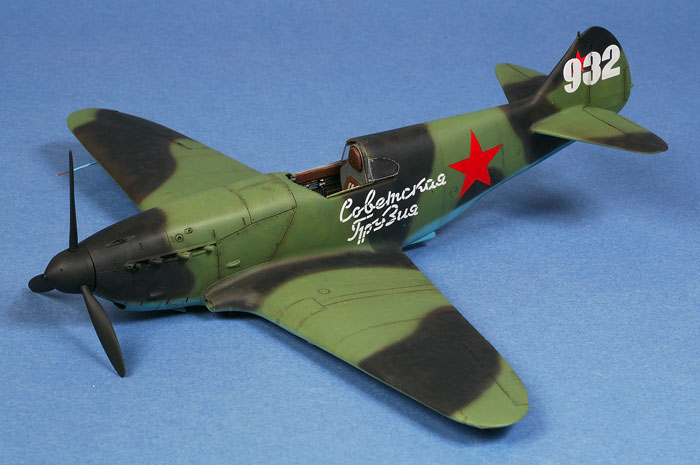
Vector's Late Version LaGG-3
Vector has chosen one of these late versions, the LaGG-3
66 series, as the first kit in their 1/48 scale LaGG family.
The kit comprises 58 parts in grey-green coloured resin; 1 clear vacform
part; printed acetate sheet (instruments); and markings for three
aircraft.
The resin is perfectly cast and beautifully detailed. It is amongst the
most impressive casting that I have seen.
Being a largely wooden aircraft, surface detail is minimal but it is
subtle and appropriate where present. The recessed rivet detail on the
engine cowl is incredibly fine. Fabric detail on control surfaces is
convincingly restrained.
With most models, especially resin kits, parts
preparation is the first step. In the case of Vector's LaGG-3, this is a
very quick job.
The wings are supplied
almost ready to use, with no casting blocks or strips to remove. There
are a couple of raised circles on the mating surfaces of the fuselage
halves only take a few minutes to remove. A few swipes of the
fuselage halves against some medium grade abrasive paper, and these
major parts were ready to assemble.
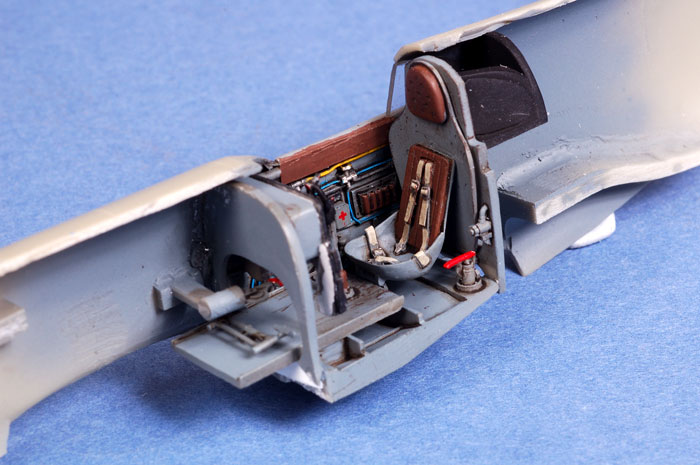
The cockpit comprises nice deep sidewall detail cast
onto the inside of the fuselage, a separate fuselage floor with structural detail,
and a very nice pilot's seat with the harness cast in place.
The instrument panel is resin too, with a separate sheet supplied with
printed acetate instruments. Nothing else is required.
Click the thumbnails below to view larger images:
[../../photogallery/photo00011008/real.htm]
 I
spent a bit longer than usual painting the cockpit because the detail
was so nice. I
spent a bit longer than usual painting the cockpit because the detail
was so nice.
The cockpit paint job commenced with a coat of Tamiya
Flat Black followed by Tamiya XF-66 Light Grey, which seems to be a
reasonable match for VVS Interior Blue-Grey. This colour was misted in
several thin coats onto the parts at a high angle, leaving natural
shadow areas in black..
This was followed by an oil wash using a heavily thinned
mixture of Raw Umber and Lamp Black. Next, details such as straps, knobs
and buckles were picked out with acrylic paints and a fine brush. The
next step was applying wash of Tamiya Semi-Gloss Black acrylic paint to
the edges of framework, piping, electrical wiring and harness straps to
add further depth to these structural features. A fine brush was used
for this precise task. Finally, chipping was simulated here and there
with a well-sharpened 2B pencil.
The whole cockpit finally received a coat of Polly Scale Flat.
It took me a little while to figure out the exact
alignment for all the cockpit parts. The single photo of this area in
the instructions did not answer all of my questions. The third thumbnail
photograph (above) is a side view that might help other modelers in this
respect.
Click the thumbnails below to view larger images:
[../../photogallery/photo00001033/real.htm]
I damaged the delicate canopy rail in the area under the
port side window while handling the model. I sliced the remaining
section of the rail off, and replaced the entire length with thin
plastic strip.
The small side windows behind the cockpit are not
supplied, so I cut out the approximate shape from the waste of the kit's
vacform sheet. This material has the advantage of being quite thick, and
therefore offers a decent surface to accept adhesive. The windows were
trimmed and sanded to shape, dipped in Future and, when dry, secured
into their enclosure with superglue. I was quite apprehensive about
these windows, but in the end they were unexpectedly easy.
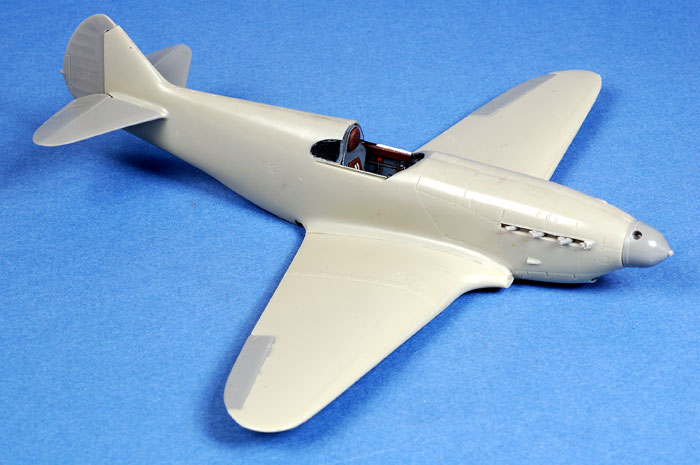
The balance of construction was incredibly fast.
The exhausts were glued in place, and the main
components test-fitted. It looked like there would be a small gap at the
leading edge of the port-side wing root, so I installed a spreader bar
from plastic sprue to slightly widen the fuselage in this area. The
result was a perfect fit at the wing root, but a new gap at the bottom
of the nose. This was later easily eliminated with a smear of Milliput.

Click the thumbnails below to view larger images:
[../../photogallery/photo00004404/real.htm]
The wing root intakes were solid, but my reference
photos suggested that they should be hollowed out. I started out by
drilling holes at each end of the intake, then carved out the opening
with a sharp hobby knife.
No more than a swipe of Milliput and Mr Surfacer was
required before the model was ready for paint.
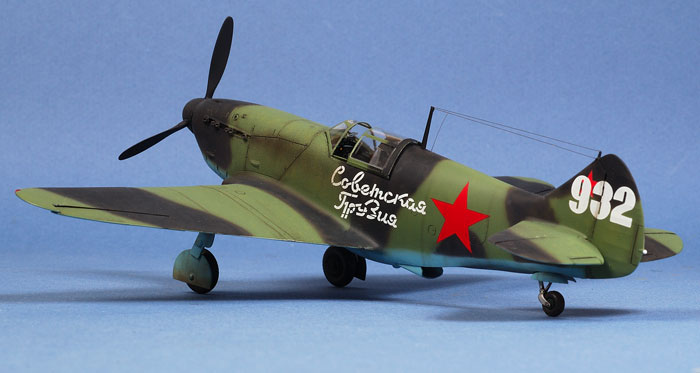
Painting,
Decals and Weathering
|
Paint
Before painting, I referred to the VVS
camouflage Bible, Erik Pilawskii's excellent "Soviet Air Force Fighter
Colours 1941-45" to determine colour matches. If you have the slightest
interest in VVS camouflage and markings, this book should be on your
shelves.
All paint was applied with the Testor
Aztek airbrush fitted with the fine tan coloured tip.
Prior to camouflage, the rear windows
were masked and the frames sprayed Flat Black
Next, the lower surface was painted Light Blue. I mixed Tamiya XF-23
Light Blue with approximately 20% X-14 Sky Blue to obtain a fairly vivid
shade. Once the entire lower surfaces were covered, I mottled the base
coat with 100% XF-23 Light Blue to obtain a subtly irregular effect.
Gunze H422 RLM 82 was then applied to
the upper surface. This colour was close to the FS equivalent for the
Soviet upper surface green. With the first coat in place, the base
colour was heavily thinned and mixed with approximately 15% XF-4 Yellow
Green for the disruptive mottle. The objective here is for the variation
to be barely noticeable once the model is finished, so subtlety (along
with a willingness for trial and error) is the key.
Black can sometimes look stark and
unrealistic on a model, so I mixed 50% XF-1 Flat Black with 50% XF-64
Red Brown for a "scale black" colour. This was painted according to the
appropriate camouflage pattern in Erik Pilawskii's book. The camouflage
was sprayed freehand (ie, without masks), but in a tight, semi-hard
demarcation to match the finish seen in wartime photos.
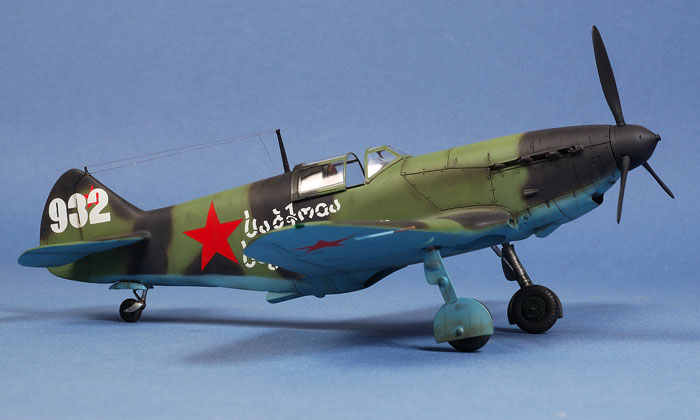
Weathering
A very thin mix of Tamiya XF-64 Red
Brown and XF-1 Flat Black was sprayed along selected panel lines. I
focused on the metal nose and the wing reinforcement strips.
Light streaks and spots were also
sprayed onto the larger areas of the wings and the fuselage to represent
subtle staining of these wooden surfaces. The key to this technique is
to slowly build up the effect – it is very easy to go overboard!
A thin wash of Tamiya Semi-Gloss Black acrylic paint was applied with a
fine brush to selected panel lines.
Click the thumbnails below to view larger images:
[../../photogallery/photo00021905/real.htm]
Decals
The model received a coat of Polly
Scale Gloss acrylic before the markings were applied. I used the kit
decals except for the fuselage stars, which were from a generic
Aeromaster sheet of Soviet national markings.
All decals proved to be opaque and
free from silvering.
The completed paintwork was sealed
with a two thin coats of Polly Scale Flat acrylic.
Finishing
Touches and Decals
|
The vacform canopy supplied with the
kit is quite nice but the frame detail is a little soft.
Falcon's Clear Vac set no.37 WWII
Fighters Part Two includes canopy parts for the old LTD kit. I cut the
canopy out out of the clear sheet and test-fitted. The fit was pretty
good but the sliding section was not quite tall enough to completely
cover the canopy rails. In fact, the kit canopy is the same height as
the Falcon replacement and therefore suffers from the same problem.
I decided to extend the height of the
canopy by gluing a section of plastic strip to each side. I thought that
this would also provide a more robust join between the fuselage and the
canopy. In fact, the plastic strips slotted snugly into the canopy
rails. If I had wanted, I could have left the canopy workable, but I
eventually glued it in position.
I glued two short lengths of fine
copper wire to the fuselage section above the instrument coaming. These
acted as positive locating points for the thin vacform windscreen.
Now the canopy sections were masked
with strips of Tamiya tape and sprayed the upper surface camouflage
colours.
Following a final coat of Polly Scale
Flat, masking was removed from the canopy.

[../../photogallery/photo00026315/real.htm]
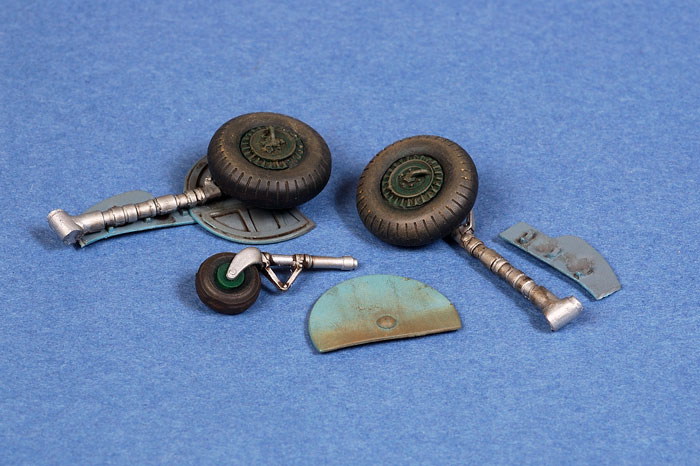
The smaller details are just as
impressive as the larger parts. To their credit, Vector has supplied
resin wheels in their latest two releases. These are noticeably nicer
than the vinyl tyres included in their first two kits.
The undercarriage gear was painted and
weathered with an oil wash. The gear doors were further dirtied up by
spraying fine lines of my weathering mix. Both the wheels and the
undercarriage doors also were treated to a pastel dusting with Tamiya's
pastels applied with the "cosmetics brush" supplied in the set.
The fit of the main undercarriage
parts was quite positive, although I did have to trim the top of the
upper gear doors before gluing them in place. My references were not
specific enough to tell the exact position and overlap of the covers for
the gear legs and the wheels.
The tail strut attached via a single
narrow point. This is not sufficient to hold the weight of the rear
fuselage. The tail wheel sank further and further into the wheel well
until it eventually disappeared. I removed the tail wheel and added a
short, narrow plastic block in front of the top of the strut. This was
superglued into the wheel well, resulting in a more robust fit.
I was concerned that the resin aerial
mast might be too flexible to maintain tension on the distinctive twin
aerial wires. I drilled out the base of the mast and installed a short
length of wire as a locating pin to improve its chances of at least
staying on top of the fuselage. I used nylon monofilament (invisible
mending thread) for the aerial wires, secured with a spot of superglue
at each end.
The exhaust pipes were brush painted
in a 50/50 mix of Testor's Metalizer Gunmetal and Burnt Iron.
The very last task was painting the
wing tip navigation lights in clear red and clear green.
Resin casting technology has reached a
level of sophistication in 2007 that has seen some very ambitious full
kits hitting the marketplace. In the best of these releases, cleanup of
parts before assembly is easier, the main parts are thinner and less
prone to warpage, and detail is world-class.
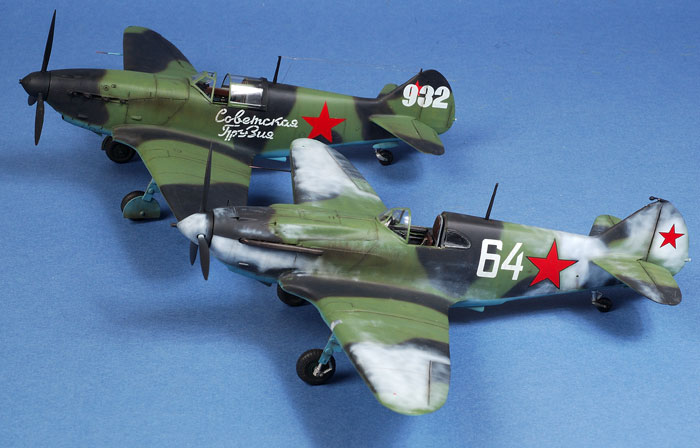
Vector's 1/48 scale LaGG-3 meets this high standard. It is, in my
opinion, even better than Vector's excellent predecessors, the La-5 and
La-5F, thanks to the absence of casting strips and the improved
appearance of the resin.
I suppose comparisons with South Front's recent 1/48 scale LaGG-3 early
version (4th series) are inevitable, even if they are somewhat moot. It
is apples versus oranges. The Vector kit depicts a very different
variant, occupies a vastly superior detail universe and will be much,
much easier and faster to build. The only round that the South Front
wins is cost, at around a third of the retail price of the resin Vector
kit. So, the decision is one of philosophy - price versus quality,
detail and ease of construction.
Myself? I like apples and oranges. I have happily built both - but Vector's kit
was a faster, easier and more detailed experience!
If you are a modeller with limited experience, but you have dabbled with
resin accessories and are considering your first full-resin kit,
Vector's 1/48 scale LaGG-3 will be an ideal choice.
Thanks to Buffie's Best for the sample
kit.
For a detailed look at the
contents of Vector's 1/48 scale LaGG-3 Series 66,
see my FirstLook review elsewhere on HyperScale.
Click the thumbnails below to view larger images:
[../../photogallery/photo00024527/real.htm]
Model,
Images & Text Copyright © 2007 by
Brett Green
Page Created 12 January, 2007
Last Updated
24 December, 2007
Back to
HyperScale Main Page |
 Home
| What's New |
Features |
Gallery |
Reviews |
Reference |
Forum |
Home
| What's New |
Features |
Gallery |
Reviews |
Reference |
Forum |