|
Vector's 1/48
scale
Lavochkin La-5
by Floyd S.
Werner Jr.
|
 |
|
Lavochkin
La-5 |

HyperScale is
proudly
supported by Squadron
Background
The Lavochkin
La-5 was the
amalgamation of
the Lagg-3
airframe with a
M-82 bomber
engine. The
resulting
airplane took a
mediocre
airframe and
turned it into a
match for the
Luftwaffe. The
new airframe was
heavier than the
Lagg-3 but the
additional power
made the La-5 an
outstanding
fighter plane
with good
developmental
potential.
The Kit
Vector is a new
company out of
Russia,
distributed by
Buffies Best.
Vector has made
resin aircraft
engines that are
the ultimate in
detail and
accuracy. The
La-5 is their
first full resin
kit. The kit is
molded bubble
free in straw
colored resin.
The details are
exquisite. All
the parts are
easy to remove
from the pour
gates. There is
no flash
anywhere. The
panel lines are
fine, crisp and
very nicely
presented. You
are treated to
four vacuformed
canopies. Two of
each type for
those of you
who, like me,
are heavy handed
and still want
to pose them
open. The decals
are nice and
offer options to
do three
machines. They
aren’t as crisp
as Western
decals but
appeared to be
useable.
Considering that
they were
painted on the
real airplanes
by unskilled
laborers they
may be more
accurate. You
will need to
scratch build
three things,
the antenna
masts on the
spine, tail and
pitot tube.
These are easily
done and should
cause no
problems.
I got an early
production
version of the
kit and the
wings and
ailerons were
one piece but my
later production
version had
separate
ailerons, which
I thought was a
very nice
addition. My
early production
kit had rubber
wheels from Avia
Equipage that I
couldn’t bring
myself to use
(except for the
tail one), but
the later
versions have
resin wheels,
which are more
accurate than
the Squadron
ones.
The instructions
are on one sheet
of paper and are
pretty basic.
Good thing
everything is
numbers on the
instructions.
Remove the parts
one at a time
and attach them
and you won’t
have any
problem. You are
given an acetate
instrument faces
to add to the
back of the
panel.
Preparation
Construction
begins by
carefully
washing the
parts in Dawn
dish detergent
to remove any
mold release
agent from the
parts. Be
careful as some
of the parts are
only attached by
tiny pour gates.
Once that is
done, I removed
the fuselage
pour gates. Take
a scribing tool
and just scribe
along the spine
and nose. Once
you have it thin
enough you can
break off the
pour gate. Flat
sanding just the
top with some
sand paper and
the fuselage is
ready to put
together. Repeat
the process for
the other half
and the one
piece wings.
Ensure you
retain the
airfoil shape of
the wing leading
edge. This is
the only cleanup
required.
Everything else
when removed
will be ready to
use. You may
have to touch it
with a sanding
stick just to
clean it up. I
had the whole
kit ready to
assemble in less
than a half
hour. I can’t do
that even with a
Tamiya or
Hasegawa kit.
Heck they take
me that long
just to fill
mold marks. The
quality of
Vector’s casting
is impeccable
and the
engineering
excellent. I
don’t know how
they do it.
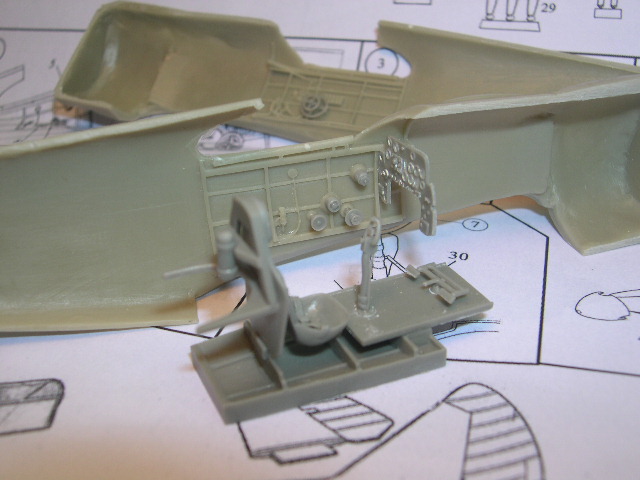
Cockpit
Now that the
fuselage halves
are ready, the
cockpit is
easily assembled
by following the
instructions.
The cockpit is
very complete
and needs
nothing other
than throttle
handles, which
are not
provided. I
didn’t add any
keeping the kit
OOTB and it
still looks
great. The seat
has the harness
molded on and
looks great. I
assembled
everything
except the
instrument panel
and painted the
whole interior
Model Ensign VVS
Wood Aerolak
Primer. The
instrument panel
was painted flat
black. The
instrument
acetate was
attached to the
back by Future
floor wax
flooded on the
acetate sheet
itself and then
positioned
properly. Once
dry, the back of
the sheet was
painted white.
When dry paint
over the white
with flat black,
as the back will
be visible from
the top.
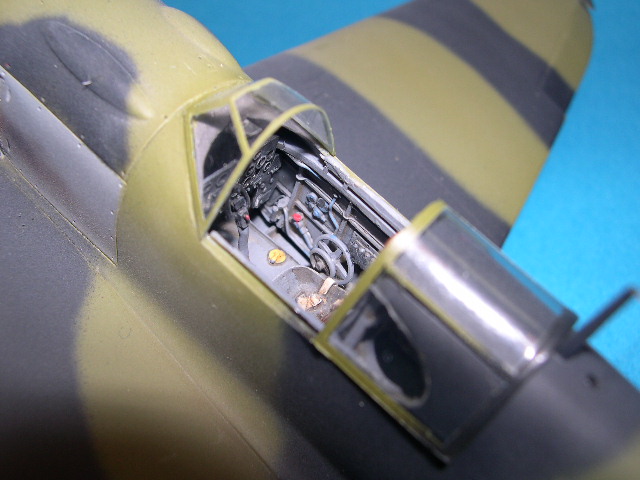
Details were
painted with
Apple Barrel
hobby paints. An
oil wash and
light gray dry
brush is all it
takes to finish
up the interior.
All easy, all
painless, and
best of all
quick. Except
for the throttle
handles you have
to add nothing.
[../../photogallery/photo00024431/real.htm]
Fuselage
The fuselage
once cleaned up
is pretty
anti-climactic.
You flat sanded
the surface so
they are ready
to go. Make sure
you glue the
cockpit floor
into one half
before joining
them, as the
armor plate
behind the
cockpit won’t
fit otherwise,
likewise for the
instrument
panel. I used
superglue to
join the halves
and fill the
seam. Clean up
is quick and
easy. Being of
wood
construction
there is no
seam.
Wings and Tail
The wing is a
solid one-piece
affair. As
mentioned
earlier, the
first castings
had molded in
ailerons but the
newer ones has
separate ones.
No big deal
either way. You
will note that
my stick in the
cockpit is
offset to
correspond with
the aileron
position.
The tail unit is
two pieces, left
and right. Fit
is perfect.
Both were
attached with
super glue and
accelerator.
Just the
slightest filler
was needed on
the front part
of the wings.
Landing Gear
The landing gear
fit solidly in
the wings.
Nothing
difficult here.
The actuators
fit onto the leg
perfectly. The
whole
arrangement is
very sturdy and
solid. You can
assemble the
landing gear
before painting,
as they are the
same color as
the underside of
the airplane.
Painting
One key thing
with a resin kit
is to prime the
kit with an
enamel or
lacquer primer
before painting.
This gives the
paint, whether
it is acrylic or
enamel,
something to
stick to. I used
Alclad Grey
Primer and
Microfiller. It
works well for
me. After fixing
up some minor
sand marks it
was time to
paint. There are
not many panel
lines to
preshade so I
would have to
rely on post
shading for my
panel
variations.
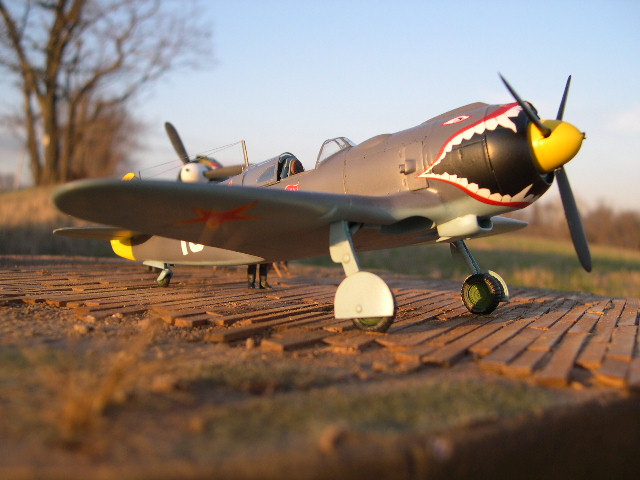
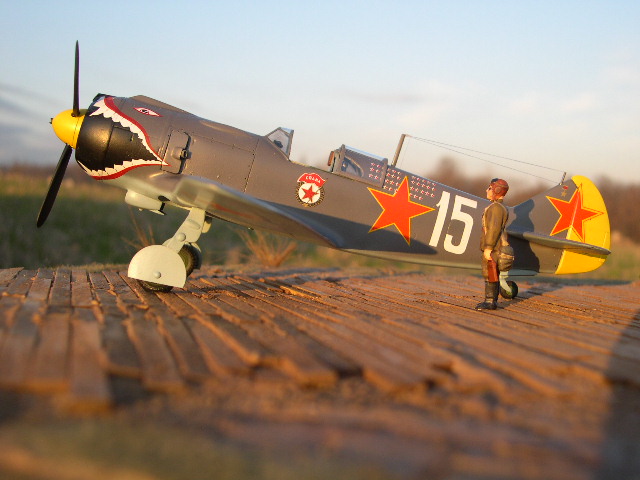
The color of
“White 15” is
open to
discussion but
the current
school of
thought is that
it was never
flown in combat
and only used as
a presentation
aircraft after
the war. After
the help of Wes
Stachnick and
the VVS website
(
http://vvs.hobbyvista.com/)
we determined
that the color
of “White 15”
with its large
bass mouth, too
ugly to be
called a shark
mouth was
painted in
AMT-12 a dark
gray. I opted
for the Gunze
color for this.
I added a little
white to the
color and
painted the
flight control
surfaces this
color to break
up the bland
gray color. I
know the
controls and the
wings were
fabric cover
wood but call it
artistic
license. The
lower color was
from the old
Aeromaster line
and approximated
AMT-7. It is a
little pale but
looked good to
me. “White 15”
did not have the
aluminum panel
behind the
exhaust typical
of the other
La-5s. Yellow
was added to the
tail and the
spinner. Don’t
forget to cut
masks for the
mouth pattern on
the decals. I
painted the area
semi-gloss
black.
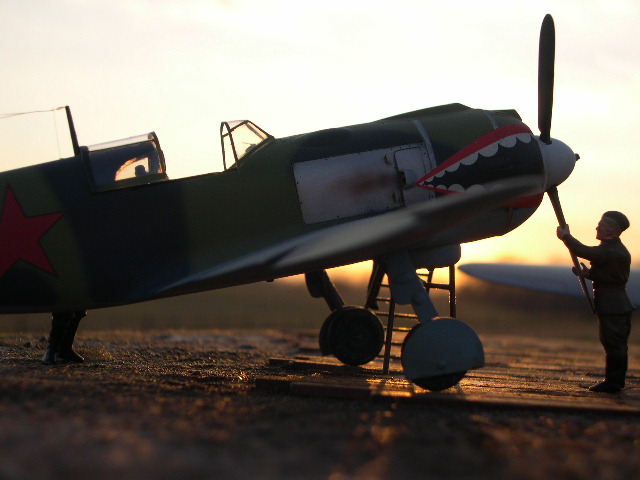
The other
aircraft would
be similar in
appearance in
that it has an
ugly bass mouth,
but this one was
used
operationally
and is more
typical of a
La-5. Before
painting the
camouflage I
painted the heat
panel behind the
exhausts with
Alclad Aluminum.
After masking
this off with
Tamiya tape I
painted the
underside AMT-7.
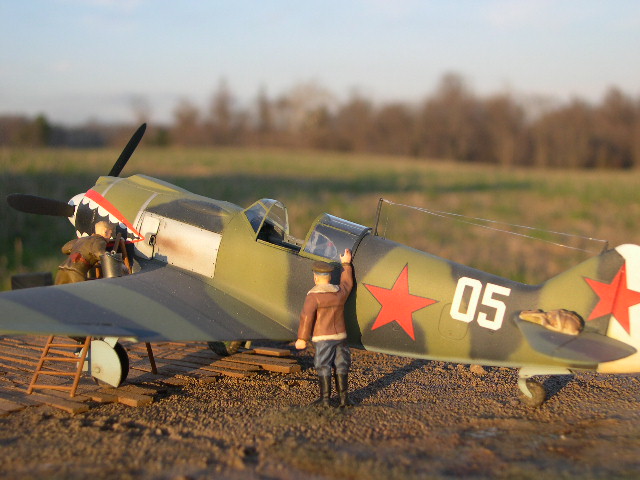
The topside is
typical of most
La-5 in having
AMT-4 green and
AMT-6 black. The
black is very
easy I used
Gunze Tire Black
as I thought
flat black to be
too, well black.
The AMT-4 is
almost a direct
match with Gunze
US Interior
Green so that is
what I used. The
colors were
freehanded for a
loose pattern. A
coat of gloss
and it was off
to the decals.
Decals
What can I say -
I’m a sucker for
a large mouth
bass. Okay so
they are
technically
shark mouths. I
utilized the
Aeromaster sheet
for “White 15”.
The shark mouth
would make or
break the kit so
I put it on
first. No
problem
everything fit
like it was
designed. I used
Solvaset to make
sure everything
settled down
nicely. The rest
of the decals
were cobbled
together from
various
Aeromaster
sheets. This
particular
airplane had
peculiar stars
with yellow
surrounds on
them. Unique
looking to say
the least.
I decided to use
the La-5 bonus
sheet that comes
with the La-5F
kit. The small
mouth bass decal
was not a
problem. I used
the kit decals
for the wings
and fuselage.
They all reacted
well with the
setting solution
but when I
overcoated the
decals with the
gloss coat they
crinkled. All of
them, except the
bass mouth.
Thank God. How
that happened I
don’t know, but
I’m grateful. I
pealed the
Vector decals
off with tape. A
light sanding
with Micromesh
reapply some
gloss and it was
time to apply
some Aeromaster
decals. The
issue with the
decals is the
only weak spot
of the kit.
Over coated with
gloss and then a
semi-gloss clear
(Grey one) and
flat
(camouflaged
one) made the
airplanes ready
for weathering.
Weathering
Weathering was
kept to a
minimum, as the
wood surface
seems to hold
their color
pretty well.
Besides “White
15” was a
display bird
anyhow. The
other one would
have been
relatively new
and the
Luftwaffe shot
them down with
alarming
numbers. Just
some burnt umber
in the panel
lines and some
Alclad burnt
Sepia exhaust
streaks, along
with some Mig
Pigment mud for
the wheels and
the weathering
was done. If you
haven’t tried
this weathering
medium they work
really well.
Paint them where
you want them
and then apply
some water to
set things up.
Or ally water
and then the
dust and you
have some mud.
Very versatile.
Final Touches
Adding the
front part of
the canopy was a
non issue, if
you were careful
when you cut
them out the fit
is very good. A
little white
glue and it
faired in
perfectly. The
sliding portion
was tacked down
with just little
bit of superglue
to hold it on
the tracks. I
did have to
fashion
replacement rear
windows from
acetate because
I screwed up the
ones in the kit.
I got carried
away with the
sanding stick.
They were all
attached with
white glue.
Adding the
wheels and the
antenna masts
are the final
steps. Put the
custom built
antenna on the
spine and tail
is relatively
easy. No big
problem. Time to
sit back and
enjoy my first
two VVS machines
in all their big
mouth bass
glory.
Some people will
complain about
the cost of the
kit, but think
about it this
way - an
injection kit of
this quality
will cost at
least $40. Now
you know you
have to have an
Eduard photo
etch set, which
you will only
use some of
anyhow, $15. You
like the look of
the photo etch
seatbelts too,
$10. We all know
that a resin
cockpit set
would set it off
too, $20. Of
course you’ll
want to have
resin wheels,
$5. Don’t forget
the vacuform
canopy, better
buy two, as you
will need them
both, $10. You
are now over $90
already. You
typically spend
the cost on a
kit, just not
all at once. Now
take into
account the
excellent fit
and engineering
of this kit and
you have a
winner.
I cannot say
enough good
things about
this kit. The
fit is fabulous,
the cleanup is
easier than most
injection molded
kits, the
subject is fresh
and exciting and
to top it off
the engineering
makes this a
quick build. I
absolutely loved
it. The only bad
thing is the
decals and that
may have been
me. Obviously I
liked it enough
to do two kits.
It is easy to
build and looks
great right out
of the box. Do
yourself a favor
and try this
kit. You won’t
be sorry. If you
have never built
an all resin kit
this is an
excellent place
to start. If you
have you will be
surprised at how
easy this one
is.
Now it is on to
the La-5F,
La-5FN and the
new Lagg-3s.
When will this
madness end? It
is a very good
time to build
VVS fighter
airplanes. We
now finally have
accurate kits of
these
historically
significant
airplanes. Why
did it take so
long? Come on
decal
manufacturers
and make us real
happy.
Without a doubt
this is one of
the finest resin
kits that has
ever been
kitted.
Marvelous work
Vector.
Highly
recommended.
Thanks to
Buffies Best for
the review kit
and it can be
purchased
directly from
Buffies Best at
http://www.buffiesbest.com
. Or by
contacting them
at:
8716 East
Frontier Place
Denver, Colorado
80237
720-200-9122
-
Lavockin
La-5, MBI
Publisher,
ISBN
80-86524-10-8
-
Lagg and
Lavochkin
Aces of
World War
II, George
Mellinger,
Osprey
Publishing,
ISBN:
9781841766096
-
Soviet Aces
of World War
II, Hugh
Morgan,
Osprey
Publishing,
ISBN:
9781855326323
-
Soviet Air
Force
Fighter
Colours
1941-1945,
Erik
Pilawski,
Classic
Publications,
ISBN:
190322330X
-
Lagg
Fighters in
action,
Squadron/Signal
Publications
Click the
thumbnails below
to view larger
images:
[../../photogallery/photo00028877/real.htm]
Model, Images &
Text Copyright
©
2007 by Floyd S.
Werner Jr.
Page Created 23
March, 2007
Last Updated
24 December, 2007
Back to
HyperScale Main Page |
 Home
| What's New |
Features |
Gallery |
Reviews |
Reference |
Forum |
Home
| What's New |
Features |
Gallery |
Reviews |
Reference |
Forum |