|
Tamiya's 1/48 scale
Mitsubishi Ki-46 III Dinah
by
Bruce Salmon
|
 |
|
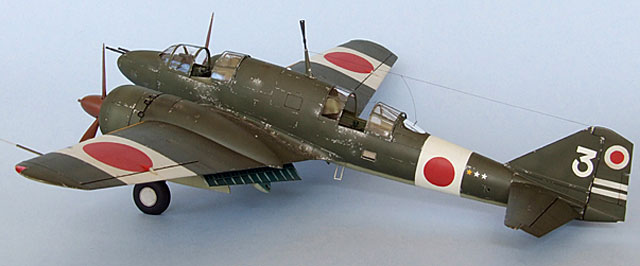
Mitsubishi Ki-46 III Dinah
Air Defence Fighter |

Tamiya's 1/48 scale Dinah is available online from
Squadron
This build started after I realized that it was taking too long to
make an impression on my modelling cabinet with fighters - so it was
time to make something a bit bigger. Firstly I dragged out my Tamiya
Betty which is a very sexy beast. Unfortunately, after a quick
tape-together, it wouldn’t fit in my cabinet by the merest millimetre.
It also looked like it was going to need some major internal surgery and
I hadn’t decided whether I was going to build it as a whole plane or a
dismembered jungle wreck; another time my pretty. The only other twin I
had was the Dinah so it won by default.
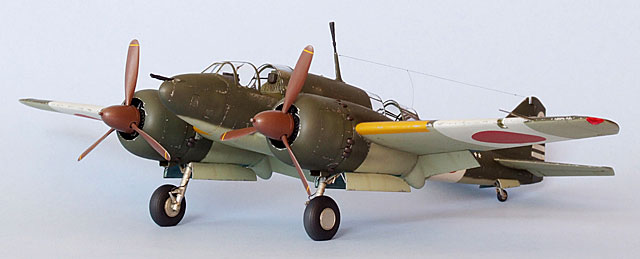
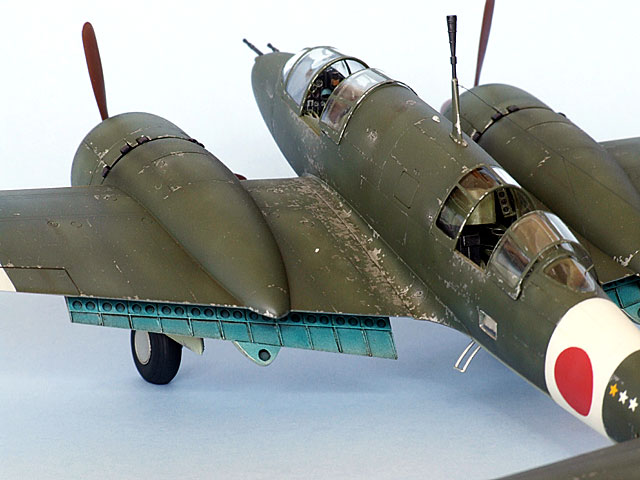
The Dinah air defence fighter was the armed version of this well known
recon aircraft sporting two 20mm machine guns in the nose and an
upwardly angled 37mm cannon in the roof for wasting B-29s. One of the
few Japanese aeroplanes capable of reaching the heights of the American
bombers, it was apparently quite effective in this role.
The Kit Moan...
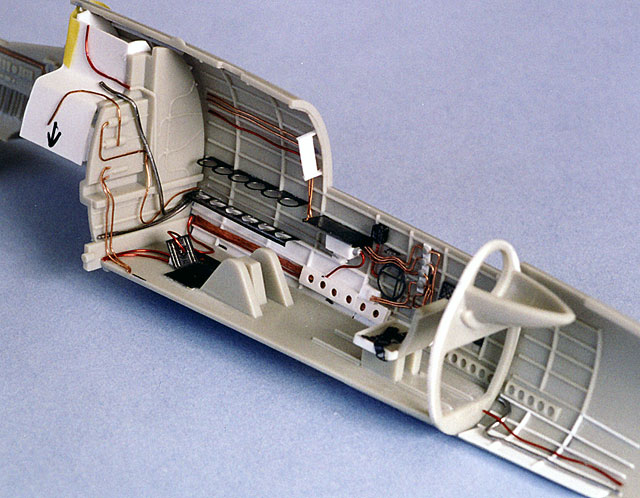
As with most Tamiya kits the fit of the parts and the detail are
excellent… until you get to the inside. Both front and rear cockpit
assemblies don’t even come near to touching the sides with gaping holes
into the wing roots. The wheel wells also leave major abysses into the
wing interior with little or no details. And that’s just for starters!
This aeroplane is usually very busy inside with lots of wires, hoses and
other paraphernalia on the bulkheads and sidewalls yet only the
framework and a few of the major appliances are moulded.
You can make 2 versions of this aircraft; the first with just 20mm nose
cannons and the second with those and the extra 37mm cannon in the rear
cockpit. Unfortunately if you want to make the first one there is
nothing in the instructions to tell you what to do with the mounts for
the 37mm gun which are moulded into the floor of the rear cockpit. I
have yet to find any photos of this particular set up either.
Only one thing for it - lots of scratch-building (the one thing I was
hoping to avoid!). IMO they need at least another sprue of parts and a
re-scribe of their moulds to make this into an acceptable kit. This is
really pathetic for a modern kit especially when you consider that there
are plenty of good interior photos and actual aircraft still extant.
I bought the Eduard PE set for this aeroplane and not only was it
Spartan but also lacking in many ways. E.g. No engine wiring, poor
instructions, parts in the wrong order, parts in the wrong places, parts
that don’t fit, and parts that you need to have during the PE-ing
process that they don’t even bother to supply. Gad!
Time to get cracking…
After gathering all the reference material I needed from the net and
pillaged books I got stuck in. The scratch-building was actually quite
fun (though rather tedious at times, considering how unnecessary it
should have been).
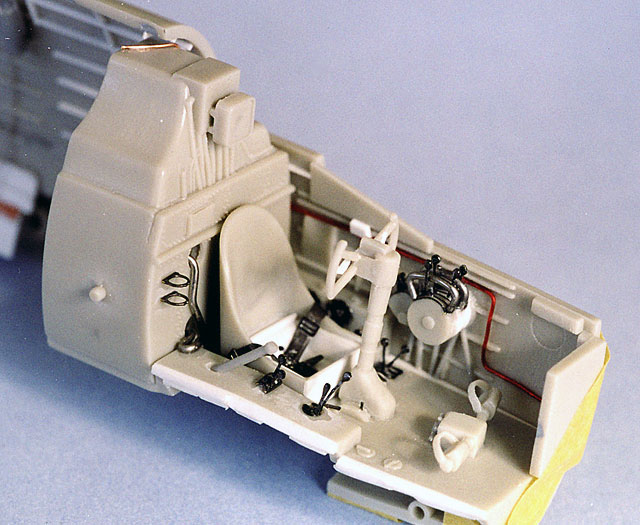
Heaps of stretched sprue, plastic card, various thicknesses of wire,
junk from the spares box, a bit of dremelling and a ton of superglue.
New nav and landing lights were made from Perspex (because the clear
sprue I had wasn’t thick enough) and the guns were hollowed out at the
ends by spinning them on the tip of a pointy knife blade. I learned
plenty of modelling techniques and a few new magic words too.
I’ll let the photos speak for themselves.
Click the thumbnails below
to view larger images:
[../../photogallery/photo00005707/real.htm]
Aftermarket Products Used:
Eduard PE set (48 184) Ki-46 III Dinah
Squadron (9584) Mitsubishi Ki.46III Dinah vac-u-form canopy
Paint
Firstly the instructions call for the aircraft upper surfaces to be
painted blackish (1 – XF1 Black / 3 – XF13 JA Green). However, in B&W
photos I have seen of the aircraft the Hinomarus are darker than the top
colour which would mean that it was probably just straight JA Green. I
chose to make mine a bit drabber than that:
-
Upper surface: 2 parts Tamiya XF51
Khaki Drab / 1 part Tamiya XF13 JA Green
-
Lower surface: 8 – Tamiya XF14 JA
Grey / 1 – Tamiya XF2 White
-
Interior: 1 – Tamiya XF62 Olive Drab
/ 1 – Tamiya XF58 Olive Green / 2 – Humbrol 226 Interior Green / 1 –
Tamiya XF2 White
-
Hinomaru: 5 – Humbrol 153 Insignia
Red / 1 – Humbrol 113 Rust
All surfaces were post-shaded using that particular colour
successively lightened with white in preparation for weathering.
Decals
The only decals I used on this kit were the stars on the rear
fuselage and the number 3 on the tail; everything else was masked and
spray-painted. I wanted my Dinah to have the “Defence of Japan” white
bands as well as the 37mm cannon but this combination is not one of
those in the painting instructions. I take the view that the aeroplane
was fitted with the big gun after the photos were taken – could have
happened…anything is possible in a war situation so a bit of artistic
licence is A-OK.
Weathering
After a coat of satin varnish, an overall light wash of raw umber
oils was applied. A darker mix was used in areas that would naturally be
dirtier such as around the engines and in the wheel wells. Six hours
worth of crippling chipping then followed by using a tiny brush and
Tamiya XF16 Flat Aluminium.
Lastly some exhaust and gun smoke staining was sprayed with Tamiya
X19 Smoke followed by a final coat of varnish.
Click the thumbnails below
to view larger images:
[../../photogallery/photo00019720/real.htm]
Final Assembly
All the flimsies and breakables were attached concluding with an
aerial wire made from stretched sprue and painted black.
Aside from the aforementioned (mostly internal) problems with this
kit I actually quite enjoyed the build. If you are willing to put in the
effort you can produce a stunning model of this zippy little Japanese
twin.
Model, Images and Text Copyright © 2007
by Bruce Salmon
Page Created 08 August, 2007
Last Updated
24 December, 2007
Back to
HyperScale Main Page
|
 Home
| What's New |
Features |
Gallery |
Reviews |
Reference |
Forum |
Home
| What's New |
Features |
Gallery |
Reviews |
Reference |
Forum |