|
Hasegawa's
1/48 scale
Nakajima Ki.44-II
Shoki
by Fernando Rolandelli
|
 |
|
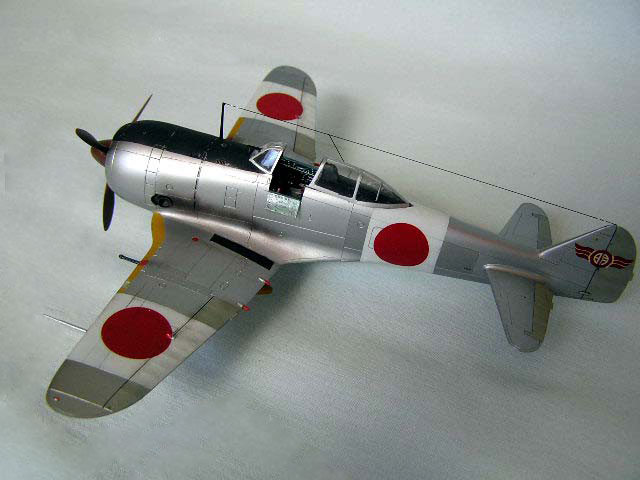
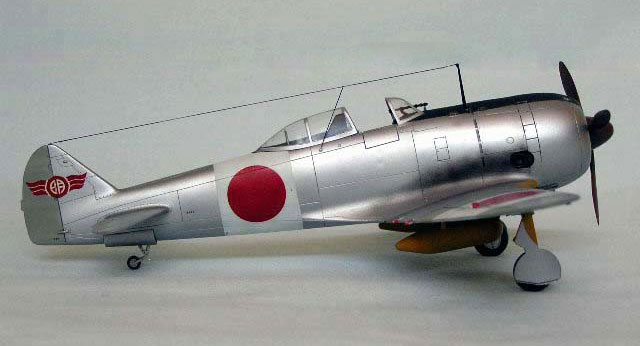
Nakajima Ki.44-II Shoki
Akeno Training Air Division, June 1944 |

Hasegawa's 1/48 scake Nakajima Ki.44-II Shoki is available online from Squadron.com
Background
Hot on the heels of the Ki.43
specificacions, the Japanese Army issued another assignment to the
Nakajima aircraft company, this time for a radically different air
defense fighter. The company set up a new design team, led by Tei
Koyama, to deal with it. He accepted from the start the visibility
restrictions imposed by the big bomber engine, the new Ha.41, however
well faired in, and incorporated “butterfly” flaps on the 12th model, to
keep maneuverability within acceptable levels.
First examples were flying by the second
half of 1940, but they proved not to live up to expectations, especially
in a flying competition against the Navy A6M, which could outpace and
outmaneuver both Nakajima products, while having greater range and
heavier armament; Ki.44 was found to have an edge only in vertical
speeds. Modifications led to an improved speed, and the pre-series
examples were sent to a new experimental unit, named the “Kingfisher
Unit” (later 47th Independent Coy), for combat evaluation, in September,
1941. No matter what Japanese propaganda published, this unit was
somewhat of a fiasco, even against the overwhelmed Buffaloes and
Hurricanes trying to defend Malaya and Burma.
The change of engine to the much more
reliable Ha.109, and a switch to more standard chin oil cooler (as was
the case with the Ki.43) did much to bring the Ki.44 to maturity.
However, they were never really successful in their intended role of
interceptors, having no chance against the fast, high-flying, well-armed
and enormous B-29s. In spite of this, the aircraft was popular among
their crews because of the modicum of protection it offered, their
sturdiness and a fast dive which could at least take them out of
trouble.
The Kit
This is the Hasegawa JT37 Ki.44-II ko
“85th Flight Regiment”, and it is designed and molded with the
particular care Hasegawa puts on Japanese subjects. However, the cockpit
is somewhat simplified and the guns shape is rather fancy. An Eduard PE
set, 48-212, was thrown in for good measure. No, both wing and fuselage
are about the same scale… in the box it looks like an overfed Hayabusa
fuselage mated to 1/72nd scale wings.
Cockpit
With no Shoki surviving to date, data on
the cockpit is scanty at best. There are a couple of pictures from the
original ATAIU files in the book by Mikesh. However, having being
developed in parallel to the Ki.43, it may be assumed that many of the
fittings and systems were shared, a vision supported by the few pictures
available and evidently shared by the people from Eduard! Armed with
this assumption, I set up furnishing the cockpit. The main contributions
of the PE set are the instrument panel and the seat, and believe me they
alone are worth the investment. The electrical panel on the right
sidewall is too prominent in my opinion, next time I shall shave off
some of its back.
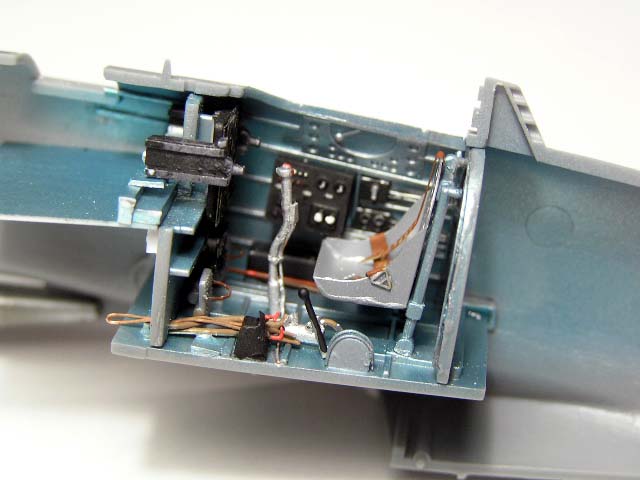
I added a scratchbuilt throttle unit, and
a prominent hydraulic distributor on the left floor, plus many cables
and tubing. I hollowed out the front “bulkhead”, as there was nothing
like that on the real plane, and made a shelf and new MGs butts from
scratch (but you could use the butts of any Browning .50 resin ones!) I
also opened the left entry door, thinned it and replaced the lost
internal detail with the appropriate PE piece. The whole set was painted
in Aotake; though there is no specific information, Ki.43’s cockpits
were like that. Therefore, I airbrushed the whole in Alclad II “Dull
Aluminium”, and then sprayed very light coats of Xtracolor Aotake,
except in the seat, which I chose to leave in NMF. Electrical cables are
Red, and hydraulic tubing in Tan.
Main Construction
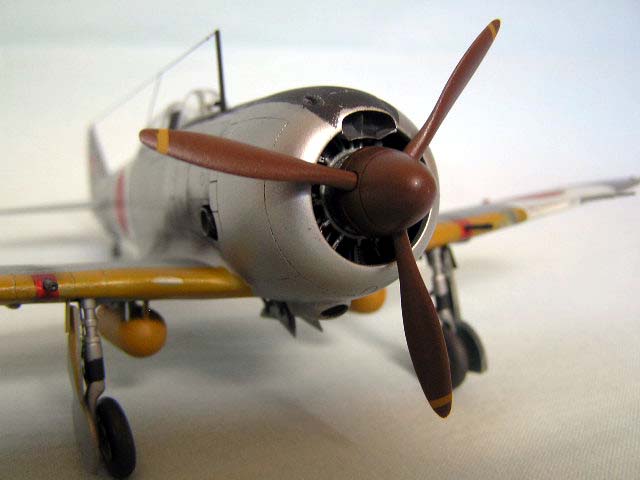
I set to detailing the engine, adding the
spark plug cables to the collector ring, and mating that to the engine.
Gluing the fuselage halves together was uneventful, not having been
unduly disturbed by my scratch built gun shelf.
The cowling has a too prominent step
where it meets the upper fuselage; I chose to filling and sanding it and
marking it with a panel line, but the effect ended up looking too
subdued.
Wings were somewhat problematic: the
trailing edges of upper and lower halves do not match. I choose to
extend the upper wings, though in truth it seems they are the correct
ones, for shortening the lower halves would have crazed the outline of
the Fowler flaps. Of course, my lazy nature soon found an excuse not to
cut and replace them by the PE ones in “deployed” position, as no
picture of a Shoki on the ground shows that attitude. I left the opening
of the holes for the drop tanks to the last step; those little things
often do not look good at all. In this case, after much filling and
sanding, they did. The anachronistic telescopic sight received a rod for
opening the security cap and was added after painting, with the
windscreen already in position. I cheated and glued the reinforcement of
the canopy hood to the fuselage, simply sliding the hood over it
afterwards.
I added gun muzzles made of perforated rod to the cowling openings; the
wing guns were replaced by barrels found at the PE, twisted around a
pin. By themselves, they look too bare, so I added the last section of
the injected parts, with fairly good results.
Natural Metal
Finish
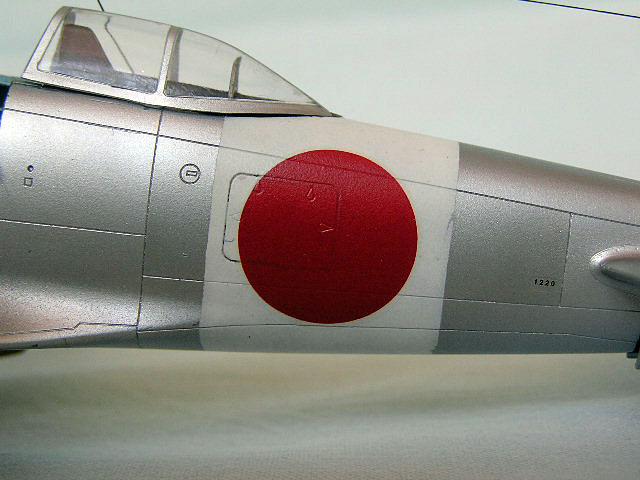
I chose to build the natural metal finish
example in the instructions; having the Home Defense White bands it only
had half the Akeno badge decal on a metal zone. I used the Alclad
system, priming everything in Grey Primer, and applying Aluminium as a
base, as well as Dull Aluminium and Duraluminium to some panels to
provide interest. Beware that Japanese planes were wholly skinned in a
munition quality dural, so do not make the usual metal panel tricks that
makes US jets of the fifties so handsome. The finish was really
outstanding, but in many instances, the masking tape lifted up not the
Aluminium, but the primer! As I had had no problem in a parallel
project, I guess it was because I had not given the primer proper time
to set, but anyway, it was very disturbing.
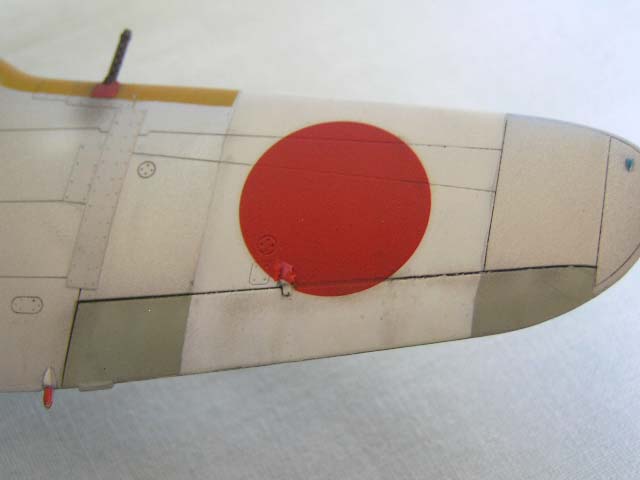
White bands were painted in Xtracrylix,
which are glossy and grips to the Alclad as glue, but the Black
antidazzling and the Yellow ID strips were painted in Humbrol enamels,
which proved fragile (I used that to my advantage to make scraps and
dents both by rubbing the paint off of pricking it out with a
toothpick), while the Gray-Green fabric surfaces were treated with WEM’s
appropriate colour. Drop tanks were painted the customary Orange-Yellow;
I guess it was an aid in the recovery of these once dropped.
Decals
Two versions are provided, both well
documented:
-
2nd Coy, 85th
Flight Regiment, Capt. Yukiyoshi Wakamatsu, Nanking, China, 1943, in
Green mottles over NMF, and the customary flight surfaces in Light
Gray-Green. This machine, sporting “halo” Hinomarus and the leader
Red stripe on the fuselage, is shown in a picture on pg 21 of the
Schiffer book.
-
Akeno Flight
Division, Akeno airfield, 1944, the “winged” badge denoting combat
status. A rather anonymous machine, but a couple of pictures of what
could be this one are shown on pg. 32 of the same book.
I dread painting mottles over NMF,
overspray usually kills it, so I chose the latter, and used the kit’s
decals, a rather unusual practice. They were the usual Hase stuff, well
printed but stiff and thick. The “hot flannel” trick was used and,
guess, it worked: the decals went properly down in every cranny and
panel line beneath them.
Nothing could be done about their
thickness… but as most of them were on the White bands, I could hide the
carrier under some Gloss varnish (I cheated and sprayed Xtracrylix Gloss
on the metal parts of the fin, to help the Akeno winged badge to settle,
and of course it worked fine, with absolutely no bad effects on the
metal finish look). All decals were oversprayed a protective coat of
Xtracrylix Gloss and then a Flat finish, together with the White bands.
Weathering
The usual dark Burnt Umber and Black
concoction was sprayed on every non-NMF surface, as well as used for
exhaust stains. Panel lines were stressed by an oil wash, which was also
used for fluid stains. Pictures show Shokis in a fairly well entertained
and clean state, but I had to overdo the exhaust stains a little to hide
some other nitty-gritty (shame on me).
An unusual machine, keyed to a
specialized role in which it did not succeed completely (but the B-29
was a mighty machine… against B-17s and B-24s it could have had a
chance), and, as such, lacking flexibility for doing anything else (as
demonstrated by its failure as air superiority fighter even in the
extremely favourable environment of the Malaya and Burma campaigns) was
soon superseded by GP fighters like the Ki.84 and Ki.61/100. Being in
the process of building one of the latter in parallel, I may say it
looks like a streamlined bird, while the Shoki seems more of a fatty
fish. However, it is a powerful albeit pleasant looking machine and one
wonders what it could have done as a racer in the late forties, perhaps
fitted with a more powerful and reliable American radial, had some
examples survived.
-
“Japanese Aircraft Interiors”, Robert
Mikesh, Monogram Publications
-
“Ki.44 Shoki In Army Service”,
Bueschel, Schiffer Publications
Click the thumbnails below to view larger
images:
[../../photogallery/photo00000492/real.htm]
Model, Images and Text
Copyright © 2007 by
Fernando Rolandelli
Page Created 06 February, 2007
Last Updated
24 December, 2007
Back to
HyperScale Main Page |
 Home
| What's New |
Features |
Gallery |
Reviews |
Reference |
Forum |
Home
| What's New |
Features |
Gallery |
Reviews |
Reference |
Forum |