|
Hasegawa's
1/48 scale
Nakajima Ki-43-I
by Tom Dungan
|
 |
|
Nakajima Ki-43-I Hayabusa (Oscar) |

Hasegawa's 1/48 scake Nakajima Ki-43-II is available online from Squadron.com
Background
The Nakajima Ki-43-I Hayabusa (Peregrine
Falcon) – code-named ‘Oscar’ by the Allies – was the intended
replacement for the successful Ki-27 ‘Nate’ IJAAF monoplane fighter.
Although initially disliked by test pilots, the production aircraft had
phenomenal range that was well-suited to Japanese strategic plans. The
fighter was underarmed and fragile relative to its opponents after 1942,
but was a surprising and dangerous opponent to the Allied men and
machines of 1941-1942 who were expecting to fight bi-planes. The initial
success led the IJAAF to delay development of successors, and thus the
Ki-43 had to serve until the end of the war. The –II and –III versions
offered limited upgrades to firepower, protection, and performance.
Hasegawa's 1/48 scale Oscar
This is a typical modern 1/48 Hasegawa
kit, which means fine engraved panel lines, good interior and exterior
detailing, and kit engineering to allow multiple versions with minimal
additional tooling.
Hasegawa offers both the –I and –II kits
in multiple re-boxings with different fuselage, cowl, oil cooler, and
wingtip parts. The somewhat simple kit reflects the fact that the
Hayabusa was a small, relatively simple aircraft.
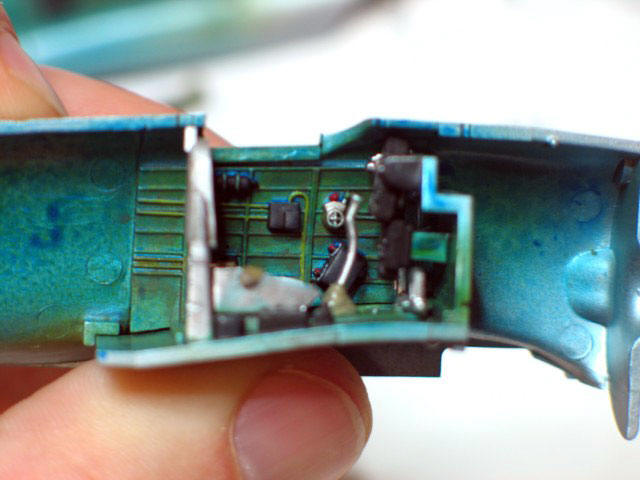
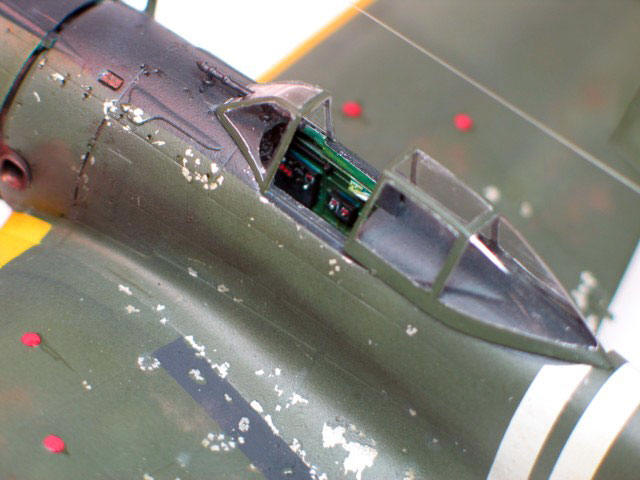
Cockpit detail is good out of the box,
with fully-detailed sidewalls. However, the pilot’s seat is very thick,
so I fashioned a new seat out of a soda can to achieve scale thickness.
The only other addition to the kit was a set of photo-etched seat belts
from an Eduard IJAAF set.
For cockpit painting, the builder will have to enter the morass of
information regarding Hayabusa cockpit colors and make a choice. The
Ki-43-I restored by the Alpine Fighter Collection in New Zealand has a
blue-green aotake interior, and this what I used as there were photos
available. There is significant opinion that this is an exception –
including the fact that later –II and –III versions had painted
interiors. In any case, I sprayed Testors aluminum from a rattle can,
then coated with transparent blue and transparent green.
The wingtips are an area of potential problems, as separate wingtips are
used in the versions of the kit to allow long-span –I and shorter-span
–II wings. Hasegawa would have you join each wing half and each tip half
before gluing the completed tip to the completed wing. I chose to
complete each half as a unit, and then glue the halves. This allowed me
to ensure the exterior of each wingtip join was good, and sand off the
mating surfaces from below to get the completed wing halves to close up.
Hasegawa continued their tradition of
providing lowered “butterfly” flaps on WWII Japanese fighters, despite
the fact that they were rarely deployed when on the ground. I’m OK with
giving modelers the choice (I’ll probably build one someday with the
flaps deployed – “accuracy” be darned – just to provide a talking point
for my usual lay viewers), but there is work to be done if you want to
take the high road and close them up. I sanded the flaps down to PE-like
thickness, then glued them into the provided recesses. That wasn’t
difficult – unless you were the skin on my finger – but then the
recesses for the deployment arms had to be filled, and retracted arms
built from styrene.
The only other issue I found with the build was with the landing gear,
as the instructions were unclear on the exact mounting position of the
gear doors on the landing gear. I’m not sure if I did it right, but
using photos as a guide, the L-shaped top half of the door should be
fitted with the upper part of the “L” flush with the wing. The lower
gear door should then mount flush with the lower leg of the “L,” but
should flare out a few degrees. I had to cut down the mounting points on
the inside of the gear door to get the right flare. The gear door
thickness is obviously overscale on a small aircraft like this, and PE
or thinner scratchbuilt styrene replacements are recommended for the
purist.
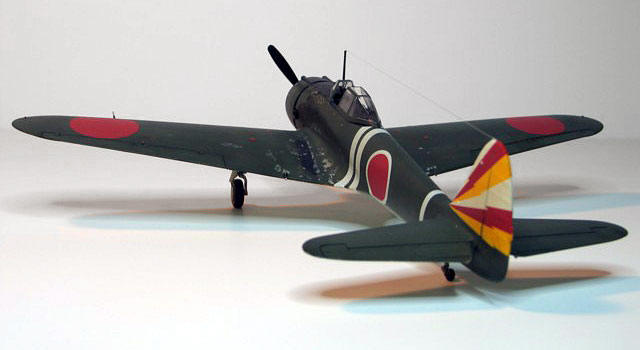
 I
used the kit markings and color scheme for Major Katsuji Sugiura’s
Hayabusa, based in Burma during October, 1942, as this was a most
colorful bird. According to my references Ki-43-I’s left the factory in
natural metal finish and were repainted in the field. Figuring that
field painting would be done without priming or other metal preparation,
it would weather quickly. However, I didn’t want to over-weather –
something that has struck some of my other Japanese builds before! I
used the kit markings and color scheme for Major Katsuji Sugiura’s
Hayabusa, based in Burma during October, 1942, as this was a most
colorful bird. According to my references Ki-43-I’s left the factory in
natural metal finish and were repainted in the field. Figuring that
field painting would be done without priming or other metal preparation,
it would weather quickly. However, I didn’t want to over-weather –
something that has struck some of my other Japanese builds before!
I decided to try the salt-chipping method
of simulating flaking paint to weather my model. I used ordinary table
salt, although the grains were larger than ideal. I’d recommend buying a
finer grain or grinding up table salt. After spraying an aluminum base
using a Testor rattle can, I used a paintbrush to place drops of water
in areas that I wanted flaked paint. Then another brush was used to
place individual salt grains into the water drops. I focused on
high-traffic areas like wingroots, wing walks, and the fuselage sides
below the cockpit. Once the water dried, it was time to paint!

I simply went with Tamiya IJA Green and
IJA Green-Grey acrylics, sprayed with an Iwata Eclipse CS airbrush. I
pre-shaded the panel lines, but they really didn’t show up on the
topside. To break up the green topsides, I used lightened shades of IJA
Green to paint various panels, and to make random streaks on the
fuselage (up-and-down) and wings (front-to-back). This is more apparent
in person than perhaps in the photos.
After the paint dried, I used a dull
scalpel blade to “scrape” off the salt grains, exposing the aluminum
underneath. One unexpected thing that happened is that the evaporated
salt water cast a whitish color through the green top-coat. Not sure if
this is a property of the salt used, but I thought it looked like part
of the paint wear – even if unintentional.
Panel washes were limited to flying surfaces, flaps, and panels around
the engine. Washes were applied using brush-painted artist’s oils, then
excess later removed using Q-tips soaked in turpentine.
I used kit decals for all the markings –
including the stripes, which had to be touched up with paint. Solvaset
was used to fix the decals, which were applied on a gloss coat.
Final details included adding
monofilament antenna wire, drilling out the exhausts, and weathering
with pastels.
I’ll leave it to you to decide if I met
my intention of not over-weathering. I learned enough with this first
salt-chipping exercise to refine the technique next time.
I very much enjoyed building this kit,
and wonder why I don’t see more examples built. There are certainly
ample colorful schemes available. It would make a great “quickie”
between more difficult projects.
-
“Camouflage and
Markings IJA Type 1 Fighter Nakajima Hayabusa (Oscar)” -
http://ipmsstockholm.org/magazine/1997/02/stuff_eng_oscar.htm
-
Japanese Aircraft
Interiors 1940-1945, R.Mikesh, Monogram Aviation Publications,
2000
-
Japanese Aircraft
of the Pacific War, R.Francillon, Putnam Aeronautical Books,
1987
-
“Peregrine Falcon,”
Richard Caruana, Scale Aviation Modeler International Vol.6 Issue 9,
SAM Publications, 2000
-
“WWII Japanese
Aircraft Photos” -
http://www.ijaafphotos.com/
Click the thumbnails below to view larger
images:
[../../photogallery/photo00030919/real.htm]
Model, Images and Text
Copyright © 2007 by Tom Dungan
Page Created 05 June, 2007
Last Updated
24 December, 2007
Back to
HyperScale Main Page |
 Home
| What's New |
Features |
Gallery |
Reviews |
Reference |
Forum |
Home
| What's New |
Features |
Gallery |
Reviews |
Reference |
Forum |