|
Hasegawa's
1/48 scale
Junkers Ju 87 D-5
Stuka
by Chris Wauchop
|

|
|
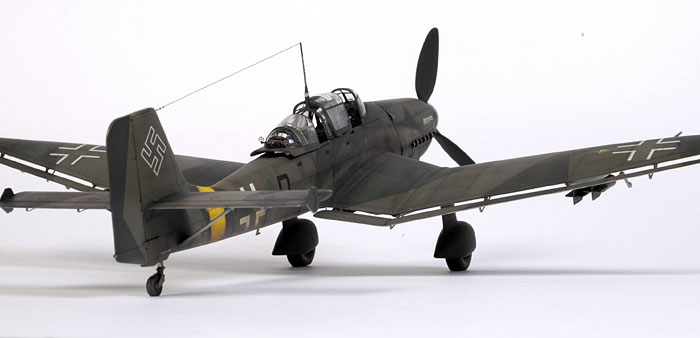
Junkers Ju 87 D-5 Stuka |
images by Brett Green

Hasegawa's 1/48 scale
Ju 87 D-5 Stuka is available online from
Squadron.com
Background
The Junkers Ju 87 Stuka entered the Second World War with a fearsome
reputation as a "terror bomber". Its brutally angular lines, screaming
dive and pinpoint precision bombing made the Stuka a terrifying icon of
the early Blitzkrieg campaigns.
During the Battle of Britain, however, unescorted Stukas on long-range
bombing missions were shot down almost at will by Spitfires and
Hurricanes. The reputation of the Stuka was severely damaged.
Nevertheless, the Stuka continued to be used effectively in other
theatres and roles until the last days of the war – troop support in
North Africa, night bomber in Italy, and tank killer on the Eastern
Front.
The most successful Stuka pilot was Hans-Ulrich Rudel. Rudel had already
completed 1,000 Stuka missions before developing the tactics for "Panzerjagdkommando
Weiss", the embryonic tank-killer Stuka unit.
Despite being shot down on at a number of occasions and sustaining
frequent injuries (including the loss of a leg), Rudel’s tally included
a total of 519 tanks and one Soviet battleship. He ended the war as
Germany’s most decorated pilot and the sole recipient of Germany's
highest military honour - the "Golden Oak Leaf with Sword and Diamonds
to the Knight's Cross of the Iron Cross."
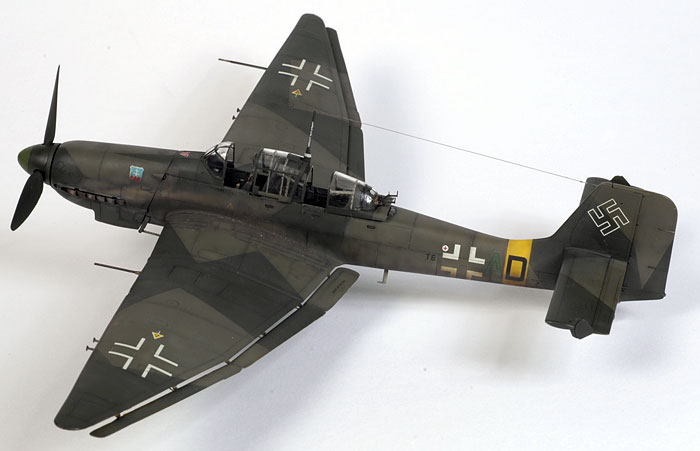
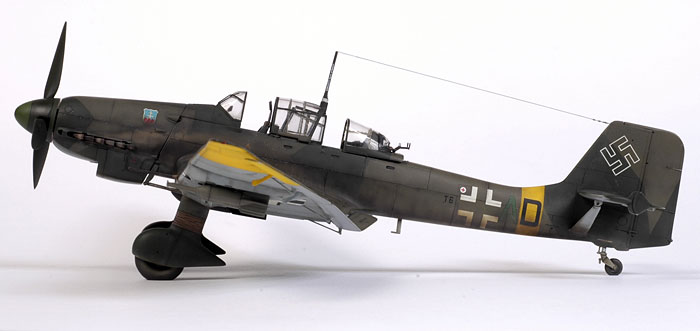
This model represents Rudel's D-5 Stuka when he was Kommandeur of
III./SG2 in Russia during 1944.
Hasegawa's 1/48 scale Ju 87 D-5 Stuka in the box
Hasegawa’s 1/48 scale Ju 87 D-5 Stuka kit shares the fuselage and
wheel sprues with the earlier Ju 87B kits, but little else.
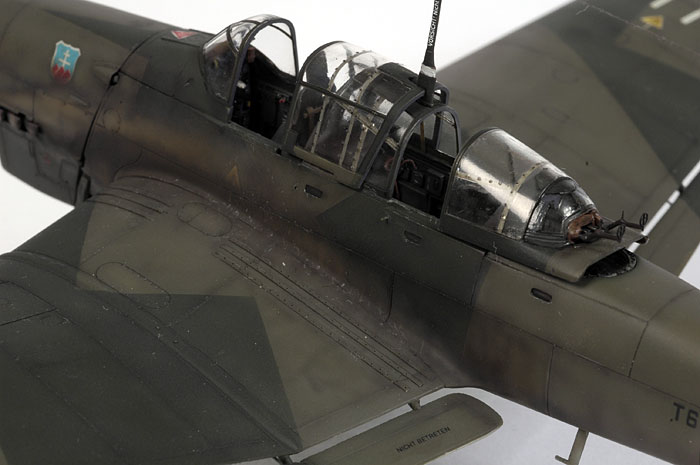
The lines of the aircraft are well captured. The very prominent
glasshouse canopy is impressively clear and thin.
The surface of the kit is detailed with crisply engraved panel lines
although photos of the real thing show that this was a lumpy, rough
aircraft – lots of overlapping and raised panels.
Cockpit detail is adequate, but does not fully represent a number of key
features of the later Stuka.
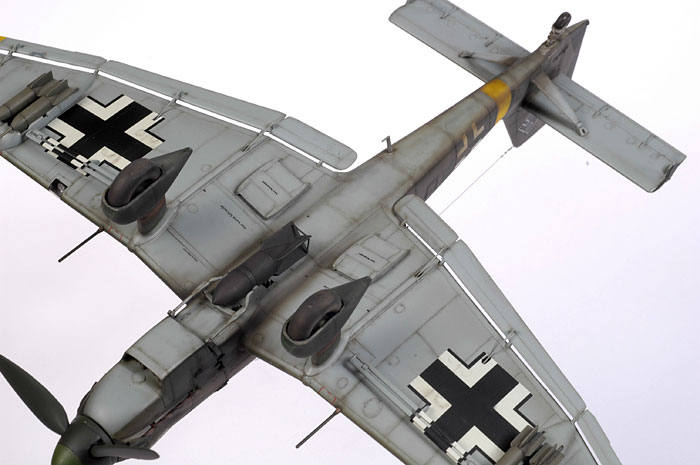
The wings are slightly disappointing in a number of respects. The
ailerons and flaps on the real aircraft were attached to the wing with a
series of hinged mounts. Hasegawa have represented these complex mounts
with solid slabs of styrene - the ailerons/flaps are moulded as part of
the lower wing. Although this simplifies construction and provides the
strongest possible engineering, it looks far from realistic.
The wing tips seem to have been added as an afterthought. There is a
noticeable step that requires sanding, filling and rescribing.
Overall, though, this is an excellent kit that represents the later
variant of the Stuka well.
This is Hasegawa's 1/48 scale kit number JT53, Junkers Ju 87 D-5
Stuka.
Basic construction was straightforward, but the instructions for
opening the locating holes for the bomb racks to the wings do not
correspond to pins on the bomb racks. Also note that only the port side
foot step should be used for this variant.
A number of additions and modifications were made.
In the cockpit, the rudder bar and pedals were added from the spares
box. Harness straps were scratch built using lead foil with buckles from
fine wire. The pilot's headrest was cut from plastic card. Plastic card
was also used to make the prominent rear gun armour, which was not
provided in the kit.
The following additions were made to the exterior:
-
The exterior Zwilling ring gun sights
were sourced from Verlinden German Gunsights set no. 1270.
-
Foot tread strips on the wing roots
were cut from plastic strip.
-
The door on the supercharger intake
was added from plastic card.
-
A leading edge landing light was
added.
-
Exhaust stacks were hollowed out
using a motor tool.
-
Gun barrels and the pitot tube were
hollowed with the tip of a hobby knife.
-
Trim tab, flap and aileron actuators
were added using fine brass wire.
-
Long impact fuses on the 250kg bombs
were added using dress making pinswith the heads filed flat.
-
Bomb fin braces were added from spare
photo-etched fret.
-
Main wheels were sanded smooth,
removing the radial tread, and flat spotted.
-
Scoops and engine bearer bulges were
hollowed.
-
Detail inside the bulges was added
using spare bits of plastic shaped to fit.
-
Spinner cap had a row of rivets added
using a pin.
-
Invisible mending thread was used for the main antenna wire.
 The
model was painted using the metal bodied Testor Aztek airbrush fitted
with the fine tan-coloured tip. The
model was painted using the metal bodied Testor Aztek airbrush fitted
with the fine tan-coloured tip.
The interior of the model was painted Tamiya XF-24 Dark Grey to
represent RLM 66.
Lower surfaces were painted using Gunze Sangyo H67 Light Blue 65,
with upper surfaces are Gunze Sangyo H64 Dark Green and H65 Black Green
70.
Panel lines and various dirty patches on the fuselage using were
emphasized using the thin Tamiya Red Brown / Flat Black mix thinned
around 80% with alcohol.
Kit decals were used with the aid of Gunze's Mr Mark Setter and Mr
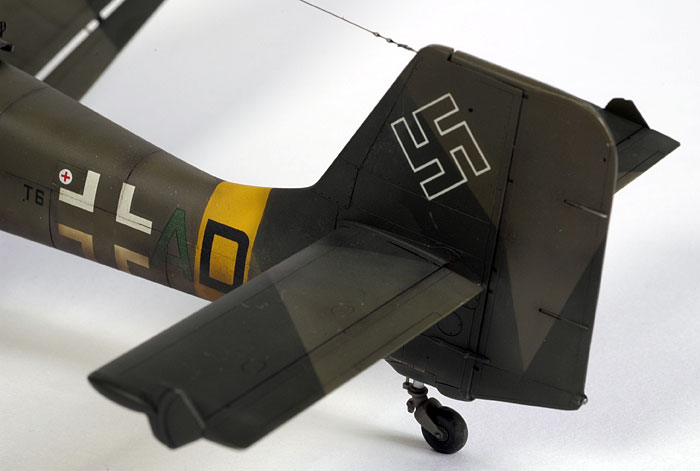
Mark Softer. The white outline swastika had to be sourced from an old
Trimaster decal sheet as the black and white style supplied with the kit
seemed to be incorrect.
The final finish was a coat of Polly Scale Acrylic Flat.
The model was photographed in HyperScale's studio using a Nikon D70
digital SLR. Illumination was via two studio flash units - one Bowens 250
and a generic 100 flash - on stands and illuminating from a high 45º
angle from each side of the front of the photography table.
The camera was fitted with a Micro
Nikkor 60mm lens.
ISO was set to 250, and the manual
shooting settings were 1/100 of a second at f.29. The high aperture
ensures good depth of field.
The model was placed on a base of plain
white cardboard.
All of the images were optimized
(brightness and contrast) in Photoshop CS, resized to 700 pixels in
width and saved as 75 dpi .jpg files using Photoshop's "Save for the
Web" option.
Click on the thumbnails
below to view larger images:
[../../photogallery/photo00022870/real.htm]
Model by Chris Wauchop
Text Copyright © 2007 by Chris Wauchop and
Brett Green
Images Copyright © 2007 by
Brett Green
Page Created 01 August, 2007
Last Updated 24 December, 2007
Back to HyperScale
Main Page
|
 Home
| What's New |
Features |
Gallery |
Reviews |
Reference |
Forum |
Home
| What's New |
Features |
Gallery |
Reviews |
Reference |
Forum |