|
Hasegawa's 1/48
scale
Junkers Ju 87 B-2 Stuka
by Charles Whall
|
 |
|
Junkers Ju 87 B-2 |

Hasegawa's
1/48 scale Junkers Ju 87 B-2 Stuka is available online
from Squadron.com
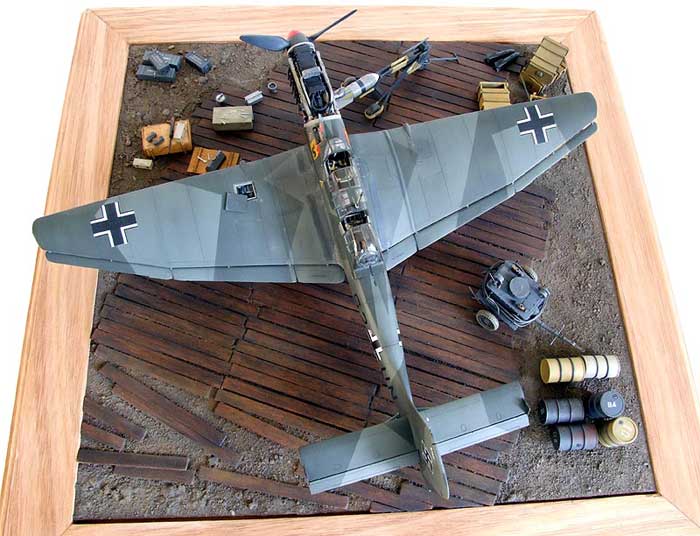
This is the 1/48 scale Hasegawa Junkers Ju 87B-2
representing a Stuka of 2./St.G 77 based in Caen, France during August
1940
I have always been fascinated by the Stuka,
especially the Battle of Britain period, and have wanted to build one
for a long time but was never really sure what to represent, until I
discovered this one. Shot down by my namesake Sgt.Basil Whall of 602 Sqn
18th August 1940, S2+UN force-landed on Ham Manor Golf Course,
Littlehampton, Sussex.
The pilot, Oberfw Geiger, was killed and Oberfw
Schweinhardt was captured.

This was just one of 17 Ju 87's lost that day.
Additions/Reference
-
True Details
weighted wheels
-
Classic Colours,
Luftwaffe Colours, Stuka volume 1, Luftwaffe Ju87 Dive-bomber units
1939-1941, Peter C Smith
Modifications
I decided to go to town on this one, as there are a
lot of aftermarket accessories available for the current kit
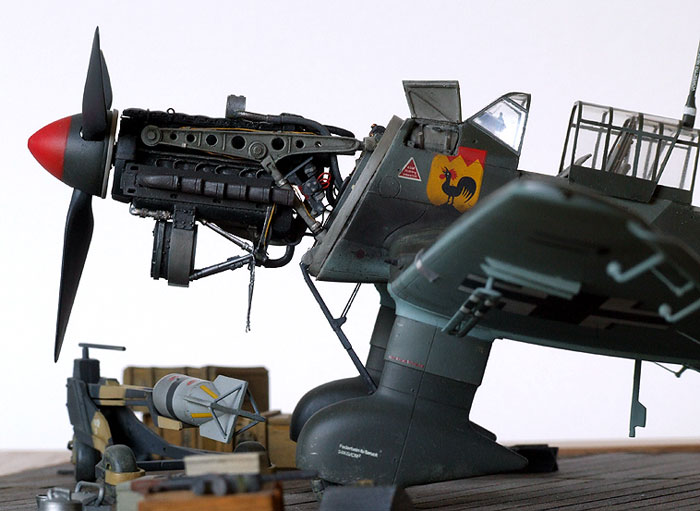
The Aires engine set is meticulously detailed with firewall, engine
bearers and other equipment. I added a lead solder wire of varying sizes
for the plumbing behind the engine making it look ‘busy’ and looks very
realistic once complete.
The kit also kit includes a wing armament set which I found quite easy
to add by thinning the relevant wing area and adding the photoetch
square to the back of the opening before fitting the resin part. I added
a small amount of wiring to ‘lift out’ the detail.
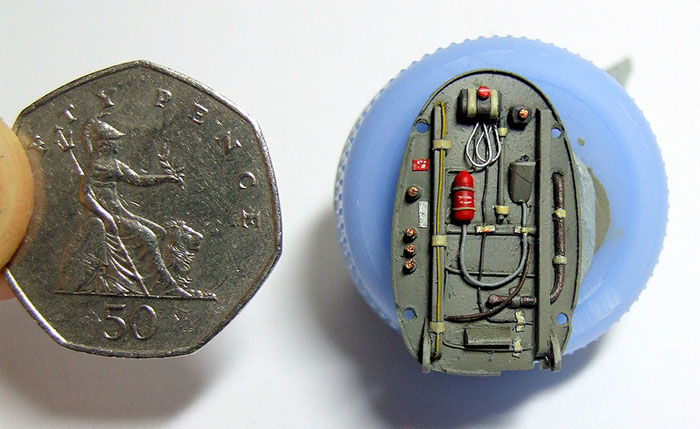
The cockpit went together very well with no problems and I decided to
spruce it up with some extra 0.2mm wiring from Plusmodel-not necessary
really as most of it is invisible once the fuselage has been
constructed! Once the cockpit was finished, I added thin strips of
styrene rod for the canopy rails. I added wiring to the radio and gunner
compartment.
Click
the thumbnails below to view larger images:
[../../photogallery/photo00027037/real.htm]
The flaps were improved by removing those hideous
plastic triangles that attach them to the wings and added the Eduard
actuators-quite time consuming but worth it in the end. I cannot
remember how many times I snapped the flaps off while handling the
model!!
Other details: The resin bomb support was enhanced using some brass wire
to represent actuator rods. The Pitot tube was made using two gauges of
‘telescoped’ brass rod. Antennae wire made with a hair donated by my
fiancé (from her head BTW!)-Chinese hair is the strongest in the world
apparently and perfect for antennae!
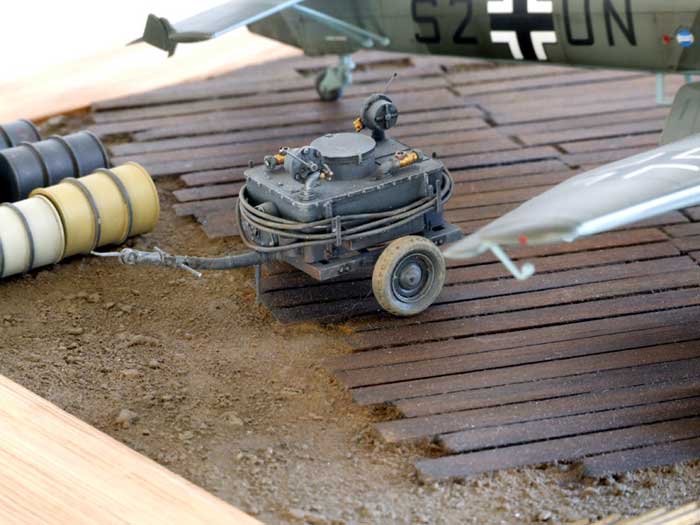
I used a lot of Verlinden bits and pieces including their airfield set
with all the boxes spanners etc. The oil bowser (?) is a fantasic little
set and really adds to a Luftwaffe diorama.
The bomb trolley was from the Hasegawa Luftwaffe ordnance set and much
more to scale (IMHO) than the CMK offering which seems far too small
(and delicate!).
Other diorama parts were from Tamiya and some were scratch-built.
I scratch-built the hardstand using wooden coffee stirrers, the
groundwork is earth and MIG pigments (which are wonderful!!).
The base is a bit busy but I just wanted to showcase all the aftermarket
bits!
The Battle of Britain camouflage is standard
Luftwaffe splinter scheme of RLM 70/71/65. The cockpit is painted RLM
02, all done with various acrylics (Tamiya, Aircraft Colours etc) and
applied using my Iwata HP-B airbrush. I do like the pre-shading effect
some models but it was lost on mine after application of the upper
scheme, and I actually preferred the final finish which is much more
subtle and just enhanced slightly with some highly thinned black-brown
mix.
General weathering to the wings, walkway areas was done with a dusting
of Tamiya and MIG pigments (I LOVE this stuff!!) and scuffing was done
using a Prismacolour silver pencil.
To create a metallic sheen to the engine and MG 17,
I lightly dusted graphite powder using a cotton bud (Q Tip)-I find this
is great for creating a realistic steel finish. I also used some on the
fuselage and wings to create a metallic sheen. Canopy was dipped in
future and masked with the brilliant Black Magic masks.
The Aeromaster decals settled down beautifully with a minimal amount of
Microset/sol. Finished with a flat coat of Matt/Satin mix.
Photography:
Fuji Finepix 9500S using a sheet of white card as
background and just experimented until I was happy with the results.
Click
the thumbnails below to view larger images:
[../../photogallery/photo00012128/real.htm]
Model, Text and Images Copyright
© 2007 by
Charles Whall
Page Created 19 June, 2007
Last Updated
24 December, 2007
Back to
HyperScale Main Page |
 Home
| What's New |
Features |
Gallery |
Reviews |
Reference |
Forum |
Home
| What's New |
Features |
Gallery |
Reviews |
Reference |
Forum |