|
Tamiya's 1/48 scale
F-84G Thunderjet
by
Michael Novosad
|
 |
|
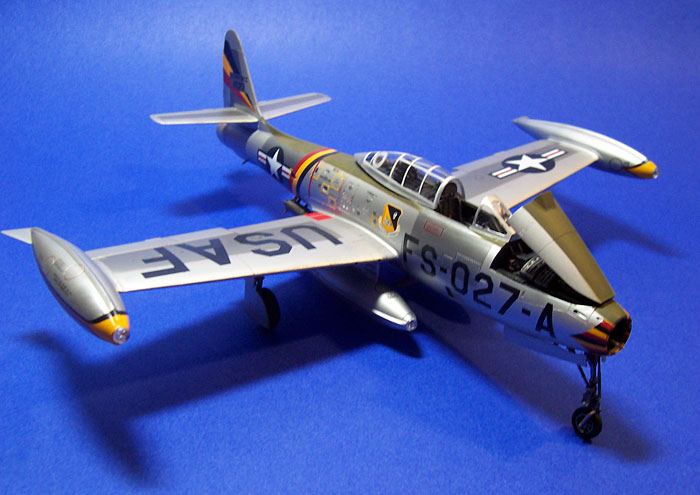
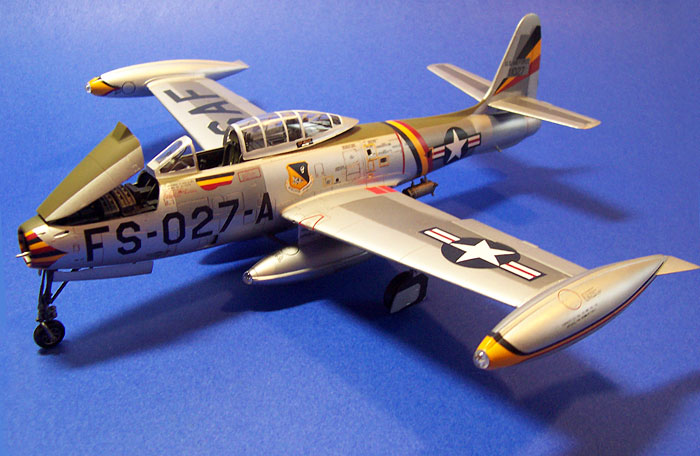
Republic F-84G Thunderjet
|

Tamiya's 1/48 scale F-84G Thunderjet is available online from
Squadron
 This
looked like an easy kit as there were not that many parts to it, but I
was always intimidated by the natural metal finish requirements. Tamiya
and Polly Scale acrylics were used for the interior parts, and
ModelMaster Metalizer paints were used for the exterior. This
looked like an easy kit as there were not that many parts to it, but I
was always intimidated by the natural metal finish requirements. Tamiya
and Polly Scale acrylics were used for the interior parts, and
ModelMaster Metalizer paints were used for the exterior.
The cockpit was first painted flat black, then airbrushed interior
green. An oil wash was applied once everything was thoroughly dry, then
the high points were dry brushed with Rub-n-Buff silver. Details were
painted with red, white and yellow per the references on hand. The kit
decals were used for the dial faces. Several applications of Solvaset
were required for the decal to snuggle down over the instrument panel
surface features. After everything had dried each dial was given a dial
face made from a small drop of Krystal Kleer applied with a round
toothpick.
The interior of the fuselage sides were painted and oil washed the same
as the cockpit. There were several small vent openings aft of the
cockpit on each side of the fuselage, and these were covered over from
the inside with small pieces of .010” sheet styrene painted black to
eliminate see through.
The intake vane and front wheel well at made up from two halves,
resulted in a seam down the middle of the well. I covered the seam with
small pieces of Evergreen channel section. The wheel well was painted
dark green and over sprayed with yellow/green. The pitot tube located on
the leading edge of the intake vane was replaced with telescoping
sections of brass tubing. I cut each section to length and chucked each
into my Dremel tool and by using the lowest speed and 400 grit paper was
able to taper the front of each section to more resemble the kit part.
The end result is a more realistic pitot tube in my opinion.
The nose cone fit required some filler to blend the join. I used Tamiya
putty in this instance as this putty has a very fine grain and can be
sanded and polished to a very smooth surface which is just what is
required for a natural metal finish.
The interior of the wheel wells was painted deep green, than a thinned
application of Tamiya Yellow/Green was applied with an airbrush. The
same final color was than dry-brushed over the high points. A light
application of Rub-n-Buff silver finished the wheel wells. The wing
halves were then cemented together.
There are four external fuel tanks that may be added to the model: wing
tip and two under-wing tanks. I drilled locating holes in the tanks and
wing pylons and added short lengths of wire to the under-wing tank
mating points to assure a solid connection.
I air-brushed the landing gear and wheels with Tamiya flat black, and
when cured dry-brushed the parts with Rub-n-Buff silver. The tires were
then hand-painted PolyScale night black, and when that cured I
dry-brushed the tires with Pactra Rubber.
After masking all openings I airbrushed ModelMaster non-buffing
aluminum over all surfaces. I was quite lucky as I found only a
few areas where flaws became apparent. This areas were cleaned up and
those areas were resprayed. This particular metal paint lays on thin and
smooth: I was quite happy with the results so far. This base coat was
allowed to thoroughly dry for 48 hours. I used post-it notes for the
masking of the various panels.
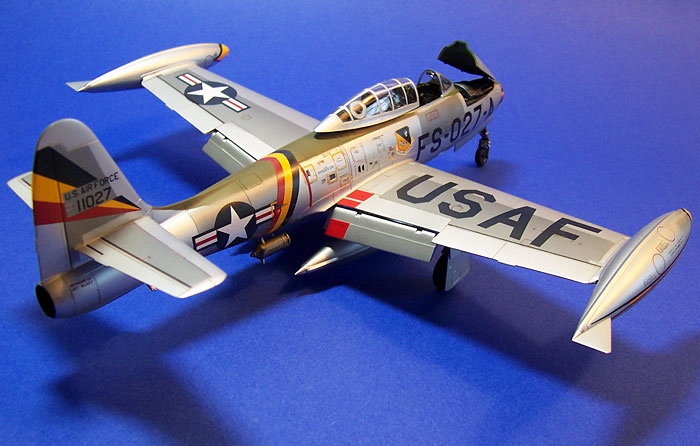
The antiglare panel on the top of the fuselage was painted with
PollyScale olive drab.
Since the metallic finish application results in a very smooth surface
there was no other preparation required for the placement of the decals.
Most modern aircraft have information stencils applied almost all over
the exterior. These can be quite tedious to apply, but the final effect
is quite worth the effort I think. Aeromaster sheet 148-025 was used for
the various stencils. The main marking and national insignia came from
the IPMS USA 2005 National convention souvenir sheet.
The panel lines on this model were finely recessed and would be
complimented by a wash. I used an Winsor Newton Artist ink to achieve
this affect.
Once the decaling was completed the model was given an application of
ModelMaster semi gloss clear.
Model, Images and Text Copyright © 2007
by Michael Novosad
Page Created 04 June, 2007
Last Updated
24 December, 2007
Back to
HyperScale Main Page
|
 Home
| What's New |
Features |
Gallery |
Reviews |
Reference |
Forum |
Home
| What's New |
Features |
Gallery |
Reviews |
Reference |
Forum |