|
Twenty First
Century Toys' 1/32 scale
Macchi C.202 Folgore
by
Ian Robertson
|
 |
|
Macchi C.202 Folgore |

HyperScale is proudly supported by
Squadron.com
Until now, a 1/32 scale kit of the Macchi C.202
Folgore has been available only from Pacific Coast Models (limited run,
multimedia kit) and Craftworks (resin kit).
Twenty-first Century Toys, increasingly well known
in the United States for its line of preassembled aircraft and armor
miniatures, has jumped into the fray by marketing its 1/32 C.202 Folgore
as an unbuilt kit for the low price of about $10US. The kit is
designed primarily for entry-level builders, but it can also serve as a
platform for more experienced builders wanting to see what they can get
from it.
I was asked by Twenty-first Century Toys to build
their C.202 kit as a project for Hyperscale, not as a review per se, but
as a demonstration of how the model looks built up. I was given free
reign to make simple modifications I thought would enhance the model.
However, I tried to strike a balance between letting the kit stand on
its own and adding a few simple changes to improve the look and accuracy
of the finished product.
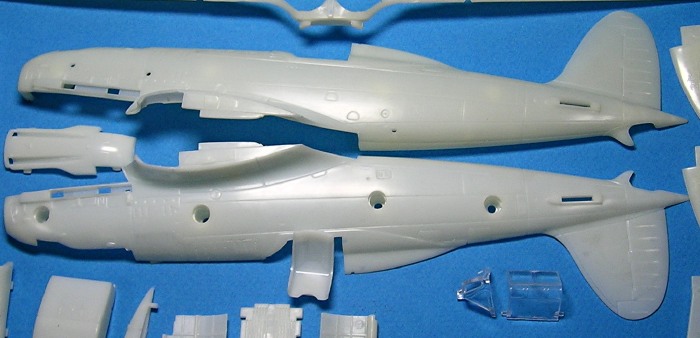
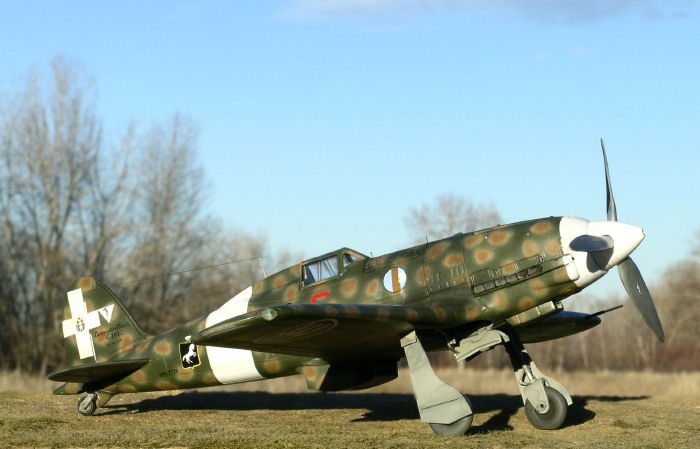
What’s in the box?
The kit contains 60+ parts, free of flash and
unattached from sprues (therefore minimizing the need for cutting and
cleanup – a real plus when working with kids). The kit also includes a
realistic pilot figure and a set of top-notch decals that cover three
attractive schemes. You would likely pay the same for the decals alone
if you purchased them from an aftermarket company.
Click on the thumbnails
below to view larger images:
[../../photogallery/photo00025020/real.htm]
While the breakdown of parts is similar to any
other aircraft model, the plastic can only be described as unorthodox as
far as modelers are concerned – it is light cream-colored, rather shiny
and rigid, but still very workable and durable. While plastic cement
should work fine in construction, I opted to use CA glue because of its
quick-drying properties. CA glue also makes a good filler for seams.
Surface details on the kit are heavier than what we
have come to expect from companies like Hasegawa and Tamiya, but not to
the extreme. I did, however, find it necessary to sand down the
exaggerated fabric details on the control surfaces. The canopy parts
are thick, yet clear and presentable. Some modelers might want to
vacuform their own canopies, but I found the kit parts satisfactory for
the purpose of my quick-build.
Construction began with the cockpit. While simple,
there is sufficient detail to provide a good impression of the cockpit,
leaving room for the addition of scratch built details should you see
fit. The only modification I made was the addition of a seat harness
fashioned from lead foil. I painted the cockpit RAF interior green
(Polly Scale), with natural metal (Alclad II) for the seat, floor
panels, and control stick.
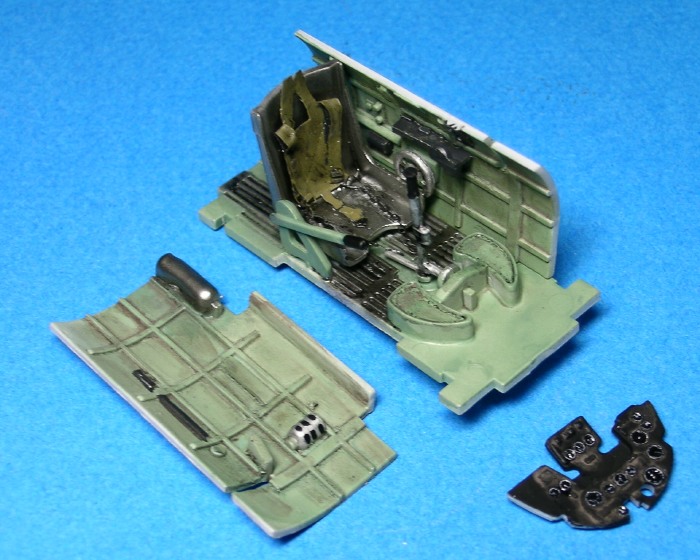
The completed cockpit plugged easily in to the
fuselage, although there was a gap between the cockpit side panels and
the cockpit rim on the fuselage (see photo). I added some sheet styrene
to fill this gap.
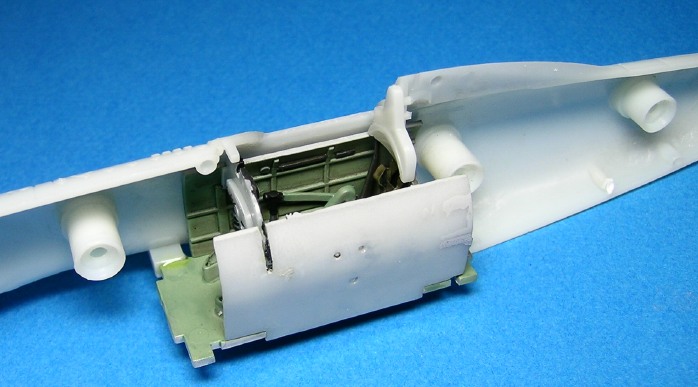
The remainder of construction was just as
straightforward and simple as the cockpit. The fit of the parts was
exemplary, and the plastic was easy to work with as far as filling seams
and scribing panel lines (e.g., on the leading edge of the wings).
Below are several images from various stages of construction. They
should be self explanatory.
Click on the thumbnails
below to view larger images:
[../../photogallery/photo00006768/real.htm]
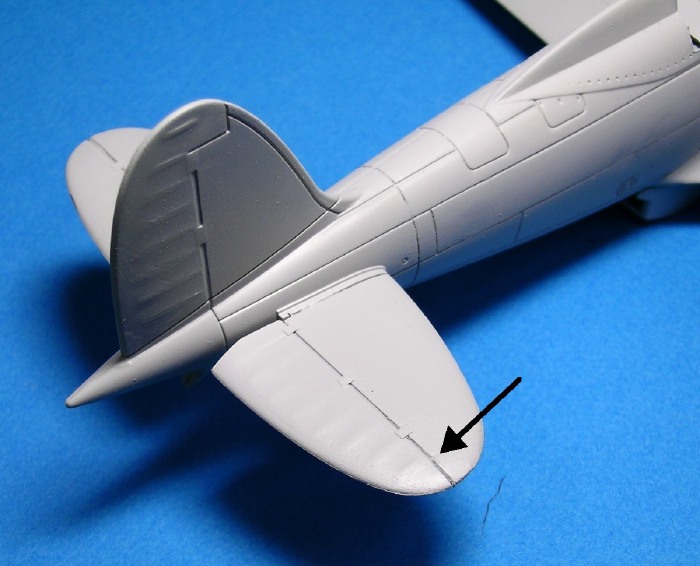
One obvious task faced by modelers is how to deal with
the large holes in the right side of the fuselage and underside of the
wings. These holes are needed to secure parts on the preassembled
version of the model, and they aid with fit on the model kit as well.
Nevertheless, you will want to find a way of concealing them. One
option is to simply add the plugs that come with the kit. Another is to
use milliput or some other similar filler. However, I opted for a
different solution that took only a few minutes.
For each hole I heated a piece of thick plastic
sprue (from another model kit) over a flame until the plastic was very
soft. I then rammed the molten plastic into the hole, snipped the stem
of the sprue, and waited a few minutes for the plastic to cool. Once
cooled, I used a dremel tool to remove the excess plastic, and then
resorted to a file and sandpaper as I got close to the model’s surface.
A bit of Tamiya putty was used to smooth over the surface. Once dry,
the putty was sanded smooth, thereby removing any hint of the plugs.
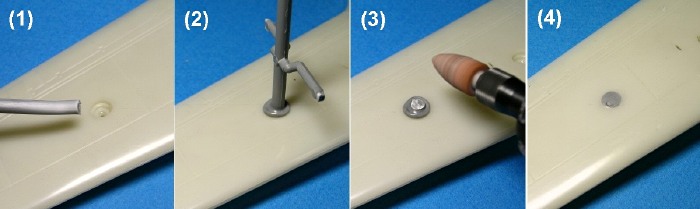
To the wings I added wingtip lights fashioned from
clear sprue. I softened a piece clear sprue over a lit match, pressed
the plastic into the general shape of the light, and then used a knife
and file to complete the basic shape. A small hole was drilled into an
interior surface of each part, and the holes were filled with Tamiya
clear red and clear green acrylic for the port and starboard lights,
respectively. Once the lights were attached with CA glue to notches cut
in the wings, I filed the lights into their final shape, and then sanded
and polished them using micromesh sanding cloths.
Although I was pleased with the overall look of the
model, including the rake of the landing gear, I was dissatisfied with
the shape of the gear covers and the small size of the main wheels. The
width of the forks holding the wheels is also oversized, but I did not
bother to make the correction.
Correcting the gear covers was easy - I used the
gear covers from my Pacific Coast Models’ C.202 kit as a pattern to
create new covers from sheet styrene. Dimensions are provided in the
image below so that you can make your own. I didn’t bother fixing the
shape of the wheel well openings, although this would have been easy to
do earlier in construction.
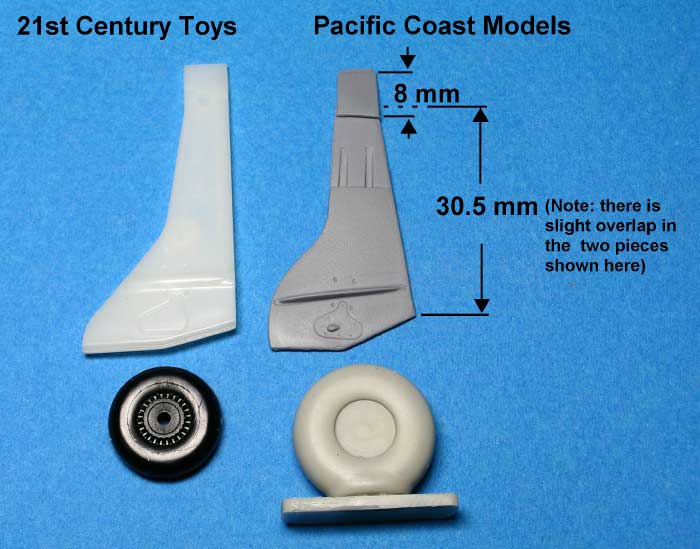
The model also benefits from replacing the kit
wheels with something more appropriately sized. I used a spare set of
wheels that came with my Pacific Coast Models C.202 kit, but I realize
that this is an unreasonable option for most (talk about an expensive
set of aftermarket wheels!). One can either use the kit wheels and
ignore their small size, or replace them with some spare or aftermarket
wheels that may not be designed for the C.202, but nonetheless improve
the look of the model. If you display your C.202 in flight, the problem
is solved. Hopefully future kit releases by 21st Century
Toys will have more accurate wheels, which I fully suspect will be the
case because it is a definite area of improvement on their preassembled
models.
Based on a comparison with the Pacific Coast Models
kit, the 21st Century Toys’ propeller blades are too wide.
Therefore, I filed them down to improve their basic shape.
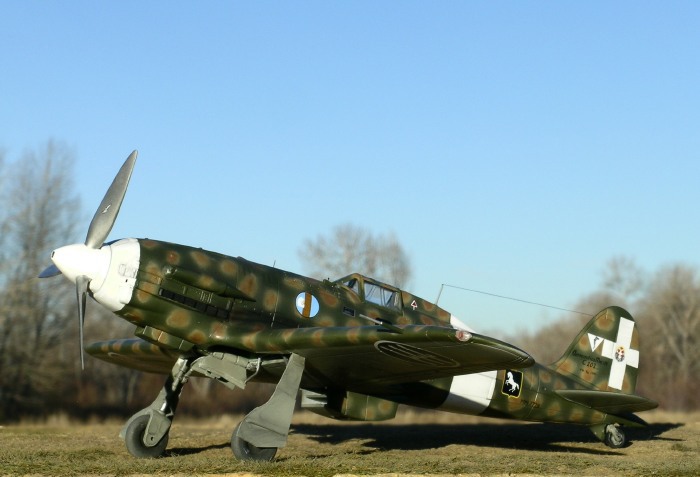
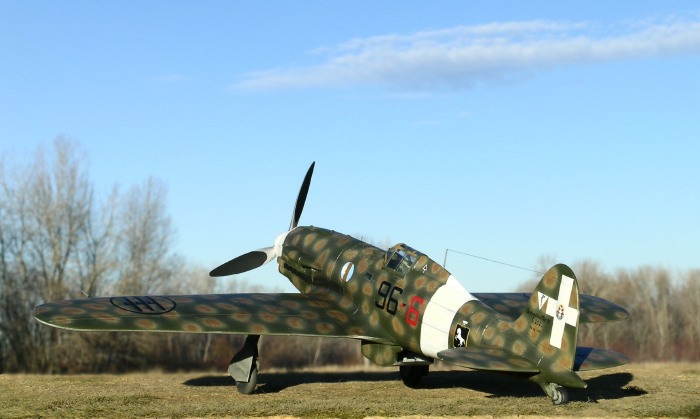
Specific Modifications for “96-6”
I chose to depict my model as “96-6”, one of the
three marking options provided in the kit. Based on its production
number (MM7742) this aircraft was an early series III Folgore. The
aircraft was stationed in Martuba, Libya, in late 1941, and it had a
number of minor details that are not captured correctly by the kit.
Although many would opt to ignore these details, I decided to make a few
minor modifications.
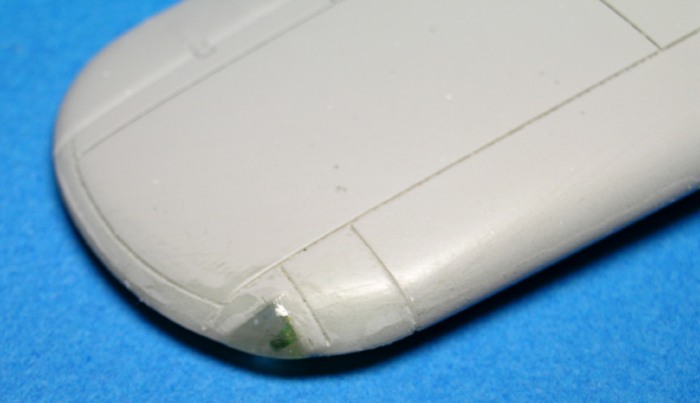
First, I modified the elevators slightly to make
them appropriate for a series III Folgore. The elevators that come with
the kit are for series XI-XIII Folgores and the C.205 Veltro, recognized
by the step along in the leading edge of the control surface. In
series III Folgores the step was absent, so I filled the incorrect lines
with CA glue, sanded them smooth, and then rescribed new ones (see arrow
in photo).
Although most C202s had a supercharger intake with
dust filter, early versions like the one I was building, lacked the dust
filter and instead had an intake that was much more tubular in shape. I
removed the ribbing on the kit’s supercharger intake to approximate the
look of an intake without a dust filter. In retrospect, it would have
been easy (and more accurate) to scratch build a new supercharger
intake. Note that most C.202s had a dust filter, so this modification
may not be necessary. Check your references.
The final modification I made for this particular
series III aircraft was a new antenna mast. Most C.202s had the large
antenna mast that comes with the kit; however, some early C202s had a
smaller mast located further back along the spine. I made the new
antenna and antenna wire from stretched sprue.
 I
painted my model in the markings of an aircraft from the 96a
Squadriglia, 9o Gruppo, 4o Stormo, stationed in
Martuba in 1941. According to my references, the aircraft sported a
“poached egg” scheme composed of blotches of Bruna Mimetico within
Giallo Mimetico 4 over a Verde Mimetico 2 base (note - this scheme is
not well represented in the instructions). The undersides were Grigio
Mimetico. Photographs of the aircraft show gray paint over repairs on
the port wing root and aft fuselage. However, I opted to present my
model as it appeared before this damage occurred. I
painted my model in the markings of an aircraft from the 96a
Squadriglia, 9o Gruppo, 4o Stormo, stationed in
Martuba in 1941. According to my references, the aircraft sported a
“poached egg” scheme composed of blotches of Bruna Mimetico within
Giallo Mimetico 4 over a Verde Mimetico 2 base (note - this scheme is
not well represented in the instructions). The undersides were Grigio
Mimetico. Photographs of the aircraft show gray paint over repairs on
the port wing root and aft fuselage. However, I opted to present my
model as it appeared before this damage occurred.
Prior to painting the camouflage I applied Tamiya
fine gray surface primer to expose any unfilled seams on the model.
Once these issues were addressed, I painted the cowl, fuselage band, and
tail cross using Tamiya white surface primer, and masked these areas
with Tamiya tape until the camouflage had been applied.
Camouflage was painted using Polly Scale acrylics
for the base colors (Italian Dark Olive on the upper surfaces and
Italian Light Blue Gray on the undersides) and mixes of Tamiya acrylics
for the spots (Tamiya XF-59 “desert yellow” for the large blotches,
followed by a mixture of Tamiya XF-64 “red-brown”, X-7 “red”, and XF-59
for the interior blotches). These colors matched reasonably close with
those made by White Ensign Models.
Once the paint was dry I added a clear coat of
Future to prepare the surfaces for decals. The kit’s decals were superb
and settled on the model without difficulty using Microscale setting
solution. A final coat of Polly Scale clear flat was added once the
decals had dried.
I built and painted this model over a three day
period, spending approximately 10-12 hours on it. Construction was
simple and the parts fit better than on many mainstream model kits I
have built. While the 21st Century Toys kits lack the detail
and finesse of higher-end kits, the price can’t be beat and an
attractive model can be made.
The kit is ideal for beginners, modelers unwilling
to pay the high prices of limited run and even some mainstream kits,
modelers wishing to advance their scratch building and airbrushing
skills on an inexpensive kit, and modelers looking to complete an
inexpensive build in short order. I’m sure there will also be some
advanced modelers looking to use this and other 21st Century
Toys model kits as the basis for more adventurous projects.
Click on the thumbnails
below to view larger images:
[../../photogallery/photo00011629/real.htm]
Model, Images and Text Copyright ©
2007 by Ian Robertson
Page Created 28 January, 2007
Last Updated 24 December, 2007
Back to HyperScale
Main Page
|
 Home
| What's New |
Features |
Gallery |
Reviews |
Reference |
Forum |
Home
| What's New |
Features |
Gallery |
Reviews |
Reference |
Forum |