|
Modelling the
Messerschmitt Bf 109
K-6
by
Mark Shanks
|
 |
|
Messerschmitt Bf 109
K-6 |

Hasegawa's 1/32 scale Messerschmitt Bf 109 K-4 is available
online from Squadron.com
The history of the
Bf 109K-6 is a bit clouded. There is even disagreement on the armament,
which is the only significant distinguisher of this sub-type from the
far-better documented K-4. Ur-historian William Green, 15 years
after the end of the war, didn’t even get the basic outline of the K
series correct, instead depicting a tall-tailed G-series, complete with
the Beule cowling bulges, in his War Planes of the Second
World War. In the first volume of that series, Green describes the
K-6 as having “two 13-mm. MG 131s and three MK 103s”. Almost all of his
information about the K series is suspect – he has the K-2 and K-4
series making their operational debut in Bodenplatte, and the
photo he identifies as a K-6 is actually a G-14. He carries that error
through to the classic Warplanes of the Third Reich. In
Warplanes, he wrote, “The MK 103 was also adopted for the next
K-series variant, the Bf 109K-6, which, intended primarily as an
anti-bomber weapon, carried two additional MK 103 cannon in underwing
gondolas, but reverted to 13-mm. MG 131s in place of the 15-mm. MG 151s
in the engine cowling. Deliveries of the K-6 to the Jagdgruppen
began in January 1945, but relatively few had obtained operational
status by the time the Third Reich finally collapsed….”
Thomas Hitchcock
did a far better job capturing the K-series outlines in his 1973 book
Messerschmitt ‘O-Nine’ Gallery. Hitchcock wrote, “The Bf 109K-6
interceptor series which appeared in January 1945 was powered by the DB
605D and armed with 2 x MG 131, 1 x MK 108 or 103, plus 2 x MK 108 in
the wing positions. He provides a “Messerschmitt perspective drawing
detailing the main components including the BSK 16 gun camera (standard
equipment) and FuG 16ZY antenna … Production began in January 1945.”
From this perspective drawing, he extrapolates a sideview showing
internally mounted MK 108s with no wing fairings. In 1979, Hitchcock
wrote the Monogram Close-up 16: Bf 109K. Here, he wrote, “Early
in 1944 the Messerschmitt design staff had projected other versions of
the Bf 109K including the Bf 109K-6 interceptor. Powered by the DB 605
DCM, and driving a metal VDM 9/12159A prop, this version entered
production in January 1945. However, it is very doubtful if very many
were completed. This model had its armament increased by two
wing-mounted MK 108’s buried within the wings. In spite of the
devastating punch three 30-mm cannons afforded, pilots viewed the
increase in wing weight with disdain. Most, in fact, removed these
cannons from the wings as soon as they reached the front”. The sideview
in the Close-Up now shows subtle fairings for the MK 108s. John R.
Beaman’s 1976 “Last of the Eagles” and his later 1983 opus
Messerschmitt Bf 109 in Action Part 2 don’t even mention the K-6
variant.
Heinz J. Nowarra
wrote Die 109 in 1986 (English version Aircraft and Legend
Messerschmitt Bf 109). Nowarra wrote, “January 1945 saw the first Bf
109 K-6s coming off the assembly line. This version was designed
specially for attacking large bombers. It had a pressurized cabin and
was usually equipped with the MK 103 motor cannon…the addition of two MK
108s (field mod kit R5) was possible.” Nowarra rather surprisingly
asserts that “In April 1945, Bf 109K-10s and K-14s were still being
produced and put into service. The K-10 differed from the K-6 very
little.”
Probably the best
single-volume reference on later-model Bf 109s is Prien and Rodeike’s
Messerschmitt Bf 109 F, G, & K Series: An Illustrated Study. Prien
and Rodeike wrote, “The K-6 series was to enter production alongside the
K-4 in January 1945. The production of 3,570 machines was planned, 2,070
by Erla and 1,500 by WNF. According to a report by the main department
of the OKL (Hauptausschusses) on October 31, 1944, it was planned to
produce the K-4 and K-6 in a ratio of 2:1. In any case it is not known
if the K-6 actually entered production and there is no known Werknummer
block for the K-6 series. It is known, however, that at least one K-6
was being tested at Rechlin as early as autumn 1944.” Prien and Rodeike
do not feature any guess as to the appearance of a K-6 model.
Finally, we come to
the outstanding JaPo book Messerschmitt Bf 109K by Aleš Janda and
Tomáš Poruba. In this book, Janda and Poruba write, “On June 26, 1944,
just a few days later than the K-4, a Bf 109K-6 sketch was drawn up,
revealing principal changes in construction. The fight against bombers
required heavier armament, so two wing-mounted MK 108s with 40 rounds
each were added to the basic configuration of an engine-mounted MK
108…and the installation was similar to that one designed by the Hirth
company for wooden wing…A partially armed prototype was built at
Regensburg in mid-September 1944…The plane took off again at the end of
February 1945, when handed over (probably for operational testing) to 1st
Fliegerdivision. If the handover was really carried out, then it was
probably to the III/JG 3 at Pasewalk, which was the only Gruppe of 1st
Fliegerdivision almost completely equipped with Bf 109K’s and therefore
had most experience with their operational use”. The JaPo book features
a sideview identical to the Hitchcock one, plus, as far as I can tell,
the only front-view of a K-6. Of course, I suspect these are entirely
conjectural. However, it looks very similar to a Mk108 installation in
the Fw190A-8/R2 (see photo).
My conclusion is
that the K-6 probably never entered wide scale production but that some
were built and entered operational use. The wing modification
would be modest and the firepower potential was simply too great to
ignore. The weight of the MK 108 was 128 pounds. The widely-used (if
not exactly well-loved) MG 151/20 weighed little less (95 pounds) and
the additional weight and drag of the gondola must have resulted in
significantly poorer flight characteristics in the lower-powered G-6. I
know that I would much rather fly with internally-mounted MK 108s than
those monstrous 210cm Dodel rockets!
Hasegawa’s 1/32 Bf109K-4
The kit itself has
been extensively reviewed elsewhere, so I will just repeat here that it
is extremely accurate in profile but the aft fuselage cross section is
mysteriously flat-topped. This is readily corrected with a sanding stick
and rescribing, but you are now stuck with either using the kit’s
squarish canopy or using an aftermarket vac-form. I chose to use the
kit’s – odds are that, being in the open position, it’s shape will not
detract from the final appearance as much as the too-thin vac-form
ones. The cockpit is sparse but usable, and the spinner is a bit
bulbous but only 109 fanatics will really notice. You can certainly
build an attractive model straight from the box.
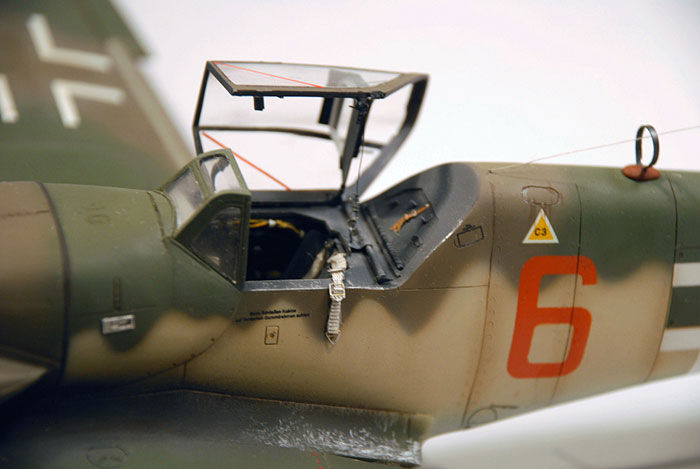
Modifications
I replaced the
kit’s cockpit with the marvelous MDC resin one. This has phenomenal
detailing, right down to decals for the starboard wall circuit breaker
panels. I epoxied the side walls to the model fuselage halves and,
after the front fuselage halves were joined, forced the MDC cockpit
floor up into position. I mention this because I must not have trimmed
enough somewhere – from this point on, I was fighting a decidedly
ill-fitting kit. Since no one else has written of any problems, I must
have made an error that rippled right through the rest of construction.
Before joining the
aft fuselage to the front end, I corrected the cross section and
rescribed. I removed the rudder with photo-etched sawblades and replaced
the now-lost counterbalance with a section of brass square-section
stock. I used sheet lead to reconstruct and detail this area. I removed
all three of the kit’s rudder trim tabs, replacing the Fletnner tab with
a section of airfoil stock and the two fixed tabs with sheet lead
wrapped around the trailing edge and “pinched” to replicate the
construction of the “real thing”. Frankly, I’m surprised there’s no
resin aftermarket tall-tail rudder, but this wasn’t a difficult
modification. I decided to depict the tailwheel doors as being closed,
as this was by far the most common photographic representation. The
forward and aft fuselage sections were then assembled, and the flat
forward cross section was blended into the corrected aft. Installing the
wing center section was my first hint that all was not to go smoothly –
I had a serious step AND gap, and it took two tries with generous
portions of Milliput to take care of this. Adding the upper cowling, I
saw the same problem: quite noticeable gaps and steps all the way around
– time for more Milliput and sanding sessions over the sink. I corrected
the small nose intake locations using the Cutting Edge replacement set,
but only a real 109-nut will notice. After the intake and oil cooler
were added, this subassembly was primed with Mr. Surfacer 1000 and set
aside to dry. The following weekend, I added “rivets” with a jeweler’s
beading tool along the aft fuselage former sections. Apparently, these
late-war 109’s didn’t all get the “premium” sealing treatment – see the
photo on page 7 of the Close-Up for a spectacularly ratty-looking
rivet-fest. I didn’t want to highlight this, but kept it fairly subtle
and later didn’t apply any washes or shading to bring attention to the
texture.
I got more
ambitious with the wings. The ailerons were removed before assembling
the wings. The underwing radiator areas were ground out to allow the use
of Eduard radiator screens (which come complete with ingenious “boxes”
to prevent see-through). The wheel wells themselves received a great
deal of attention. The area where the landing gear strut rests had the
lightening holes removed and the entire back area thinned to scale
thickness. Behind these, I added wiring and then enclosed the entire
area in a sheet lead half-cylinder. I also cut out the openings on the
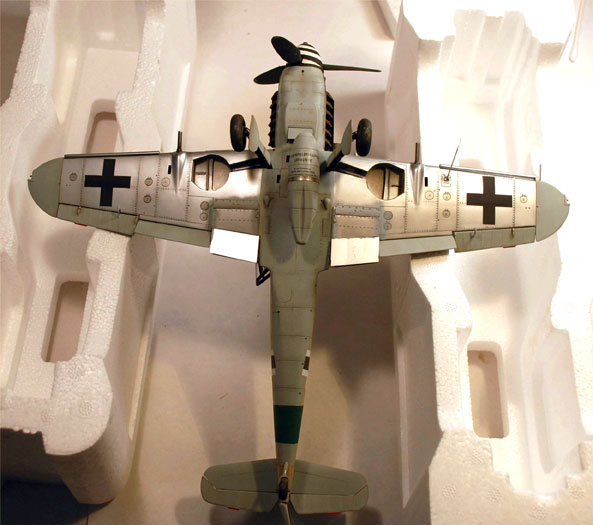
wing topsides where the wheel would pass through.
The MK108 fairings
are obviously an approximation using the JaPo drawings as my only
reference. My concern was in replicating a smooth aerodynamic shape in
duplicate. I think the method I used has the advantages of complete
symmetry combined with minimal wing modification and possible loss of
surface detailing. I sawed off the ends of two of my largest paint
brushes and split each section in (roughly) half lengthwise. I then cut
truncated “V” sections into the appropriate locations on the lower wing
halves. I fit the brush pieces into these cut-outs and blended them with
Milliput. The brush pieces had a wonderful gloss finish and required
only minimal sealing on their leading-edge faces. I also added the MK
108 shell ejection chutes next to the fairings. When satisfied with the
fairings’ appearance, I glued the wing top and bottom surfaces together.
I replaced the wing-tip lights with sections of Plexiglas that had been
drilled out and treated with Tamiya clear red and clear green to
represent the light bulbs. These subassemblies were glued to the wing
cut outs and then filed and polished to shape. At this point, I primed
the wings with Mr. Surfacer 1000, replaced any lost detail, and then
drilled out the front of each MK108 fairing to accept the cannon
barrels. The barrels themselves were made from swaged sections of brass
and aluminum tubing, painted with Gunze Sangyo “Dark Iron” and added
after all painting was completed.
The wing to
fuselage join was a real shocker – the gaps were so bad I actually had
to shim with plastic strip. Again, this was entirely my own fault for
insufficient test-fitting the MDC cockpit, but I was really paying for
my sins now! Perseverance and elbow-grease paid off in the end, and I
primed the entire assembly, and rescribed the detail lost in the
process.
 Here’s
where building an undocumented variant has it’s attraction: you can
paint it any way you want it (within reason, of course). I wanted
something with unpainted underwing surfaces - I believe that this was
more common than is currently acknowledged, but that is hard to prove. I
polished the “Mr. Surfacer” primer with the Detail Master Polishing
System and applied varying shades of Alclad II to the wings and slats. Here’s
where building an undocumented variant has it’s attraction: you can
paint it any way you want it (within reason, of course). I wanted
something with unpainted underwing surfaces - I believe that this was
more common than is currently acknowledged, but that is hard to prove. I
polished the “Mr. Surfacer” primer with the Detail Master Polishing
System and applied varying shades of Alclad II to the wings and slats.
When this had dried
(after about 4 days – leaving the work until the following weekend), I
painted the molded strip on the aft end of the engine cowling with
Testor’s “Rubber”, since this was pretty well documented in the first
JaPo volume and many other photographs, including the cover of the
Monogram Close-Up.
I masked off that
strip and the undersides of the wings and painted the fuselage, all
control surface undersides, wing tip undersides, landing gear doors, and
drop tank and rack with Aeromaster RLM 76.
Next, I wanted to
use what has become known as “109K buff”, and here a few words may be
appropriate.
Photos of a late
war 109G-6 (found at
http://www.clubhyper.com/reference/luftcambg_2.htm) show a
distinctly yellowish color applied over the RLM 76 on the fuselage
sides. Several of the photos show the fuselage underside to be RLM 76
with the yellowish color ending (roughly) at the bottom of the fuselage
cross. This color has also been documented in color photographs of some
K models (see p.46 of the JaPo book). The best documentation available
are the photos of Major Frederich-Karl Müller’s rudder in the Monogram
Close-Up (page 19) and the JaPo Camouflage and Markings
book (pp 81-82). The Close-Up states:
“The third
camouflage color appearing on the lower section of the Müller rudder is
not positively identified. On the surface it bears a resemblance to RLM
Gray, 02. Interestingly, on the very bottom edge of Müller’s rudder, one
finds the unmistakable Light Blue, 76.”
The JaPo book:
“One of the most
interesting pictures shows the bottom of the leading edge of the rudder
with unmistakable RLM 76. However, the standard shade appears only on
the part that usually was not visible. The rest of it was over-painted
with a grey-yellow color, apparently after some repairs. This can be
seen where the upper layer flakes and the original RLM 76 shows
through.”
E. Brown Ryle III,
in his Luftwaffe Colors 1935-1945, refers to this color as
“Buff”:
“A light
yellow-tan/dark cream. A lower surface color found on several excellent
condition late-war Bf109 parts. No known documentation for the color.
The color’s application appears to have been limited to the lower
surfaces, seemingly, but not necessarily, only on the fuselage. The
paint does not appear to be a poor quality RLM 76 (or “Green-Blue”). It
may be speculated the color served as a surrogate form of late war
camouflage but the intent and extent of the color’s use is not fully
known.”
Michael Ullman
writes, “Later in
the war the percentage of pigments was decreased, as mentioned above.
Now the brighter pigments were no longer able to cover the yellow zinc
chromate. The colour of the lacquer in the colour RLM 76 turned from
bright blue grey into a bright green grey. This is the reason why you
find so many late war colour photos with that greenish colour.”1 What
this doesn’t explain are the existing airframes and parts with a
buff color painted over pre-existing RLM 76. (Ryle writes
that he has had conversations with Ullman about this “buff”, but no
details provided.) Ken Merrick’s new book shed’s no light on the
subject, and in fact ignores it completely, lumping together all
late-war “mystery colors” as blue-green variations of 76. I theorize
that this “buff” was a purely defensive color applied over RLM 76, which
by that stage of the war was being used as an overall aircraft primer. I
have no explanation why there is no RLM record of the color, but the
simple fact is that it was used, regardless of the absence of an
RLM color number or reference in official documentation. Misterkit
actually sells this as an acrylic paint, LW15, “Buff
Late War Bf-109K”. I haven’t seen this paint, and preferred to mix my
own. I started with Gunze Sangyo H85 “Sail”, and lightened it with Gunze
Sangyo H21 “Off-White”, which has more of a grayish cast than the usual
ivory/cream. When satisfied (subjective, I know), I airbrushed the
fuselage sides down to about 5mm from the bottom with the “buff”, so
that there is still a line of RLM 76 visible, matching the demarcation
to the photos from the website listed above. When done, I added a couple
of drops of Testor’s “Rubber” to the buff, and post-shaded the fuselage
panel lines.
The remainder is
relatively uncontroversial. I went for a typical RLM 81 Braunviolett/RLM
83 Dunklegrun scheme based on a Werknummer 331xxx batch fuselage as
shown on page 36 of the JaPo book. I think this is credible because it
is entirely possible that such an early Werknummer fuselage could have
been mated with wings reworked to the K-6 standard, and also allowed me
to use the RLM 66 landing gear struts. I mixed my own RLM 81, starting
with an ancient Compucolour Swedish Braun blended with, yes, some Model
Master “Napoleonic Violet” (plus other colors) to match a paint chip on
page xx of the Monogram Guide, and used Aeromaster RLM 82 (which is
really intended to be 83, but, well, you probably know the story by now,
right?) straight from the bottle, as it was an excellent match to the
Monogram RLM 83 chips. I used the close-mask technique for the
distinctive wavy demarcation on the fuselage sides, and a hard mask for
the tail section (which almost invariably shows this as having been
built and painted separately from the rest of the fuselage). I also used
a close-mask for the somewhat harder-edged mottle on the rudder.
The wings, being
the K-6 version, could have been camouflaged in almost any manner if
trials had started in autumn of 1944. I went for a later Werknummer
334xxx version, as shown on page 37 of the JaPo book. The leading edge
“sawtooth” effect was done freehand – thank goodness for my Sotar 20/20!
The exhaust stains were freehanded using a thinned mixture of Floquil
Grimy Black and Rail Brown. Some additional post-shading was added with
Tamiya Smoke. The model is pretty clean, with just a bit of operational
use, not heavy wear and tear – these planes had a lifespan of just days,
if not hours.
I did an aircraft
from JG27, as they seemed to have a great many 109K’s and the RLM 25
tail band is attractive. All fuselage and wing crosses were masked with
frisket and airbrushed, as was the RLM 26 fuselage number (selected at
random).
After the remaining
stencils and other decals were added, I airbrushed a topcoat of Humbrol
Gloss to seal them, and a final coat of Humbrol Matt. Final assembly
consisted of adding the control surfaces, Moskit exhausts, assorted
antennas, etc. I left off the outer gear doors – they seemed to be
commonly removed in the field, and with those MK108s sitting right next
to the wheel well, I imagine there wasn’t any room for the retraction
mechanism anyway. The main gear wells were done in natural metal with
Eduard canvas covers. I used the MDC spinner as this is the most
accurate version, showing the prop cutouts narrowing at their base. I
used the Cutting Edge white metal “tall” tail wheel, as the kit piece is
molded as a single unit. (I hate that, and find it pretty lame in 1/32
scale.) Also added to the port wing was a BSK 16 gun camera made from a
section of aluminum tubing with an epoxy lens. The drop tank is
intentionally offset to port. Not commonly depicted, but the 109K series
had gear position indicators a la the Fw190 series. I have a
(reprint) copy of the Fw190A-8 maintenance manuals, and the indicators
on that aircraft were RLM23 with a white band showing when the gear was
fully down and locked. I assumed that the 109K series used the same
operating philosophy and painted these accordingly. I did my best to
model the canopy retaining mechanism – fiddly, that. And I added the
45-degree red stripes to both sides of the canopy. I’ve never seen a 109
canopy without these, but they seem to be rare on models.
The result is a
model of an aircraft type that I think probably saw action in a
camouflage scheme well-documented and entirely plausible for the type.
Some readers may draw different conclusions, but I am quite satisfied
with the result. To me, it just looks right, and it was a very
interesting project to research and build.
1
http://www.clubhyper.com/reference/latewarrlm76mu_1.htm
-
Beaman, John R.:
Messerschmitt Bf 109 in Action Part 2; Squadron Signal
Publications, 1983
-
Green, William: War Planes of the
Second World War; Hanover House, 1960
-
Green, William: Warplanes of the
Third Reich; Doubleday and Company, 1970
-
Hitchcock, Thomas:
Messerschmitt ‘O-Nine’ Gallery; Monogram Aviation
Publications, 1973
-
Hitchcock, Thomas, Monogram
Close-up 16: Bf 109K, (Monogram Aviation Publications), 1979
-
Janda, Aleš and Poruba, Tomáš:
Messerschmitt Bf 109K; JaPo, Hradic Králové, Czech Republic,
1997
-
Merrick, Kenneth A. and Hitchcock,
Thomas: The Official Monogram Painting Guide to German Aircraft
1935-1945 (including errata-omission sheet); Monogram Aviation
Publications, 1980.
-
Nowarra, Heinz: Aircraft and
Legend Messerschmitt Bf 109; Haynes Publishing Group, 1986
-
Poruba, Tomáš and Mol, Kees:
Messerschmitt Bf 109K Camouflage
and Markings; JaPo,
Hradic Králové, Czech Republic, 2000
-
Prien, Jochen and Rodeike, Peter:
Messerschmitt Bf 109 F, G, & K Series: An Illustrated Study;
Schiffer Military History, 1993
-
Ryle, E. Brown III: Luftwaffe
Colors 1935-1945: RLM Numbered Paints, their Production, Application
and Camouflage Uses; self-published through Kommandear Decals,
2000.
-
Ullmann, Michael: Luftwaffe
Colours 1935-1945; Hikoki Publications, 2002
Model, Images and Text Copyright ©
2007 by Mark Shanks
Page Created 26 December, 2007
Last Updated 26 December, 2007
Back to HyperScale
Main Page
|
 Home
| What's New |
Features |
Gallery |
Reviews |
Reference |
Forum |
Home
| What's New |
Features |
Gallery |
Reviews |
Reference |
Forum |