|
21st Century Toys' 1/32 scale
Messerschmitt Bf 109
F-2
by Brett Green
|
 |
|
Messerschmitt Bf 109 F-2 |

HyperScale is proudly supported by
Squadron
Background
The Messerschmitt Bf 109 F was a major transformation of
the famous Augsburg Eagle. The airframe was streamlined with a newly
designed engine cowling, large spinner, rounded wing tips, revised flaps and many mechanical modifications compared to the
earlier Bf 109 E.
The Bf 109 F entered service in 1941, at around the same
time as the RAF introduced the Spitfire Mk.V. RAF Fighter Command also
switched to offensive operations over France and Belgium during this
period, creating a new challenge for the Luftwaffe.
The new Spitfire was superior to the Bf 109 F in most
respects, and it would not be until early 1942 with the general
introduction of the Focke-Wulf Fw 190 that a Luftwaffe fighter aircraft
would gain a temporary upper hand.
Despite this see-sawing combat on the Channel Front, the
Messerschmitt Bf 109 F achieved stunning success over the grassy steppes
and frozen tundras of Russia, and the harsh desert of North Africa
during 1941 and 1942.
21st Century Toys' 1/32 Messerschmitt Bf 109 F
21st Century Toys has been making a name for itself in
the collector's market with their large-scale, pre-assembled and painted
aircraft and military models. Now, 21st Century Toys has expanded into
plastic construction kits.
This first generation of 1/32 scale kits includes a Messerschmitt Bf 109
F-2/F-4.
We have been waiting for a Friedrich variant of the Messerschmitt Bf 109
in 1/32 scale for a long time. Revell's 1/32 scale Bf 109 F from the
1960s displayed some fatal accuracy issues, and Hasegawa seems to be in
no rush to expand their excellent 1/32 scale Bf 109 family.
So do we finally have a decent 1/32 scale Messerschmitt Bf 109 F?
21st Century Toys' Messerschmitt Bf 109 is nicely detailed; offers useful options including drop tank, bombs, workable undercarriage
and slats; fits together well and is simple to build. On the other side
of the equation,
clear parts are quite thick, recessed panel lines are wider and softer
than we would normally see on a mainstream kit, and there is some
ambiguity about exactly which variant this model represents.
Even so, at around
USD$10.00, it is an indisputable bargain.
Straight from the box, the kit actually best depicts a
Bf 109 G-2, as suggested by the panel arrangement, closed tail wheel
well, style of oil cooler fairing, supercharger
intake and wide propeller blades. Some extra work
will still be required for total accuracy. A full list of these modifications, plus a closer
inspection of the parts in the box, may be found in
my detailed review elsewhere on HyperScale.
I decided to finish my kit as a Bf 109 F-2. I
gathered the various accessories and conversion parts needed for the
task.
Cockpit
 In
my initial review of the 21st Century Bf 109 F, I thought that the
cockpit was a bit underdetailed. I quickly changed my
mind after I started working on the kit. The finished cockpit looks very good with only minimal extra work. In
my initial review of the 21st Century Bf 109 F, I thought that the
cockpit was a bit underdetailed. I quickly changed my
mind after I started working on the kit. The finished cockpit looks very good with only minimal extra work.
I decided to simply add harness straps and rudder
toe straps.
The harness is the flexible resin item from Cutting Edge The toe
straps are strips of lead foil. There was an ejector pin circle on the armour headrest that I covered with Mr Surfacer.
The only other addition was a length of fuse wire to
complete the fuel line on the starboard sidewall (the front part in
front of the inspection tube is not moulded to the sidewall).
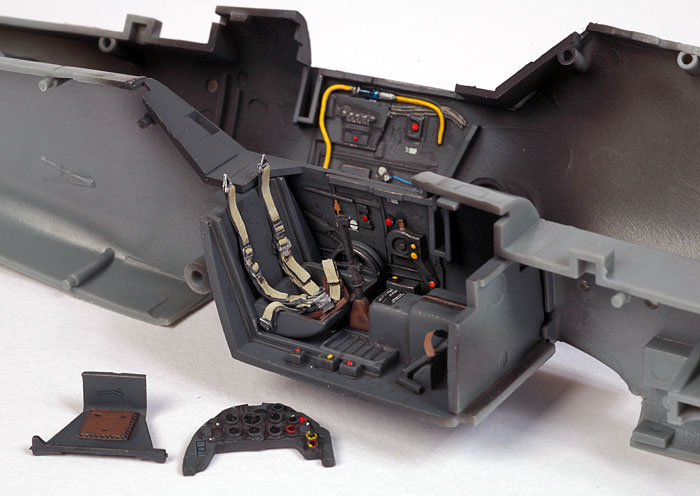
I spent a couple of hours painting up the cockpit. The
results were better than I expected. The sidewall detail looked shallow when unpainted, but
was very convincing after painting and weathering.
I added a few placard decals from MDC and Reheat before
sealing the paint job with Polly Scale Flat.
With the cockpit finished, construction of the main components could
take place.
Click the thumbnails below to view larger images:
[../../photogallery/photo00008370/real.htm]
Airframe
As I was building my model as a Bf 109 F, I cut open the tail wheel
well before joining the fuselage halves. This does not effect the fit or functionality of the tail wheel
strut, which is secured inside the fuselage.
Before assembly, I painted interior components including the wheel
well and inside of the rear fuselage plus the landing gear legs in Gunze
RLM 02. While the airbrush was loaded up I also sprayed the inside of
the gear doors.
Inside the wings, the radiators are blanked off with raised plastic
sections. The front of these were painted black to hide the lack of
radiator faces.
The main undercarriage legs must be installed before the wings are
assembled. A plastic plate is screwed over the gear legs which, in
theory, allows the gear to be retractable. I am not willing to test this as the legs are held very tightly in place. Perhaps the softer
plastic of the pre-assembled kits makes this easier. I can advise that
the legs are very secure, and sit at the correct angle, when they are
installed.
The leading edge slats are moveable, and these must also be installed
before the top wings are glued in place.
Next, the tail sections were added to each fuselage half. I figured
that this order of assembly would provide the best alignment along the
panel line. I was right. Before gluing the tail sections to the main
fuselage halves, however, I first cut off the rudder. I have a spare
tail section from a Hasegawa Bf 109 G, and I decided to adapt this
better-shaped item to the 21st Century kit.
Click the thumbnails below to view larger images:
[../../photogallery/photo00026567/real.htm]
The tail wheel strut was now mounted on its pin, the cockpit tub was
placed between its locating tabs and the instrument panel installed on
one fuselage half. The panel is located securely in slots inside the
fuselage resulting in a very positive fit.
The fuselage halves almost snapped together. A tiny bit of fiddling
was required to align the cockpit and instrument panel, but the locating
pins along the fuselage provided a strong and accurate fit for the
fuselage halves.
I faithfully followed the instructions and inserted the three screws
in their holes on the fuselage sides. However, these made very tight
going and I was eventually worried that I would damage the plastic. I
gather that this method of construction was designed for the softer
plastic of the pre-assembled kits. As it turns out, Tamiya Liquid Cement
was perfectly adequate for the plastic seam lines, so next time I will
not bother using the screws at all.
At this point I smugly ignored the instructions, and glued the
full-span lower wing to the fuselage. I should have followed the
instructions, as I wound up with a gap at the wing root on one side when
test-fitting the upper wing halves. I cut open the joins at the lower
front of the bottom wing, and glued the top halves in place before
re-securing the bottom wing to the fuselage. The result was a perfect
fit at the wing root, the lower wing at the rear fuselage, and very good
at the lower front wing section.
You can save yourself this extra step by simply following the
instructions and assembling the wing before offering it to the fuselage.
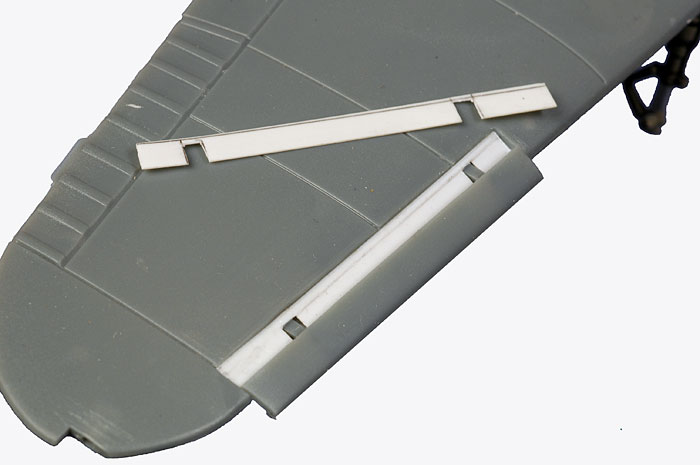
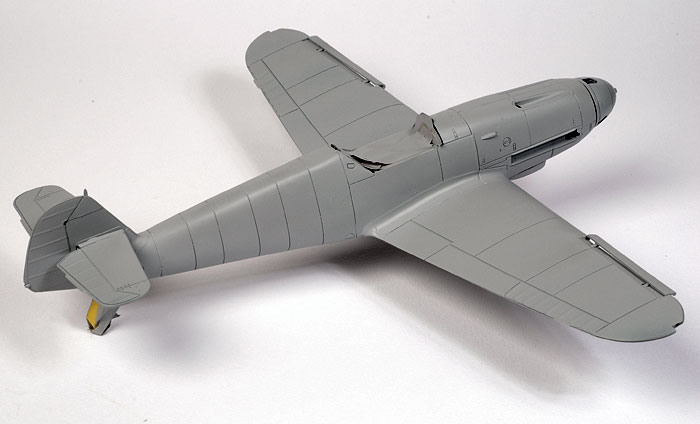
Additions and Modifications
With the basic assembly done, it was time to make a few changes.
The moveable leading edge slats are a nice idea, but I thought that
they looked a bit clunky due to the see-through effect behind the slats
into the interior of the wing.
I decided to blank off the area behind the slats. This
would mean that the slats would no longer be workable, but I could live
with that.
I measured and cut two lengths of plastic strip to fit
over the mounts, creating a diagonal blanking plate. I test-fitted the
blanking plates in position then, when satisfied, ran a bead of liquid
glue along the upper and lower joins while it was still in place.
I think these blanking plates improve the finesse of the
model in this area.
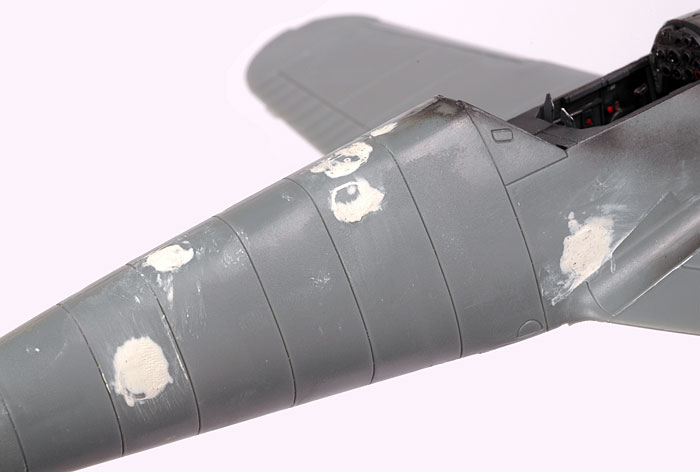
Now it was time to deal with those pesky plugs covering
the screws. There are five of these plugs, and the fit varies from okay
to poor. Regardless of the fit, however, they all need to be filled and sanded. I
like to use Milliput White for this type of job. Milliput is a two-part
epoxy putty that remains workable for at least a half-hour. It also has
structural strength. Best of all, the hardness when dry is about the
same as styrene, so you don't have to be Charles Atlas to sand the putty
down the the level of the surrounding plastic.
I mixed up a small batch of Milliput by briskly kneading
and rolling two equal-sized balls. The heat generated from this mixing
process also makes the putty softer and easier to work with.
The putty was then selectively pressed into the gaps and
recesses, then the excess removed (to make the job of sanding easier).
While I had the Milliput mixed, I used the leftovers to fill the
unecessary hatches and redundant locating holes (eg, for the DF loop and
the cannon gondolas).
Click the thumbnails below to view larger images:
[../../photogallery/photo00007772/real.htm]
My model was destined to be finished as an "F", so I sliced off the
four scoops on the nose and the raised pips under the canopy (these are
to mount an umbrella on tropical versions).
I filled these small scars with Milliput too. I also added a small
amount of filler to the join line on the engine cowl, where the top cowl
meets the main fuselage. There was no separate panel here on the real
aircraft.
The only actual gaps left during construction were at the bottom rear
of the engine cowls, and one side of the leading edge of the wing root
close to the fuselage.
Overall fit was very impressive, especially the traditional trouble
spots of the fuselage seam lines and where the bottom of the wing meets
the fuselage. There were no gaps whatsoever in these areas.
I left the Milliput to set for about three hours. By this time the
putty is hard enough to sand without sinking.
I started by sanding the bulk of the excess putty off with 400 grit
sanding paper, followed by wet sanding with MasterCasters' purple then
blue sanding sticks. These look like traditional sanding sticks at first
glance, but they have a flexible core in the middle. They work well and
are very durable.
My original plan was simply to cut the rudder off my spare Hasegawa
tail and glue it to the 21C kit fuselage. It was not quite that
straightforward. When test-fitting, I found that the Hasegawa rudder was
too tall for the 21C fin. Comparison to drawings suggest that the 21C
fin was around 1mm too short and between 1 and 2 millimetres too narrow.
I first cut off the top of the 21C fin, as the antenna mast is a bit
clunky anyway. Next, I glued plastic strip of the appropriate width on
either side of the fin, and a single wider strip to the top of the fin.
These were shaped tio conform with the kit part using a sharp hobby
knife and a small sanding stick.
The Hasegawa rudder, including the top panel of the fin, was then
glued on to the 21C tail.
The resulting fit was quite good. A swipe of Tamiya Surface Primer
(similar to thick Mr Surfacer) was all that was required to blank off
some tiny see-through gaps at the hinge line.
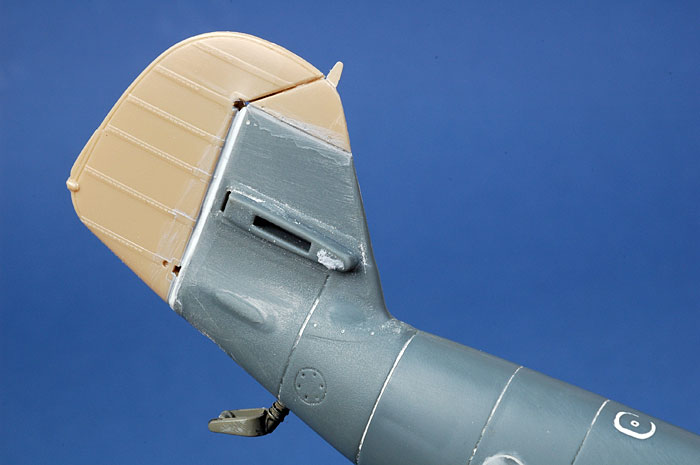
With the surgery to the tail complete, I added the four thin
reinforcing strips to the rear fuselage from fine styrene.
I brushed a layer of Tamiya Surface Primer over the sanded-down
Milliput to make sure that all the tiny imperfections were filled.
Last year I built a 1/32 scale Bf 109 G-2 using Hasegawa's kit and a
few pieces from the Aires Bf 109 F conversion. This meant that I had the
narrow supercharger intake, shallow oil cooler housing and appropriate
propeller blades left over.
I was delighted to find that the oil cooler housing and narrow
supercharger intake fitted almost without modification. The only surgery
required was to cut off the rear locating pin from the intake.
I drilled a small hole in the leading edge of the oil
cooler housing and installed a fine piece of wire to represent the
actuator rod.
I also decided to use an Eagle Editions spinner.
Click the thumbnails below to view larger images:
[../../photogallery/photo00016046/real.htm]
The entire model was sanded once more with the blue
Mastercaster sanding stick. Several rounds of sanding smoothed the
very slight orange peel texture of the plastic.
Various missing and relocated hatches were scribed onto the
fuselage using a thin stainless steel template.
The Aires propeller blades and the corresponding area on
the spinner were drilled out. Brass tube was glued into the ends of the
propeller blades to ensure a robust fit.
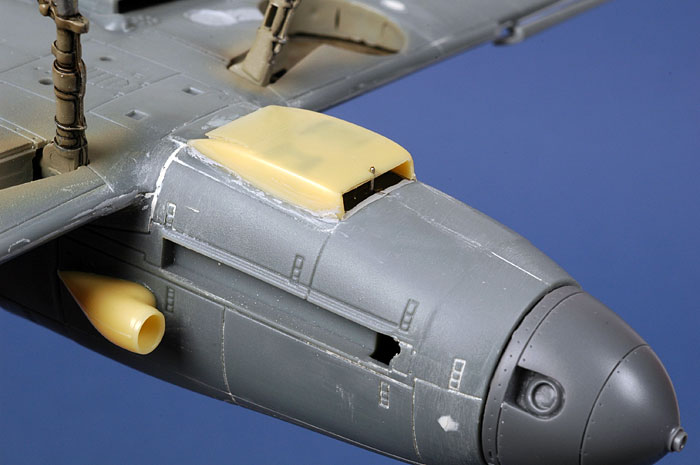
I also used one of the spare vacform canopies from
Aires' 1/32 scale Bf 109 F conversion. This is thinner and offers a more
"in-scale" appearance than the rather chunky 21 Century canopy. The
distinctive side quarter windows in the bottom of the windscreen are
much better too. I did use the 21st Century rear canopy section though,
as it was a perfect fit with the kit's fuselage spine.
The Aires canopy was quite cloudy, but a bath in Future
Floor Polish made it sparkle. Some extra hardware was added to the clear
parts, including grab handles for the top corners of the windscreen and
a canopy release handle, all formed from brass rod and strip.
Click the thumbnails below to view larger images:
[../../photogallery/photo00019572/real.htm]
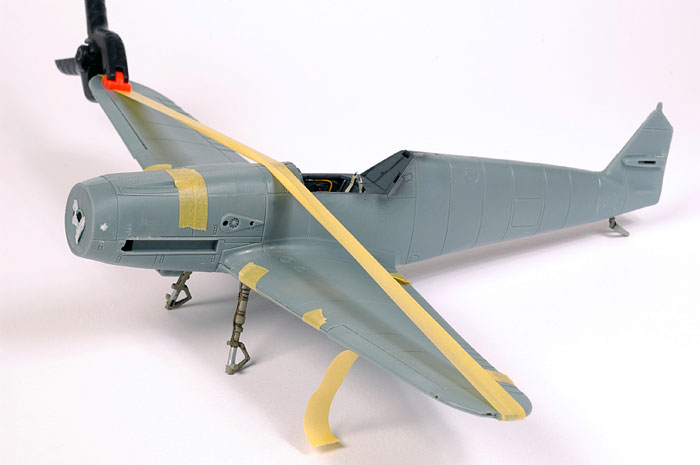
With the kit's surface now prepared, the cockpit and
landing gear was masked and the model given an overall coat of Tamiya's
Grey Fine Surface Primer straight from the can.
Painting,
Decals and Weathering
|
Paint
 All
paint was applied with my Testor Aztek A470 airbrush fitted with the
fine tan coloured tip. All
paint was applied with my Testor Aztek A470 airbrush fitted with the
fine tan coloured tip.
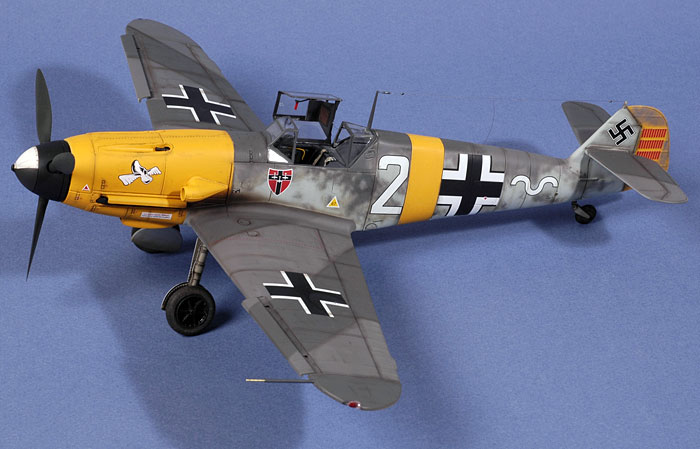
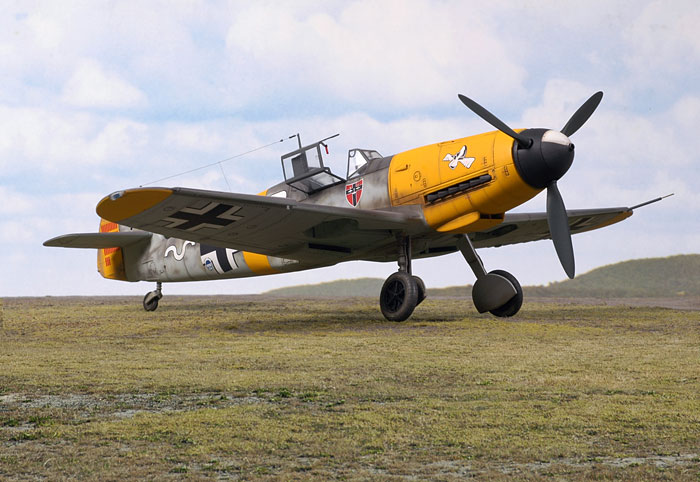
My model was destined to wear the
striking colours of Lt. Max-Hellmuth Ostermann, Staffelkapitan of 7./JG
54 in Autumn 1941. The kit supplies markings for this aircraft.
One of its prominent features is a
yellow nose and fuselage band. However, I often have trouble getting
yellow paint to cover properly. I also find that acrylic yellows take a
long time to dry and are very prone to fingerprints and damage even
weeks after application. Recently I have managed to avoid these
problems. I started with a coat of white primer on the nose, mid
fuselage and lower wingtips. This was lightly sanded and polished before
spraying a coat of Tamiya Spray TS-34 "Camel Yellow" on the area. I
decanted a quantity of this gloss yellow paint from the can into a
disposable container and applied the paint using my Aztek airbrush. This
acrylic lacquer still needed two coats over the white primer, but it
dried fast and coped well with subsequent handling.
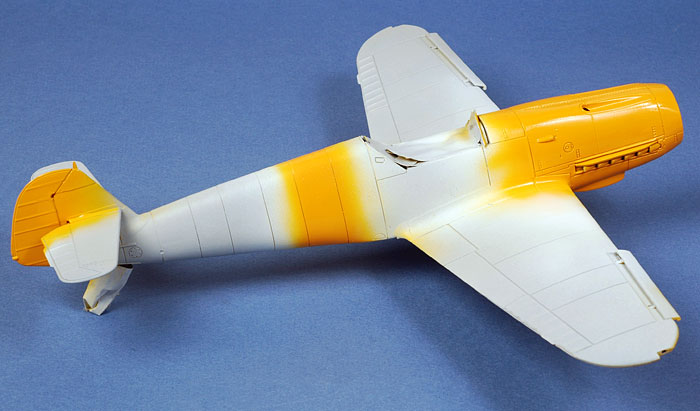
Once thoroughly dry, the yellow
sections were masked using Tamiya masking tape.
I based my painting and markings on a
colour photograph on page 13 of Monogram's old Messerschmitt Bf 109 F
Close-Up. This photo is clearly captioned as Ostermann's Bf 109 F, and
shows the aircraft with a narrow yellow fuselage band in front of the
Balkenkreuz and the number in front of the band. Note 1
However, there are some key differences between this colour
photograph and a good quality three quarter rear view wartime photo of
Ostermann's Bf 109 F which shows the fuselage cross painted directly
over a wide yellow fuselage band, and the large number 2 immediately
forward of the cross. This conforms with the kit marking guide and
decals. Unfortunately, I did not receive this image until after the
model was finished (I am grateful to Goran Edkvist for sending this
photo).
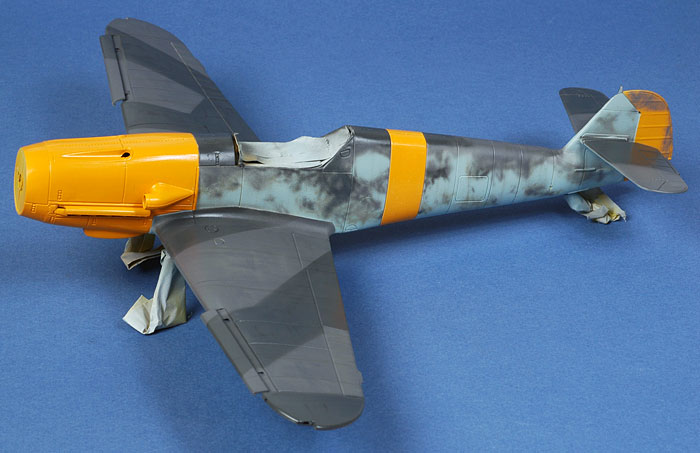
The first camouflage colour was Polly Scale RLM 76 Light Blue, applied
to the lower surfaces and fuselage sides.
Next, Polly Scale RLM 75 was applied to the top of the wings, tailplanes
and fuselage spine with the Testor Aztek airbrush fitted with the fine
tan coloured tip. A first-pass mottle of RLM 75 was also sprayed onto
the fuselage sides and fin. Similar to the treatment of the RLM 76, a
paler shade of RLM 75 was mixed. Small, random streaks were sprayed over
the base colour.
This was followed by a disruptive coat of Polly Scale acrylic RLM 74
Grey Green. The camouflage pattern on the wings was masked using paper
held off the surface of the plastic with tiny blobs of Blu-Tack. This
technique delivers a slightly feathered edge.
I painted the irregular fuselage mottle according to the colour
photograph in the Monogram Close-Up on the Bf 109 F. In this photo, the
yellow rudder also appears to have been mottled with RLM 75 around the
victory marks. I roughly masked the area to receive the panel of victory
marks and sprayed a soft mottle around it.
I also used the colour photo as a
reference for the spinner. The front of the cap appeared to be "thirded"
in white, with the rear part of the spinner was a constant dark colour.
I chose RLM 70 Black Green and white for the forward section, and black
for the rear. Propeller blades were painted RLM 70 Black Green.
Click the thumbnails below to view larger images:
[../../photogallery/photo00026148/real.htm]
Decals
The model received a coat of Polly
Scale Gloss acrylic before the markings were applied. I find that the
Polly Scale clear finish can be more easily controlled than Future when
spraying, does not run on horizontal surfaces, yet still delivers a
hard, shiny finish ideal for decals.
I used the 21st Century kit decals,
which are very thin, perfectly opaque (even the large white numbers) and
settled down beautifully into panel lines.
The completed paintwork was sealed
with a two thin coats of Polly Scale Flat acrylic.
The finishing touches were now
applied, including the canopy, pitot tube (from brass tube and rod),
wing tip lights (small resin coloured "bulbs" covered with a "lens" of
two-part epoxy glue), aerial wire from nylon monofilament and resistors
formed using small blobs of Krystal Kleer.
Note 1: The fuselage number is
almost completely obscured by the wing in the colour photograph on page
13 of the Monogram Close-Up. However, the bottom right hand side of the
number can just be made out. It is white with a narrow black outline,
but it is curved. This would suggest that the number is not "2". Digits
with a curved bottom right corner might include 3, 5, 6, 8 or 9. So
is this the same aircraft repainted, or another of Ostermann's
mounts? I would be interested if anyone has additional information.
We often speak of scale aircraft modelling as if it is one hobby. In
fact, there are as many different interpretations of the hobby as there
are modellers.
In my opinion, there is no single "correct" goal, whether it be
accuracy, artistic attractiveness, or something as simple as finishing a
model that looks vaguely like the intended subject aircraft. If the
individual modeller is satisfied with their result, that is enough.
There has been much discussion recently about factors that will bring
about the death of our hobby. The long list of these fatal influences
includes Mike Grant's "smoke ring" decals, Spitfire fuselage lengths,
the rise of die-cast collectibles, video games and the emphasis of
surface detail on particular kits. Without doubt, 21st Century Toys' new
inexpensive kit line will be added to this Doomsday list.
Even so, I believe that this model will be appreciated by an assortment
of people for different reasons.
My seven year old son loves the recent series of 1/72 scale Hobby Boss
aircraft kits. We have sat down and built a few together. It won't be
long before he is building these simple kits himself. I can see a time
in a few years where he would be delighted to be able to buy 21st
Centurys' 1/32 scale Bf 109 with his own pocket money, and build it in
one afternoon. Thinking back 37 years to myself at 10 years old, that
scenario sounds kind of familiar.
Similarly, for modellers coming back into the hobby after college and
family, these kits will represent a way to create a nice model with
basic skills, and encourage our new recruit to try something more
ambitious next time.
Even the more experienced modeller might feel jaded sometimes. This kit
could represent a refreshing sorbet between heavier courses. Or if
someone prefers painting to construction, this artist might use 21st
Century's Bf 109 as a plastic palette for their penchant.
There is no doubt that, in a side-by-side comparison to Hasegawa's 1/32
scale Bf 109 family, the Hasegawa kits are clearly superior in
terms of surface finesse, detail and finish. Despite this, there is an
important place for the 21st Century kit for less experienced modellers
and, with a sticker price of around USD$10.00, modellers on a budget.
21st Century Toys' 1/32 scale Messerschmitt Bf 109 F will be ideal as an
entry-level large-scale kit, or a "slammer" to test your painting
skills, or a low-cost alternative if finances are tight.
I also enjoyed spending the extra time and effort making the model to a
more accurate replica of the Bf 109 F. I think that 21st Century Toys
has admirably captured the overall look and feel of the Bf 109.
I already have the 21st Century 1/32
scale Corsair and Stuka kits, and I am looking forward to see what is
next in the pipeline.
Thanks to 21st Century Toys for the
sample.
Photography
The model was photographed in
HyperScale's studio using a Nikon D70 digital SLR. Illumination was via
two studi flash units - one Bowens 250 and a generic 100 flash - on
stands and illuminating from a high 45º angle from each side of the
front of the photography table.
The camera was fitted with a Micro
Nikkor 60mm lens.
ISO was set to 250, and the manual
shooting settings were 1/100 of a second at f.29. The high aperture
ensures good depth of field.
The model was placed on a base of static grass in front of an enlarged
photograph of sky. The images were optimized (brightness and contrast)
in Photoshop CS, resized to 700 pixels in width and saved as 75 dpi .jpg
files using Photoshop's "Save for the Web" option.
For the images with the extended grass
foreground, the model photo was merged with a photograph of grass taken
at Bankstown Airport in Sydney's south-western suburbs. The colour and tone of the grass in the airport photo and the
model photo were matched using Photoshop's "Hue and Saturation" tools. The demarcation
between the model static grass and the real grass in the foreground was
merged using the Clone Stamp tool.
The hangar in the background of the
title image was one of a series of photographs of buildings at Berlin-Gatow
Airport, now a museum on the outskirts of Berlin, that I took last year
(thanks Andreas, and all the members of Hans Grade Model Club). This was
added as another layer in Photoshop.
Model,
Images & Text Copyright © 2007 by
Brett Green
Page Created 13 June, 2007
Last Updated
24 December, 2007
Back to
HyperScale Main Page |
 Home
| What's New |
Features |
Gallery |
Reviews |
Reference |
Forum |
Home
| What's New |
Features |
Gallery |
Reviews |
Reference |
Forum |