|
Hasegawa's 1/48 scale
Messerschmitt Bf 109 E-1
by Floyd Werner
|
 |
|
Messerschmitt Bf 109 E-1 |

Hasegawa's 1/48 scale Messerschmitt Bf 109 E is available online from
Squadron
Lesser known than the E-3, the Messerschmitt Bf 109 E-1 was
manufactured alongside the E-3. The main differences between them were
that the E-1 only had rifle caliber guns in the wings and over the
engine. These rifle caliber guns proved to be inadequate compared to the
wing cannons of the E-3 for air to air fighting. The smaller guns
necessitated some different panels compared to the E-3, but that was the
only real differences. The E-3 eventually replaced the E-1 on the
production line.
The Kit
You get the basic E-3 kit that has been around since the 1980s which
features light grey plastic that is blemish free with fine panel lines.
You also get two caramel colored resin plugs that will fit into the wing
bulge areas from the inside. You also get a fret of steel photo etch. In
addition to the E-3 instruction sheet you get an instructional sheet for
the conversion.
The decal sheet covers two aircraft, both are from JG77 and are
conventional RLM 65/70/71 camouflage but they differ in the size of
their markings. One has the normal style crosses for the early war and
the other features some strange sized larger wing crosses. There is also
a clear sprue with the three piece canopy and the gunfight.
Cutting Edge Cockpit CEC48379
The kit cockpit is adequate but not good enough for me. I elected to
use the Cutting Edge set as it is the best fitting and easiest to use.
Also you get a great seat with seatbelts which saves you some work.
Molded in bubble free light grey plastic, the Cutting Edge set is a
vital upgrade if you ask me. You are also treated with an acetate
instrument panel.
I started construction by installing the resin plugs in the wings.
These were glued down with superglue and lots of it on the inside of the
wing. Once dried, I sanded the bulges from the outside. Of course I
needed some small amounts of filler once I sanded through the wing to
the resin bulges. I also scribed the correct panel lines at this time.
Then I went about the normal construction by assembling the fuselage.
The fit was perfect with no filler required.
Cockpit
 The
Cutting Edge cockpit was assembled outside the fuselage and preshaded
with Model Master Enamel Interior Black and painted with Model Master
RLM 02. Details were picked out with Apple barrel brand acrylic paint
and some Model Master Metalizer Magnesium. The
Cutting Edge cockpit was assembled outside the fuselage and preshaded
with Model Master Enamel Interior Black and painted with Model Master
RLM 02. Details were picked out with Apple barrel brand acrylic paint
and some Model Master Metalizer Magnesium.
The instrument panel is up to you. You are provided with a resin
instrument panel or a sandwich affair with acetate instruments. The
sandwich affair is the way I selected. It looks realistic to me. I
painted my instrument panel RLM 66.
The whole cockpit is inserted from the bottom. The fit is perfect. I
left the seat out until later.
Wings
Since I already filled the bulges the wings were handled just like a
normal kit. I did have to fill the hole for the cannon bulges and the
surrounding panel lines, but this was very easy and was a non-event. The
wings include some steel screens for the radiators. They are see through
but I don’t think they detract from the look of the kit so I lived with
them. Other than that the wings were hassle free. Once they were joined
I needed to add the piece of the conversion and that was to drill the
hole for the MG17s in the wings which is inboard of the cannon holes.
Add the wings up to the fuselage and you’ll find perfect fit everywhere.
The fit is perfect. No filler necessary. This has to be one of the best
fitting kits on the market. The horizontal tail planes are the same way.
You can tell when they are properly aligned when the support braces fit
perfectly. I left the supports off until after painting to make it
easier for me. With that everything is ready for paint.
Painting and
Black Magic Masks
|
Painting and Black Magic Masks
Washing the model with dish detergent is a vital first step
especially since you have the resin plugs in the wings. I primed my
model with Tamiya Primer White, but in hindsight I think I should have
used Alclad grey primer. This is because the Hasegawa panel lines are
very thin and the primer filled a couple of them in. I rescribed the
ones that I noticed. Model Master Enamel RLM 66 was used for preshading
and is the models first stage of weathering.
Pre- and early war 109s were painted in RLM 65/70/71 with hard edged
camouflage. I decided that this was too much of a pain to do on my own.
I did paint the RLM 65 on the bottom with Gunze and when it was dry I
masked it off with Tamiya tape.
Cutting Edge produces masks for the camouflage in the Black Magic line
and I opted for this quick and easy tool. Thank goodness I did. That was
way too much masking to do on my own and get it to where I would have
liked it.
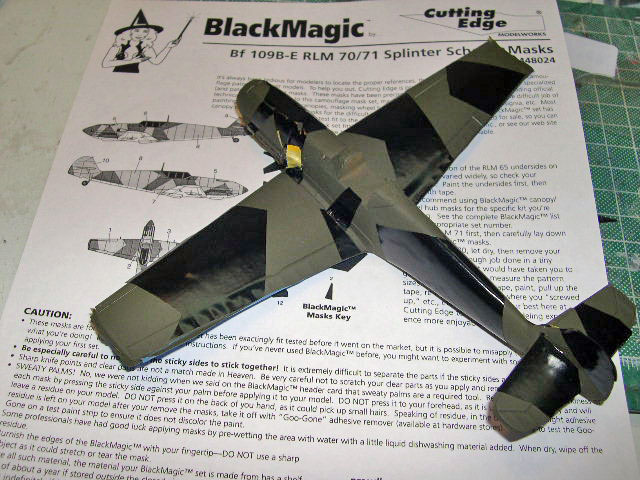
I painted the RLM 71 Dark Green with Tamiya XF-62 Olive Drab. I know
it doesn’t say it is RLM 71 but when compared to the color chips in the
Monogram Painting Guide it is a near perfect match. I always like it to
be dark. I recently painted a FW-190V-1 and was not pleased with the
results as the dark green wasn’t dark enough. Once this dried, I applied
the masks. Don’t forget follow the instructions and use the oils from
your hand to remove some of the tack. The masks themselves are indexed
where appropriate. The whole masking process took me less than 15
minutes, far less than if I had to mask them myself. Thank you Cutting
Edge. Once the masks were on the RLM 70 Black Green was sprayed over the
model. The masks were removed and viola’ a perfect early war Bf-109 in a
fraction of the time. A quick coat of Alclad Gloss Base and the airplane
was ready for decals.
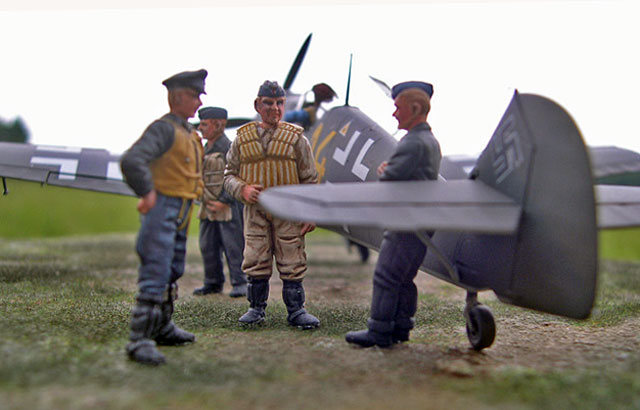
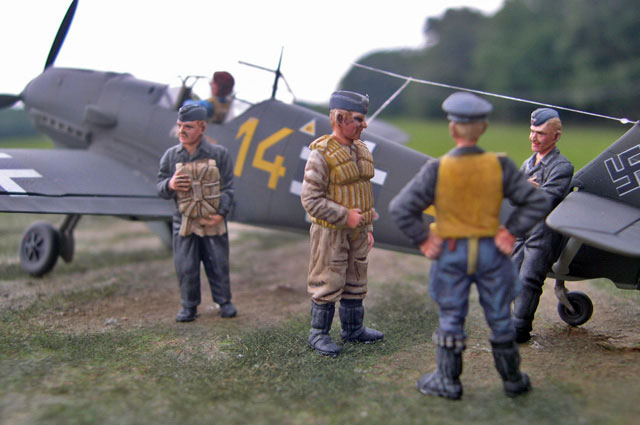
Decals
I wanted to do something a little different than the Hasegawa sheets
allowed so I hit my decal books and found an aircraft that I liked. I
looked in my reference book on JG77 by Prien and found the same airplane
and low and behold it had the huge markings on the wings. The Aeromaster
decals were based on the Classic Publications books and they were
incorrect. Imagine that. I now had my subject. The larger markings were
in response to friendly fire incidents during the Polish campaign and
would add to the rather bland look of the early war 109. I had to use
two different decal sheets from Aeromaster to cobble together the
markings. I used “Blitzkrieg in Poland Part I” sheet 48-496 for the
aircraft markings and “Blitzkrieg in Poland Part II” sheet 48-497 for
the large crosses. Everything went down well with a setting solution.
Sealing the decals with Alclad Gloss Base. Once dried the model was
sprayed with Model Master Clear Acrylic Flat in preparation for
weathering.
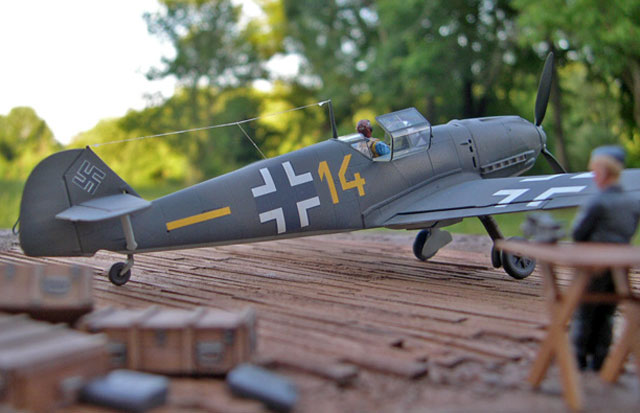
Weathering
I used a wash of burnt umber artist oils over the whole machine. This
was followed up with very thinned Tamiya flat black and red brown
airbrushed on select panel lines and the exhausts. Gunze Oil was
streaked along the bottom from panel lines aft.
Silver pencil was used to add chipped paint. Some Mig Pigment
European Dust was added to the wheels, lower wings and the wing root
area. Everything was sealed with a coat of Model Master Acrylic Flat.
Final Assembly
Adding the little parts such as the mass weights, pitot tube, and the
canopy sections and this baby was done.
This small conversion is easily within the abilities of most
modelers. If you are looking for an easy first conversion this is a
great way to go. Could you use epoxy putty on your E-3 kit? Sure, but
Hasegawa did it for you and the decals are not bad at all. Hasegawa
continues to release this kit with various upgrades and it seems the
molds have not degraded any since the first kits. The fit is perfect
everywhere. What more could you ask for in a model kit? Are there down
sides? Yes, the see through engine compartment and wing radiators are
annoying but I was happy with the end results and that is all that
counts to me.
Cutting Edge Bf-109E cockpit- Highly recommended. The best Hasegawa
Bf-109E interior in 1/48th scale, period.
Black Magic Splinter Camouflage Masks- Essential and highly recommended.
Hasegawa Bf-109E-1- Highly Recommended.
References:
The Messerschmitt Bf-109: Modellers Datafile No. 9, Lynn Ritger, SAM
Publications, ISBN 0-9551858-0-7
Geschichte Des Jadggeshwaders 77, Teil 1 1934-1941 (JG-77 Unit History),
Jochen Prien, ISBN 3-923457-19-7
Jagdwaffe Volume One Section 3; Blitzkreig and Sitzkrieg, Eric Mombeek,
Classic Publications, ISBN 0 9526867 7 5
Click the
thumbnails below to view larger images:
[../../photogallery/photo00021751/real.htm]
Modelling the P-47
Thunderbolt
Osprey Modelling 11 |
|
|
|
|
Author: Brett Green
US Price: $17.95
UK Price: £12.99
Publisher:
Osprey Publishing
Publish Date:
July 25, 2004
Details: 80 pages; ISBN: 1841767956 |
|
|
Model, Images and Text Copyright © 2007
by Floyd Werner
Page Created 30 August, 2007
Last Updated
24 December, 2007
Back to
HyperScale Main Page |
 Home
| What's New |
Features |
Gallery |
Reviews |
Reference |
Forum |
Home
| What's New |
Features |
Gallery |
Reviews |
Reference |
Forum |