|
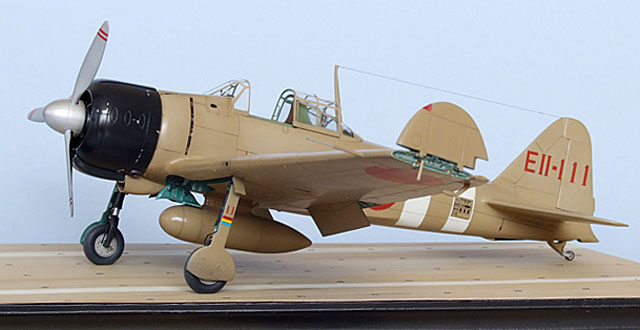
Hasegawa's 1/48 scale
A6M2b Zero Type 21
by
Bruce Salmon
|
 |
|
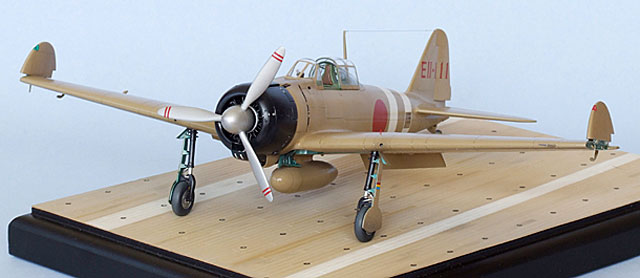
A6M2b Zero Type 21 “Pearl Harbour” |

Hasegawa's 1/48 scale A6M2a Zero Type 21 is available online from
Squadron
This is the fourth Japanese aircraft that I built since getting back
into modelling about 3 years ago – and there are only 9 aircraft in my
cabinet (7 of which are Japanese!) This not to say that I have a fetish
about Japanese stuff but rather a keen interest in the Pacific War. My
previous kit was a Hasegawa Kate and I have since finished a Val which
will complete my Pearl Harbour Warbirds.
Aftermarket Products Used:
Eduard PE set (48 306) A6M2b Zero 21
The kit appears to be nice and fairly modern-ish excepting the deep
panel lines and some raised mould marks on the cowl exterior. Some of
the panel lines on the empennage were very deep and didn’t line up with
each other due to excessively thick interior moulding points.
At this stage I cut out the rudder and elevators for repositioning
later on.
Engine
The engine was the first thing assembled PE’d and painted as I had a
production line going at the time (the others being 2 Dinah engines). It
was painted with Tamiya enamels overall (XF1 Black 6 / XF2 White 2) then
given a coat of Humbrol Satincote varnish and drybrushed Humbrol Silver
with a bit of raw umber artists oil to make it flow better.
Cockpit
The cockpit was next to be assembled and with the addition of the PE
and a few extra wires looked awesome. There is nothing behind the seat
in the kit so this had to be scratch built (a few oxygen bottles made
from sprues etc). The PE seat had holes in it and so you could see a
great gaping abyss behind. This was painted Tamiya JN Interior Green
(which I now find out is a Nakajima colour and not used by Mitsubishi).
Once dry it was brush painted with Future and then given a wash with a
50/50 mix of raw umber and burnt sienna artists’ oils. Then came
drybrushing with a lighter JN Int. green by adding white and yellow. A
coat of Satincote over this and then some silver scuff marks as I did
with the engine. The only real problem was the idiotic engineering from
Eduard where various levers were an impossibility to attach.
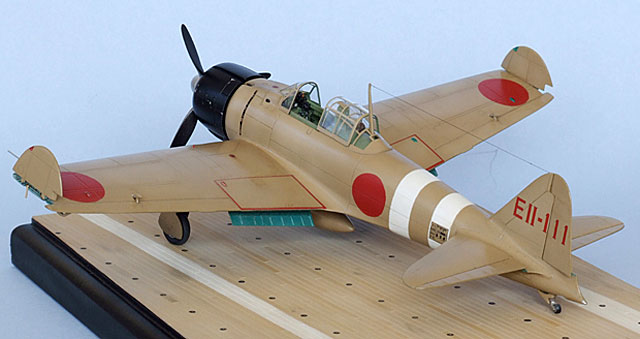
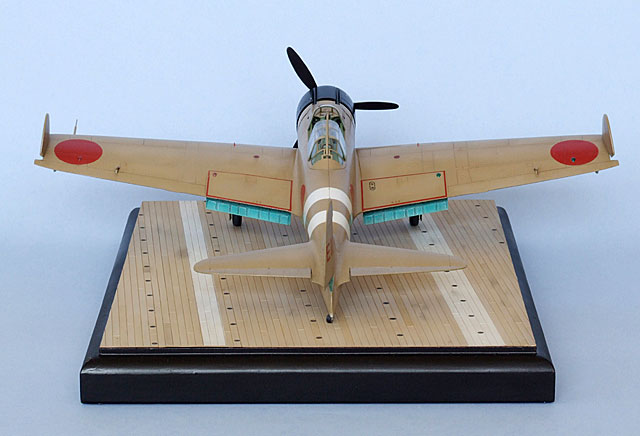
Wings
I decided early on that my Zero was going to have folded wingtips and
since I couldn’t find any resin for the job it was time to scratchbuild.
Holding my “Xacto” knife blade backwards I scored the appropriate panel
lines to separate the wing tips.
Sheet styrene ribs were inserted at the joins, sanded to shape then
the wing halves glued. This was detailed with brass tube etc using
photos I found on the internet as reference. The flaps were cut out and
the PE ones assembled to be attached in the extended position later.
Wheel Wells
Finally the fuselage halves could be glued together and the wings and
tailplane attached. Since Hasegawa also do an A6M3 (one of the
differences being the oil filter) they decided that engineering a part
that cuts through the middle of the wheel wells would be the ideal
solution. Yeah right! - this is nigh on impossible to putty and sand.
Its things like this that make you want to buy a plane ticket, go to
Hasegawa HQ and kick somebody’s arse. Next all the gaps/sink marks etc
were filled and sanded and wiped down with meths before heading to the
paint shop.
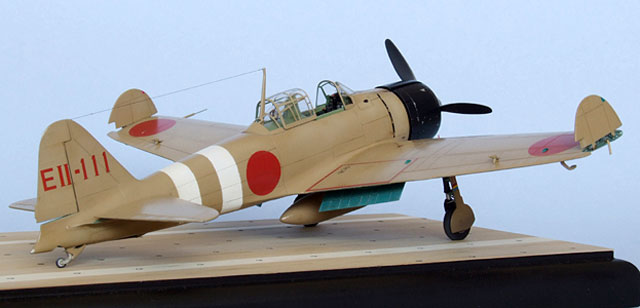
Landing Gear
The gear parts were painted separately and went together without a
hitch - well almost. Since the wheels aren’t weighted I had to sand a
bit off the bottom but forgot about the brake line attachment
positioning. Now they’re facing the rear instead of forwards – bugger!
With wire brake lines added the whole looked quite satisfactory.
I decided my Zero would be an aircraft from the Zuikaku with its double
white stripes offering a good contrast to the Ame-Iro colour scheme.
This colour Ame-Iro, which in Japanese means caramel-coloured, has only
recently been verified as the paint that all A6M2/3 Zeros wore in the
early stages of WW2. Info for this can be found on the Modelling Madness
website. I made my own concoction for this colour from Tamiya enamels
(XF64 Red Brown 2, XF49 Khaki 2, XF3 Yellow 1, XF12 JN Grey 8, XF2 White
7). Its interesting how this paint colour looks very light in bright
light yet quite dark in dim light – which ties in well with B&W photos
of the real aircraft.
Lesson 1: If you’re going to mix your own colour make sure you make a
truckload of it coz you’ll never get it to match next time; any
patching-up or canopy framework will be different – bugger!
Firstly I sprayed the wheel wells and inner flap areas Aotake primer
which is achieved by spraying a mix of clear green and blue over an
aluminium coloured base. Once dry I masked the wells and applied the
Ame-Iro then hit panel centres and high spots with a lightened mix.
Hinomarus and stripes were masked and painted and also highlighted.
Because I’d be using an oil wash during weathering, the enamel paint had
to be protected – in steps Future. I airbrushed on a coat or 6 and
here’s where the whole shebang started to lose the plot. The Future
wouldn’t spread evenly, it got lumpy, attracted heaps of hair, and it
ran and filled in some panel lines yet accentuated others. The worst of
it had to be removed with window cleaner and done again - with similar
results. The layers kept getting thicker and thicker! The kit decals
went on unwillingly and refused to settle down properly and silvered in
a few places. Then came more Future; Jeez I hate that stuff!
Canopy
Initially I was going to use a vacuform canopy but the kit one looked
and fitted really well so I just bevelled the edges with a knife to make
it look thinner. Then I masked it with Bare Metal Foil and a sharp
blade. The canopy detail is quite faint in some places so I managed to
cut some lines across the panes. After painting, the lines and scuff
marks were sanded with 1000 grit and polished with Tamiya polishing
compound until clear-ish. This is where Future actually has some merit.
It gives a crystal clear canopy so long as you don’t let it pool or get
any hair in it.
Weathering and Other Disasters
In this section I’ll tell you everything you have to do to get really
wicked weathering effects (you must follow these directions precisely).
Finally, after the Future fiasco, it was time to really make this model
look realistic. The first wash was a very weak burnt sienna and yellow
mix applied all over followed by a darker wash with raw umber added for
some panel lines the wheel wells, aileron joins and other random spots.
I wanted the model finished by our next Auckland NZ IPMS clubnite so I
pulled out all the stops to get it done…
One week to Clubnite: It was coming together quite well and all I had to
do was apply a final coat of varnish (1 part gloss / 2 parts satin), add
the landing gear, canopy and aerial wire. When I got to the canopy I
noticed that the rear section wasn’t going to be quite wide enough so I
had to bog it to size and sand to shape. This completed I re-masked it
and painted the outside and also the inside to hide the putty (see
Lesson 1). The aerial wire was made from stretched sprue and attached
into appropriate pin holes using industrial strength PVA glue. Globs of
PVA are then added to the wire to look like insulators. Exhaust and
machine gun stains were added with Tamiya smoke and given a spray with
Humbrol Mattcote varnish.
3 days to Clubnite: The paint job is looking quite rough, caused buy a
combination of undulating Future, hairs gooed down by Future a gritty
wash (bugger!) exaggerated by a covering of Future… OK, I think it’s
about time I stop here and learn another lesson.
Lesson 2: Future is for Americans. Future only works in America. In New
Zealand Future is bad Juju and can really mess with your kit’s Mojo. Oh
yeah – and don’t expect it to stop turps from getting through to your
enamel layer. Bugger!
After the worst of the gunge was removed by way of tweezers, and
sandpaper I had to respray some areas (refer Lesson 1) then varnish
again.
2 Days to Clubnite: On goes a very quick and delicate wash so that it
doesn’t attack the recent paintwork and then another coat of varnish.
Damn there’s a bloody hair in it again maybe I can just get it with my
tweezers before it hardens… So now there’s a big ding in the wing that
goes through several layers of varnish, paint and Future!
1 Day to Clubnite: All the previous days’ disasters are sanded out,
resprayed and varnished. Hmmmm looks like those dings need more
feathering out.
12 Hours to Clubnite: The dings are feathered out more. One gets sanded
through to the Future layer and it starts to peel. Gad! Overall all the
dings are looking much better. Out comes the paint again (refer Lesson
1) then the varnish. The peeled bit looks pretty crap but that repair
will have to wait for another day.
2 Hours to Clubnite: Now the aerial wire snaps off. Arrrrrrrrgh! Luckily
it only pulled out at one end so a drop of PVA fixes it right up.
Clubnite: I get the “finished” model out of its box (sagging the aerial
wire in the process) and proceed to tell some bollix story about how bad
the kit was and that only by my superior modelling skills was it
miraculously revitalized… and nobody has any idea how much of a
distaster the whole project was…
Model, Images and Text Copyright © 2007
by Bruce Salmon
Page Created 06 August, 2007
Last Updated
24 December, 2007
Back to
HyperScale Main Page
|
 Home
| What's New |
Features |
Gallery |
Reviews |
Reference |
Forum |
Home
| What's New |
Features |
Gallery |
Reviews |
Reference |
Forum |